To go tubeless or not, that is the question.
Many mountain bikers:
(a) Aren’t sure why they ought to go tubeless. (What’s the point?)
(b) Aren’t sure whether they should be running tubeless. (Isn’t it something only bike dorks do?)
(c) Find the prospect of setting their tires up tubeless to be daunting at best, and a huge, messy hassle at worst.
(d) Wonder if it’s really worth the trouble – cf. (c)
(e) And so … they just stick with inner tubes.
Fact is, tubeless tires outperform tubed tires in pretty much every way.
They are lighter (and we’re talking about rotating weight so this matters a lot!), they offer better grip, and they flat less often.
Simply put, if you already have tubeless-ready rims, converting to tubeless is one of the best bang-for-your-buck upgrades you can make.
The only downside to tubeless is that it does take a little bit of effort to get set up. But good news: while it used to be really challenging, given the improvements to both rims and tires over the past few years, going tubeless has become much, much easier.
But should everyone really go tubeless?
When weighing the pros and cons of ditching your inner tubes, we see a tipping point. If you are someone who only rides every couple of weeks and isn’t worried about pushing hard, stick with tubes.
However, if you are riding once or twice a week, or have been frustrated by too many flat tires in the past (that weren’t caused by starting out on a ride with insufficient air in your tires), going tubeless makes sense, and you should consider making the transition.
Tubeless is a pretty simple concept once distilled. Instead of holding air in a tube, you make the tire and rim airtight so they can hold the air needed to keep your tire inflated. That is a bit easier said than done, but engineers have done most of the hard work.
Essential to making a tubeless system work is having the right combination of tire, rim, and sealant—then knowing some of the tricks to getting them set up.
To make a tire and rim airtight, the following is needed:
An air-tight tire – this can be a UST (Universal Standard Tubeless) tire, or a select few other tires with a sealant used to coat the inner surface of the tire to seal any pores that exist.
An air-tight rim – either a solid rim surface that spokes don’t protrude through, or a rim with tape covering the spoke holes.
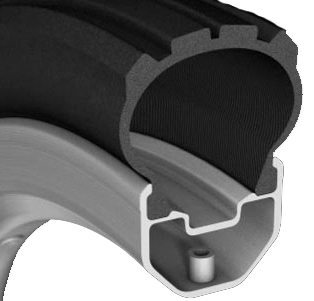
An air-tight connection between the tire and the rim – this has been approached a number of ways; the first standard was UST and it describes a rim shape with a specific hook and an internal ridge:

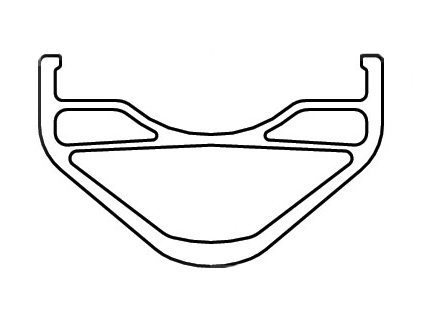
Stan’s uses their own unique shape:

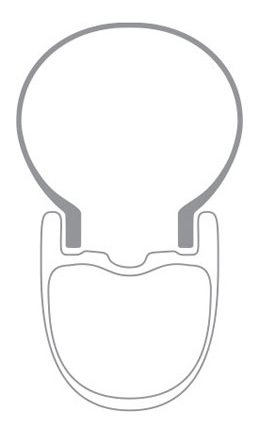
While Specialized, ENVE, and a few others are using a hookless bead:

Additionally, sealant can be used to fill in any gaps and fix small punctures that occur as you ride. It is typically some kind of latex mixture with a particulate mixed in to help plug holes. Best of all? That “particulate” is sometimes … glitter! (As in, actual glitter. Your tires will be fabulous!)
We’ve asked our bike reviewers to share their experiences with tubeless tires and rims, and to offer some of their tricks for making them work.
If you’ve never run tubeless tires, we hope this article will give you the confidence to give it a shot.
And even if you’ve been running tubeless tires for years, there may be a trick or two in here that might be new to you.
NEXT: Recommended Rims & Tires, and Our Best Tips & Tricks

Great tips. When I set up a new tire, assuming I won’t go riding right away, I like to leave it pumped up to 50-60psi over night. I also spin the tire around sideways (like a top) on both sides to coat the inside with Stan’s. I just think that coating the inside of the tire, plus the high psi, helps push sealant into the pores of the tires.
Great article. My tips/additions, after 10 years of tubeless experience:
1. After setting up tubeless, slosh tire laterally 10 times, rotate 1/8 turn, repeat for two full tire rotations.
2. Bontrager may not make the best wheels in the business, but their TLR tubeless system and TLR tires are great. I’ve also had perfect luck with Roval Carbon (hooked version) and Derby AM rims.
3. Schwalbe Snakeskin tires seal up easily. The regular versions of the Racing Ralph and Rocket Ron can be inconsistent in their success.
4. When installing a new layer of Gorilla Tape on a rim, inflate an old tire and tube onto it and leave it sit for 10 minutes to really “press” the tape firmly into place.
5. Sears has great sales a couple of times a year. Ask for a compressor for a gift. It makes tubeless life so much more enjoyable!
6. It’s hard to beat Stans sealant. Not cheap, but if you really use a lot, sweet talk your LBS guys into filling a bulk container for you (I’m pretty sure that my LBS still gets it in 5-gallon pails).
7. When you start seeing sealant seeping through the sidewall, it’s about time to quit spinning the karmic roulette wheel of blown tire death, and go shopping for a new tire!
Thanks Mike and Thanks Tom – Great tips!
Instead of soapy water, I moisten the outside of the tire bead with a little Stan’s sealant before inflating. That way, I get the quicker seating that soap and water provides, and the Stan’s helps fill any small gaps between the (inflated and seated) bead and rim.
Great tips, thanks!
Like Maciej above, I wet the exterior of the bead with Stans prior to inflation, it seems to help immediate sealing and lubricates the bead.
2 Liter Soda bottle tire inflator instead of a compressor! (can take it on road trips as well)
http://www.vitalmtb.com/forums/The-Hub,2/Joe-Barnes-DIY-Coke-Bottle-Tubeless-Compressor-Hack,8450
All tape fails after a few years, usually due to sealant getting under the tape and ruining the adhesive. So retape stubborn deflating tires, or every few years.
Scotch version of tubeless tape = $6 for 60 yards, similar or same as Stans tape.
http://www.amazon.com/gp/product/B00C0Z1Z5C
A sidewall cut is the death of the tire for tubeless.
Water helps to reseat a stubborn bead when fitting a tube in the field.
Lots of cut tires = expensive habit!!!
P
This article encourages me to stay with tubes more than switch to tubeless.
How much sealant would you guys recommend putting in? Say in a 2.4 in tire. Is it worth it to have extra sealant sloshing around? Or will that just quickly dry up?
In a 27.5 x 2.4 tire I pour in Stan’s until there is a small sloshing pool. That is usually just enough to distribute all around a tire. It is approximately 2 full scoops of sealant. The sealant does dry up, but not too quickly. Having some excess in your tire will allow it to seal small punctures and let you finish a ride without throwing a tube in.