G3 Mohair LT Skin
Construction: 100% Mohair
MSRP: $195-$205
Introduction & Background
G3’s new Mohair LT skin builds on the success of their Alpinist series of skins, and is G3’s first full mohair skin.
In the past I’ve used the Black Diamond Mohair Pure and MoMix skins, the latter of which I’ve used almost exclusively for the past few years through multiple skis and sets of skins.
This season, however, I made the transition to full mohair skins, and ended up on the BD Mohair Pures, instead of the BD MoMix. I spent twenty five days touring in Japan on the Mohair Pures (the Pures are replaced next season by the BD Glidelite, which we’ll be reviewing soon) and my experience convinced me of two things:
(1) That the extra glide provided by a pure mohair skin is truly worth a drop in durability provided by the MoMix.
(2) That good skinning technique could almost always make up for the difference in traction between mohair and nylon. I was sold on 100% mohair skins, and have since gotten grumpy any time my skins don’t glide like a puddle of ball bearings on a greased curling sheet.

So I was excited to learn that G3 was getting into the full mohair skin game with their Mohair LT. Better yet, they were doing it with a skin that promised to cut even more weight by going thinner in the plush. Light and fast usually mean happy and successful on the uphill, and I was eager to see how G3’s mohair skins stacked up to some others on the market.
(Note: Reviewer Paul Forward has also been using the Mohair LT’s up in Alaska this spring, and we’ll have a review from him soon of the Mohair LT’s performance in a more coastal snowpack.)
Features
Many features on the Mohair LT will feel familiar to people who have used G3 skins in the past.
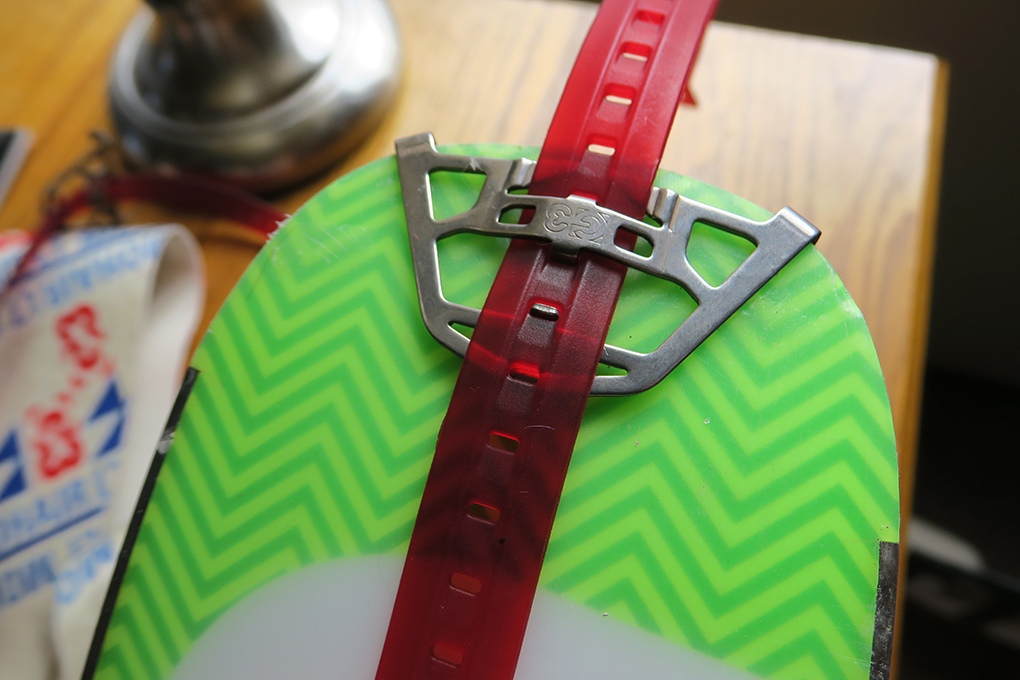
The tip connector now has slightly bigger, stainless steel hands that still swivel to quickly and easily adapt to practically any tip shape out there. The cam-style tail clips are replaced by a triangular option that is (1) lighter and (2) easily grips both rounded and square tails. The tail straps are still permanently attached from within the skin. (Note: they’re nonreplaceable should you manage to slice one, so take care there.) These details makes G3 worth buying over other brands if your skis have particularly strange tip or tail shapes (Moment, ON3P’s freestyle skis, etc.)

The Mohair LT, like the rest of G3’s skins, comes precut into a bikini shape (tapered in the tip and tail ends) to save weight and time in the install process. Cutting the skin like this also serves to help prevent perpendicular edges that tend to accumulate snow between the skin and ski while touring. Very nice.
Included with the skins is G3’s waterproof skin bag. Though it feels somewhat like a clutch, it’s a really smart way to keep your skins organized in a bigger pack or keep wet skins away from other gear in a smaller bag. Another nice touch.
Installation (& new G3 skin cutter)
G3 gets big points for how easy it is to install the skins. Remove the glue protective strips, attach the skins right down the center, slice them with the supplied G3 tool, and away you go to powder and glory. The only faster option is precut skins designed for a specific model of ski.

I cut my pair of Mohair LTs twice: once using a more traditional method and a regular skin razor, and the second time as outlined above. I’d cut some of my other skins with older (white) versions of the G3 tool, and always found that the fit that tool produced didn’t hold super well while traversing in particularly icy snow conditions. This year G3 has improved the tool so that it cuts away less skin from the base, and it represents a big upgrade from previous versions. (The new version is grey, in case you’re wondering which version you have.)
Sizing
G3’s decision to sell a range of lengths of skins instead of having the customer cutting their skin to length and installing tip and/or tail hardware makes for a much quicker in-the-box to on-the-skin-track transition.
However, this also means that getting the sizing right is essential: check out their charts prior to buying and be sure to give yourself a little bit of extra room to tension the tail clip, as skins can lengthen when they get wet.
Sizing like this allows for simpler installation and a cleaner finish to the skin. However, some skiers may find that some sizes leave either more of the tail uncovered / exposed (when the skin is on the short end) or a huge proportion of the red tail strap flapping around (when they’re on the long side)—I cut the extra tail strap off on mine, and I don’t regret it.
There’s a pretty decent range in each size. My skins, in a size Large, were initially cut for a 184 cm ON3P Steeple 102, and I then moved them down to a 174 cm ON3P Steeple 98, which proved to be too short for my set of skins. So I had to find a way to shorten the skins, and y technique went like this:
-Completely cut the skin perpendicularly a few inches away from where the tail strap enters the plush
-Remove the clip from the tail strap
-Flip the major part of the skin over, and stick the section including the tail strap glue to glue. Overlap makes for better adhesion, and you’ll need it for the next step.
-I used a strong sewing machine to bartack the two pieces of skin together. You could do the same with a strong needle and thread, perhaps even better with an awl.
-Trim the plush to restore a bikini shape to the tail
-Reinstall the tail clip. It will slide on what seems the wrong side of the strap, but there are no issues in it gripping the holes.

It’s unorthodox, but it’s lasted for a week of hard use, and I don’t think it has inhibited the skin in any measurable way. The place where the new tail piece is attached underneath could cause a bump and less efficiency on a ski that doesn’t have some tail rocker; the ON3P Steeple 98 bends up in just the right place to allow it some clearance.
NEXT: Weight, Packability, Etc.
