
Frame Design and Details
In general, the Wilson’s frame details are nicely thought out and work well. Cable routing is external, under the top tube, and integrated fork bumpers also help route the cables cleanly.
A bolt on carbon rock guard on the downtube protects the frame against flying debris, and an included frame protection sticker kit has appropriately sized chunks of rubber to put on the chainstays and other prone areas.
Of the finer frame details, the only thing I’d likely change would be the rear axle – it threads in from the drive side, and the bolt head tends to abrade the housing for the derailleur cable. Devinci could fix this by threading the axle in from the other side, or doing like Trek does and including a metal tube to protect the housing.
The Wilson runs on sealed cartridge bearings throughout, and the most mud-prone pivot near the bottom bracket has a grease port to help keep things running smoothly.
The linkage on the Wilson is essentially an upside down version of the linkage on the rest of Devinci’s lineup. At the heart of the linkage is Devinci’s Split Pivot suspension design, which means the rear pivot is concentric to the rear axle. At the forward end of the linkage, rather than having the rocker arm at the top like on the Troy or the Spartan, the rocker arm is on the bottom, and rotates concentric to the bottom bracket.
The placement of the rocker arm means a couple of things. First, the design means that the axle path is dictated by the seatstay, which has a relatively high pivot. Because of that pivot location, the axle travels rearward at the beginning of its travel, moreso than it would with a lower pivot point like on a Trek Session or Specialized Demo.
The rocker placement also means that there’s a lot going on around the bottom bracket – aside from pivoting around the bottom bracket, the rocker arm is also actuating the shock via a clevis.
The upsides of this linkage design are that it allows for a very stiff front triangle and it keeps weight on the bike very low. The slightly rearward axle path also allows the rear wheel to do a better job of getting out of the way of square edged obstacles on the trail. Like all of Devinci’s full suspension bikes, the Split Pivot design does a really good job of separating braking forces and helping to keep the suspension active under hard braking.
The main downside of the design is that the bottom bracket region is relatively complex, and all of that linkage takes a beating from muck coming off the rear tire. My first ten days on the bike saw some muddy conditions, and the bike pretty quickly developed an annoying creak. I had to fully disassemble the bottom bracket pivot area and re-grease everything to quiet things down. And because the pivot runs concentric to the bottom bracket, that disassembly is a little more involved than unbolting the pivots on many other bikes.
Once I took it apart, I found that the bearings for the concentric bottom bracket pivot had already suffered a bit from the abuse, and weren’t completely smooth anymore. I’d really like to see Devinci integrate a little fender into the frame to help keep things fresh down there.
I’ve also found that the mounting bolt between the clevis and rear shock is prone to creaking. That mount uses a 15mm aluminum bolt that runs directly through the shock’s eyelet, without a DU bushing as a buffer. I find that I have tighten that bolt down a lot to keep it from creaking, but doing so means that the aluminum bolt likes to seize into the aluminum clevis that it threads into.
But with all that talk about creaking, I should give credit where credit is due: the carbon Wilson has a threaded bottom bracket, which is fantastic. No creaking to be found there.
Geometry and Fit
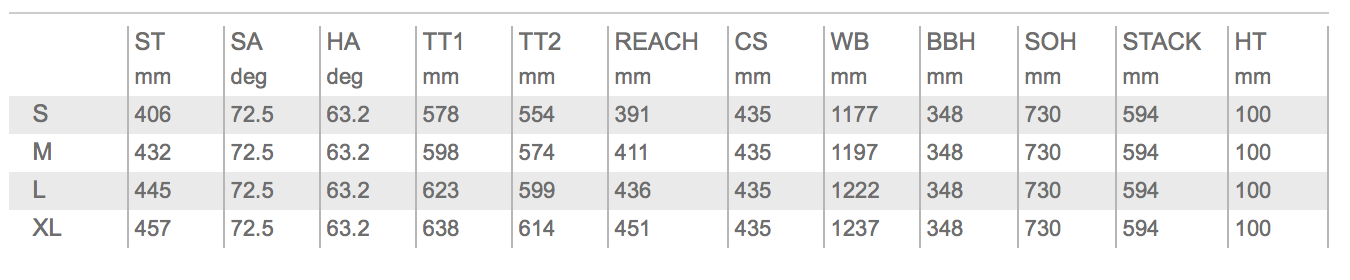
I’ll admit that I waffled a bit on which size Wilson to ride. At 5’9”, I was pretty happy with the 420 mm reach on my previous DH bike – a Medium Canfield Jedi. But the Medium Wilson is a bit smaller with a 411 mm reach. I ended up going with a size Large Wilson, which has a 436mm reach.
Sizing on DH bikes is interesting these days, mostly because there’s no standard and different companies are all over the map. At one end, there’s companies like Trek and Santa Cruz – their DH bikes run pretty small (402, and 402.5mm reach in a Medium, respectively). On the other end, there’s bikes like the Kona Operator (435mm reach in a Medium), Pivot Phoenix (428mm), or GT Fury (430mm). In other words, there’s essentially a full size difference (or more) between different brands.
Just to clarify, I’m using reach as the one number I look at in this discussion, but there’s more to sizing than that. Some of the smaller bikes (like Trek) have longer chainstays, meaning that the bike’s wheelbase actually isn’t that small. And there’s plenty of other numbers on the geometry chart that matter in terms of how “big” a bike feels. But reach is a convenient one, and it tells a big part of the sizing story.
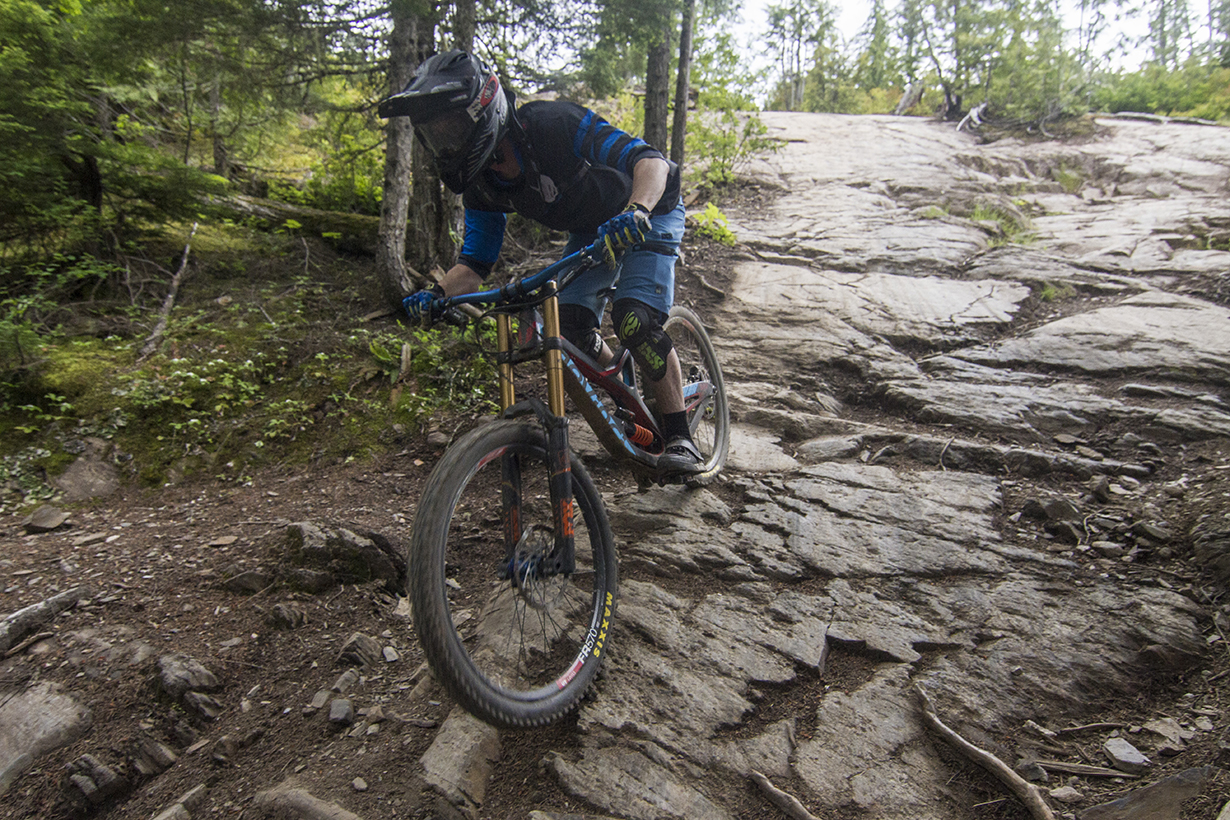
So, long story short, the Wilson falls on the smallish end of the sizing spectrum for DH bikes. On the trail, I felt like my size Large was comfortable, but occasionally I wished for a slightly smaller bike. Particularly on tighter, rougher trails where I was really having to push the bike around, something a little smaller would have been appreciated. That said, I think the size Medium would have been a touch too small, so if I was going to do it all over again, I’d still buy the Large.
As for the rest of the geometry numbers, the Wilson has pretty modern angles, but isn’t extreme in any sense. A 63.2° head angle is certainly slack, but it’s far from the slackest out there. Similarly, the 348 mm bottom bracket height is at the low end of the spectrum, but not the lowest out there.
Like I mentioned in my recent review of the Trek Session 9.9, I’ve come to appreciate longer chainstays for their cornering benefits. The Wilson is running on 435 mm stays, and as the suspension compresses, those stays get a bit longer (moreso than on, for example, the Trek). Like the other geometry numbers, those stays are pretty middle of the road by modern standards.
Suspension Setup
I’ve played around with the suspension settings on the Wilson a fair amount. It came stock with a 450 lb spring on the Vivid R2C, but for my 155 lb weight, I bumped down to a 400 lb spring which yielded about 27% sag (slightly less than the recommended 30%). With the Fox DHX2 bolted on, I ran a 375 lb SLS spring, which gave me about 29% sag.
I tend to fuss with the settings on the DHX2 pretty frequently depending on where I’m riding, but my current settings are (from fully open), 15 clicks out of 23 on the low speed compression; 11 clicks out of 23 on the high speed compression; 10 clicks out of 23 on the low speed rebound; and 10 clicks out of 23 on the high speed rebound.
NEXT:On the Trail, Comparisons, Etc,
You mentioned that the rear axle threads in from the drive side, making it awkward to pull the axle. Mine showed up the same way, which is annoying, but it’s easy to fix. The split pivot fittings can be pulled apart and swapped from side to side in about 5 minutes, allowing the axle to thread in from the non-drive side.
Keep up the excellent reviews!
Genius! Just swapped mine.
Hey did the Fox swap in easily in place of the Vivid to the yoke? I need to get rid of mine but have seen so many mixed reports on other shocks fitting – or not.
Thanks!
Hey Jon,
Yup – it was no big deal to swap it in, at least on mine. Obviously it needed the appropriate mounting hardware, but it didn’t need any work beyond that.
-Noah
Perfect! Having the R dial off the rear yoke make me think it should be easy but nice to have confirmation I don’t need to modify the yoke at all.
Thanks!
And what settings did you end up with for the WBP?
Pretty much every time I go to Whistler, my settings start out relatively soft (regardless of what bike I’m on), and on the slow side for rebound. But then, after a couple days when I’m starting to remember the lines and figure out how to go fast again, I ramp everything up. So by the end of the week, I usually have a few extra psi in the fork, maybe an additional 1 or 2 volume reducers, a few additional clicks on both the high and low speed compression, and I’ve usually sped up the rebound a bit to keep the rear wheel tracking in the chunder. And then on the last day or two of my trip, I end up softening things back up a little bit because my hands and forearms hurt, and I’d rather sacrifice a little performance in the name of comfort.
But at least on the Wilson, I seem to pretty much always have the DHX2 within ~5 clicks of the middle of the adjustment range for all of the adjustments.
sick it looks cool