
Why Getting the Right Fit can be So Tricky
Finding a bike that fits you well and is comfortable is, without a doubt, one of the most important aspects of buying a new bike. Being on a bike that’s the wrong size can make a huge difference in how the bike rides, and will usually have a bigger, more noticeable impact than any changes in suspension design or frame material.
The big problem, however, is that bike sizing is all over the map these days. Most companies have given up on using numbers to describe their bikes, and instead just list their sizes as “Small,” “Medium,” “Large,” etc. But what one company calls a “Medium” is by no means the same thing as another company’s “Medium.” In fact, it’s just the opposite — a Medium from one company might be closer to a Large from another company, or even an XL from yet another company. And to make this even more complicated, some companies aren’t even consistent within their own lineup — for some companies, there are dramatic differences in the sizing between different models.
And all of this can make choosing a size pretty difficult, which is why it’s worth taking a look at a bike’s geometry table. A bike’s geometry is going to tell you all of the crucial measurements for the bike, some of which are going to impact how big the bike feels, and some of which are going to impact how the bike rides.
What We Are (and Aren’t) Going to Cover Here
Now, before we go any further, there are two things that this article isn’t going to talk about. First, every rider is different, every rider has different proportions, and every rider has different preferences regarding bike fit (even if you might not yet be sure what your preferences are). So this guide will help assess how big or small a given bike will likely feel, but it’s still up to you to decide what size will work best for you — and the right answers will sometimes come down to your individual preferences.
Prefer a whippier, turnier bike? A slightly smaller size could make more sense. Prefer a big, stable beast? Sizing up might feel better. Have back issues that make leaning over difficult? A shorter, more upright bike might be the ticket. Have short legs and a long torso? Maybe a bike with a more stretched out cockpit will work best. You get the idea. But at the end of the day, priorities and preferences are uniquely your own, and your local bike shop can be a good resource for sorting these things out.
The second thing we’re not talking about here is swapping components to dial in fit or performance. Stems, handlebars, cranks, seats, and seatposts can all be swapped to make a bike more comfortable or fit better. But if you’re not on the right size frame to begin with, those changes are just a band-aid solution. Component swaps can make a properly-sized frame fit better, but they’ll never make the wrong frame size fit correctly.
So what we are talking about here is how to:
(a) Go through the various geometry numbers that are provided by most bike manufacturers.
(b) Draw some conclusions about how the bike will likely fit.
(c) Get at least part of the picture as to how the bike will likely ride.
There’s a lot of information here, so we’ll also talk a bit about which numbers tend to be the most important. Or perhaps more accurately, we’ll talk about which numbers are the quickest and easiest to look at to get a sense of the bike’s sizing, and how it might ride.
And in Part 2 of our Bike Fit Guide, we’ll run through some real-world examples and compare a few bikes to see how assessing these numbers might play out in real life.
A Reminder…
We’re just about ready to get started, but keep in mind: geometry numbers aren’t everything. They provide some really important information about a bike, but they are not the entire story — and anyone who pretends that they can get the whole story about a bike from looking at charts and numbers is wrong. Still, geo charts are unquestionably useful for guiding decisions and narrowing down options.
Fit vs. Ride Characteristics
We’ve divided this discussion into two parts:
There are measurements on the geometry chart that will primarily give you an idea of how a bike fits (and thus should influence your decision on what size to get). And there are other measurements that tend to be more useful in getting a general sense for how a bike will ride.
We’ve separated these two categories to (hopefully) make it easier for you to make a quick assessment of a geometry chart, but when these numbers are provided by the manufacturer, all of these numbers will be mushed together into one big table. And more importantly, know that almost every measurement, length, and angle on the bike will have some impact on both the “fit” and the “ride” of the bike — we’ve just separated this discussion to make it a bit easier to quickly skim over a geometry chart and get a sense for the bike.
It’s also worth noting that not every geometry chart will have all of these measurements listed (and some might even have additional measurements that aren’t listed here). But the ones we’ve listed are the most common and the most useful.
Bonus Reminders, Notes, and Caveats
- This discussion is primarily aimed at mountain bikes. While the basic concepts are the same when discussing other types of bikes, the aspects of the bike’s geometry that matter most tend to be a bit different between different types of bikes.
- Pay attention to units. I tend to look at everything in metric, because freedom units are dumb. But it doesn’t really matter; go with whatever you prefer. Many manufacturers offer measurements in both units, but make sure you’re comparing apples to apples — don’t get confused if one company offers measurements in centimeters and another is in inches.
- For angles, “slacker” means a lower number, “steeper” means higher numbers. So a 66° head angle is slacker than a 67° head angle.
- How much do the numbers have to move to make a difference? This obviously depends on the rider, how in tune they are with their bike, and a host of other factors. But for the “average” rider, I’d say a change of 5 mm on most of these measurements will be noticeable, and a .5° change in head and seat tube angle will be noticeable.
- Some bikes have adjustable geometry, but the geometry charts don’t always give you the measurements for every adjustment position. So if you’re comparing bikes, take note of the position listed on the geometry table, and know that the numbers will be a bit different if the bike is adjusted to a different position.
A Look at a Geometry Chart
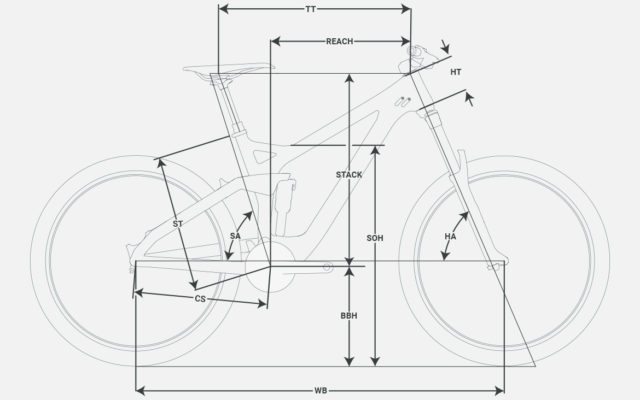
To make this a bit easier, here’s a typical geometry chart (this particular chart is for a 2018 Devinci Troy):
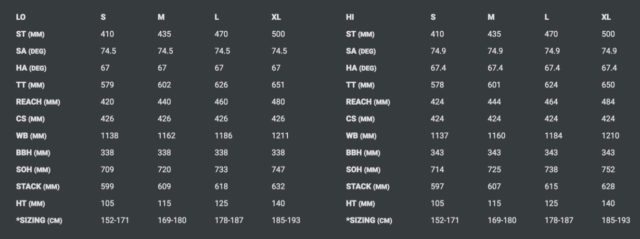
Before we dive in, there are a few important things to note. Right off the bat, we see that Devinci offers the Troy in four sizes, designated as Small, Medium, Large, and XL. But as we’ve established above, those designations aren’t particularly helpful, which is why we’ll look at the actual measurements.
We also know that the Troy has 27.5” wheels, and measurements are listed for the bike in both the “Lo” and “Hi” geometry positions. Note that some numbers don’t change between the two geometry positions (for example, the seat tube stays the same length), while others do (for example, the bottom bracket is 5 mm lower in the “Lo” position).
To Assess Bike Size, Look at (in Rough Order of Priority):
Reach: This is measured from the center of the bottom bracket to the center of the top of the head tube. The reach will largely dictate how long the bike feels when standing up on the pedals. If I’m going to look at a single number to get a sense of a bike’s size, this is it.
Top Tube Length — Effective or Horizontal (Measurement “TT” on the Devinci chart): Measured from the center of the top of the head tube in a horizontal line to the seatpost. The effective / horizontal top tube length will largely dictate how long the bike feels while sitting in the saddle.
Wheelbase (Measurement “WB” on the Devinci chart): Measured from the center of the front axle to the center of the rear axle. There are a lot of angles and lengths that will affect the bike’s wheelbase, but generally speaking, a bike with a longer wheelbase will feel like a bigger bike.
To Get an Idea of how a Bike Might Ride, Look at (in Rough Order of Priority):
Head Tube Angle (Measurement “HA” on the Devinci chart): The angle of the head tube, measured from horizontal. A slacker head tube will put the front wheel further out in front of the bike and slow down handling. This will increase the bike’s stability, but can feel floppy and cumbersome in tighter situations and at lower speeds. Generally speaking, more Cross-Country-oriented bikes have steeper head tube angles, while more Downhill-oriented bikes have slacker head tube angles.
Chainstay Length (Measurement “CS” on the Devinci chart): Measured from the center of the bottom bracket to the center of the rear axle. The chainstay length affects the relative position of the rider’s weight between the axles — shorter chainstays mean that a rider in a neutral position has more weight over the rear wheel, while longer chainstays mean the rider’s weight is more centered. Shorter chainstays make it easier to lift the front wheel and can make the bike feel more maneuverable. Longer chainstays tend to climb better, they can help keep the rider’s weight over the front wheel in corners, and they can make the bike feel more stable.
Wheelbase (Measurement “WB” on the Devinci chart): Measured from the center of the front axle to the center of the rear axle. Yes, wheelbase was listed in the fit section, too, but it significantly affects the ride quality for the same reason; a longer wheelbase makes the bike feel bigger, and a bigger bike tends to be more stable at speed at the cost of some maneuverability in tighter corners.
Seat Tube Angle: With most modern bikes, this discussion involves two considerations: actual seat tube angle, and effective seat tube angle. On a traditional bike where a straight tube went from the bottom bracket to the seat collar, those angles are the same. But most modern suspension bikes aren’t that simple.
- Actual Seat Tube Angle (Not shown on the Devinci chart): The angle that the seatpost leaves the frame, measured from horizontal.
- Effective Seat Tube Angle (Measurement “SA” on the Devinci chart): An imaginary line drawn from the center of the bottom bracket to the center of the seatpost at a height that’s horizontal with the center of the top of the head tube.
Most companies list the effective seat tube angle, even if they don’t specify it as such. But, particularly for people with longer legs, that won’t give an accurate picture. A bike can have a steep effective seat tube angle, but a very slack actual seat tube angle. That means, when the seat is lowered to the height of the head tube, the seat tube angle is effectively very steep. But that’s a pretty low seat height, and most people will run their seat quite a bit higher. And since the actual seat tube angle is quite slack, the seat moves backward at that actual angle as the seat is raised. So even though the effective angle is steep, a raised seat will still end up relatively far rearward compared to the bottom bracket. Moving the seat rearward from the bottom bracket can make it difficult to keep the front wheel weighted on steep climbs, and it can make for an uncomfortable and inefficient pedaling motion.
Bottom Bracket Drop (Not shown on the Devinci chart): A measurement of how far the center of the bottom bracket sits below the center of the axles. This is similar to bottom bracket height, but is less dependent on things like tire choice. A larger bottom bracket drop means a lower bottom bracket, which generally makes for a more stable ride that corners better, at the cost of pedal clearance issues.
Stack Height: Measured from the center of the bottom bracket to the center of the top of the head tube. This is essentially the vertical component of the reach measurement. It will partially dictate how tall the front of the bike feels, and it will be affected by choices like fork length / travel, and it is also affected by head tube length. A taller stack height can often mean that the bike struggles on steeper climbs, as it’s harder to keep weight on the front wheel.
Other Measurements
The following numbers are often listed on geometry charts, but they tend to be less determinative of a bike’s sizing or ride characteristics (or are partially redundant with other measurements noted above):
Bottom Bracket Height (Measurement “BBH” on the Devinci chart): The distance from the centerline of the bottom bracket to the ground. As with Bottom Bracket Drop, a lower bottom bracket generally makes for a more stable ride that corners better, at the cost of pedal clearance. The actual bottom bracket height will be affected by the tires on the bike, which is why bottom bracket drop tends to give a more accurate picture.
Seat Tube Length (Measurement “ST” on the Devinci chart): This is measured from the center of the bottom bracket to the top of the seat collar. Traditionally, this was the measurement that was used to state the size of a bike; an 18” bike had an 18” seat tube, and a 54 cm bike had a 54 cm seat tube. For mountain bikes, most companies have abandoned this sizing convention, and for the few that still use it, the numbers are meaningless (i.e., an 18” bike doesn’t actually have an 18” seat tube length). The seat tube length tends to matter most for those that are short or tall. A long seat tube length can make it difficult for shorter people to fit the dropper post of their choosing. If the seat tube is long, there is less room from the seat collar to the seat, which might not allow for the necessary distance to fit a dropper post. Conversely, if the seat tube is too short, tall people and people with long legs might need to run an excessive amount of seatpost sticking out of the frame, and could potentially run into issues with seatposts not achieving the minimum required insertion.
Head Tube Length (Measurement “HT” on the Devinci chart): The length of the bike’s head tube. This measurement usually increases through the size run, and a longer head tube will increase the bike’s stack height. Bikes with longer head tubes may struggle on steep climbs due to the taller front end.
Top Tube Length – Actual (Not shown on the Devinci chart): The actual length of the top tube, measured along the top tube from the center of the headtube to the center of the seat tube. The actual top tube length does less to account for seat tube angle, which will affect how long the bike feels while seated (a slacker seat tube will mean a raised saddle is further rearward), thus I prefer to look at the effective top tube length, mentioned above.
Standover Height (Measurement “SOH” on the Devinci chart): Different companies measure this differently. It is most commonly measured as the distance from the ground to the top of the top tube, measured at a point on the top tube half way between the head tube and seat tube. Other companies (like Devinci) measure it to the lowest point in the top tube. Because almost every top tube is shaped differently, and because different companies take this measurement differently, standover height numbers don’t tend to be particularly useful.
Front Center (Not shown on the Devinci chart): Measured from the center of the bottom bracket to the center of the front hub. To some extent, this will provide a sense of how long the front of the bike feels, but the bike’s head tube angle and the fork travel / length will impact the effect of this measurement, and so the reach measurement tends to be a better indicator of how long the bike will feel.
Fork Offset (also known as Rake) (Not shown on the Devinci chart): Measured from the center of the steering axis to the center of the front axle. This is essentially a measurement of how far in front of the head tube the front axle is. And putting offset down here implies that it doesn’t have a big effect on handling, which isn’t accurate — it most definitely has an effect on handling. But the offset is determined by the fork manufacturer, and for a given wheel size, there’s usually only one or two options. The fork’s offset will almost always be consistent throughout the frame sizes, and more often than not, consistent between brands. So while this number matters and certainly affects handling, there are limited options here so it’s not generally something that’s a deciding factor between bikes.
Trail (Not shown on the Devinci chart): The horizontal distance on the ground from the center of the steering axis to the contact point of the tire (which is directly below the axle). This is another measurement that has a substantial effect on the bike’s handling and stability vs. maneuverability, but it’s driven by other measurements, namely the head tube angle and the fork offset. Since the fork offset is fixed and there aren’t a lot of options there, the bike’s head tube angle tends to be the more convenient metric for assessing how stable a bike will be (which is why you’ll frequently see discussions of a bike’s head tube angle, but rarely see a discussion of how much trail the bike has).
Axle to Crown (also known as Fork Length) (Not shown on the Devinci chart): Measured along the steering axis, from the center of the axle to the top of the crown. Essentially, this is how long your fork is. The more travel the fork has, the longer it’ll be. A longer fork will raise the front end of the bike. Depending on whether that rise is compensated for elsewhere in the frame, this may increase the bike’s stack height. The axle to crown measurement isn’t discussed as often because it’s essentially a fixed distance that’s not changeable, unless you want to reduce the travel of your fork. However, for a given amount of travel, there are sometimes differences in the axle to crown measurement between different fork manufacturers.
Bottom Line
When I glance at a bike’s geometry table, I tend to look at reach, head angle, chainstay length, and maybe wheelbase to get a decent picture of how big the bike will feel, and at least a general sense of how it’ll ride. (And of course, other factors like the bike’s travel and wheel size are also huge factors in putting together the whole picture.)
But without any reference points, reach, head-angle, or chainstay numbers won’t mean a whole lot. So I encourage you to look up the geometry charts for bikes you own or have ridden, and compare them to other bikes to see if they’re longer or shorter, steeper or slacker.
And even without any reference points, if you’re shopping for a new bike and you want to make sure that you’re comparing apples to apples, geometry charts can be really helpful. Even if two bikes have the same wheel size, the same amount of suspension travel, and similar parts, if the geometry is dramatically different between the two, they’ll almost certainly ride quite differently.
And that’s what we’ll dive into in Part 2 — comparing some real-world examples, and working through a logical thought process as we take a look how these measurements might make the bike fit and feel on the trail.
“Freedom units are dumb,” says Mr Bodman.
What? I don’t think political commentary helps this article one whit. If they’re so dumb, I suggest you go try to buy shoes at your local shoe store, using the European mode instead of the US/UK mode for sizing, see how that works for you. I expect some confusion from the shoe store staff. I would also expect them to say nothing kind about your “Freedom units are dumb” observation. They’d also not likely accept your Eurodollar payment idea, since the US Dollar is in “Freedom units” also.
Practical info = very good.
Pointless politics = very useless, especially in this instance where the question isn’t political.
As to practical info, it would be good to read you dissecting the paradigm shift of classic geometry numbers to “Reach and Stack” focus. Maybe some insights would help people understand the difference between ETT and Reach, and help people use a combination of STA and ETT to understand what is practical “Reach” without a number stating it. Quite a few people were sorting out “Reach” with classic geometry numbers already, before mfrs and journalists decided we needed “Reach” numbers. Some explanation of the hows/whys on that would be good.
I say “freedom units” and you think “shoe sizes”? I’m not sure we’re on the same page here.
I personally thought “freedom units” was funny.
Then again, I am probably not as easily offended as I should be. So I promise to work on being more easily offended by more things.
Most of us here love delicate snowflakes but jeez Louise! Great joke! Keep them coming and I thought the replies by NB and JE were even funnier!
Back to regular scheduled programming… I am 175cm (5’9” in Freedom units…sry couldn’t resist.) with long arms and long legs (my poor wife, I am an ugly bastard!). I was in the market for a velo this spring and found myself on a 2019 Fuel EX 9.8. After riding it for 15 minutes I got off and remarked how it “fit” so well. It was a large! I did buy it on the spot. Moral of the story: ride bikes, drink beer, but don’t buy a bike off the internet go try it out. If ya can’t try it don’t buy it.
It is so painful/sad/telling/comedic that someone can get this offended by an innocent joke. Ah, the American superiority complex.
Great article and please don’t let the “Bobs” of the world take away comedy. I can see him screaming “O’Doyle Rules” in his highschool letterman jacket…
Forgive me. I seem to have touched a nerve. Perhaps naively, I thought Blister was doing gear review, and not tepid comedy. Best of luck in trying to be the funniest gear review site. I think you’ve got the sarcastic projection angle locked down in Mr Bodman’s and Mr Ellsworth’s replies, so maybe you’ll build on that.
Point taken. Henceforth, I’ll strive to keep my reviews purely informational and utterly dry. I can assure you that any perceived humor will merely be unintended coincidence. While I can’t speak for Mr. Ellsworth, his reviews were never that funny to begin with, so I imagine they’ll stay about the same.
I would like to hear your take on the newer forward geometry and how that also not only affect sizing, but also fit.
Thanks!
This article has made buying a MTB so daunting, I’m just going for the cheapest I can find as long as it has wheels, a seat and a handle!
Only someone who is not looking to be offended would give the freedom units joke a second look. Calling it political is beyond ridiculous and says more about the complaintants insecurities than your writing. I thought it was a good one and please don’t change your writing tone one bit. Keeping things light makes technical info like this easier to assimilate. Thanks for the great information, I’m about to read part two now.