
Intro
Most of our reviews are pretty long — and take a long time to produce — because we want to provide enough info for you to actually determine whether the gear we tested will work well for you.
But we get asked to check out an increasingly wide range of products, and sometimes, we just want to tell you about something we’ve been using and loving lately.
So that’s where this monthly series — Stuff We Like — comes in, where we keep you current on a broad range of stuff we’re currently digging.
And if there’s something you love that you think we ought to check out, drop us a note in the comment section below.
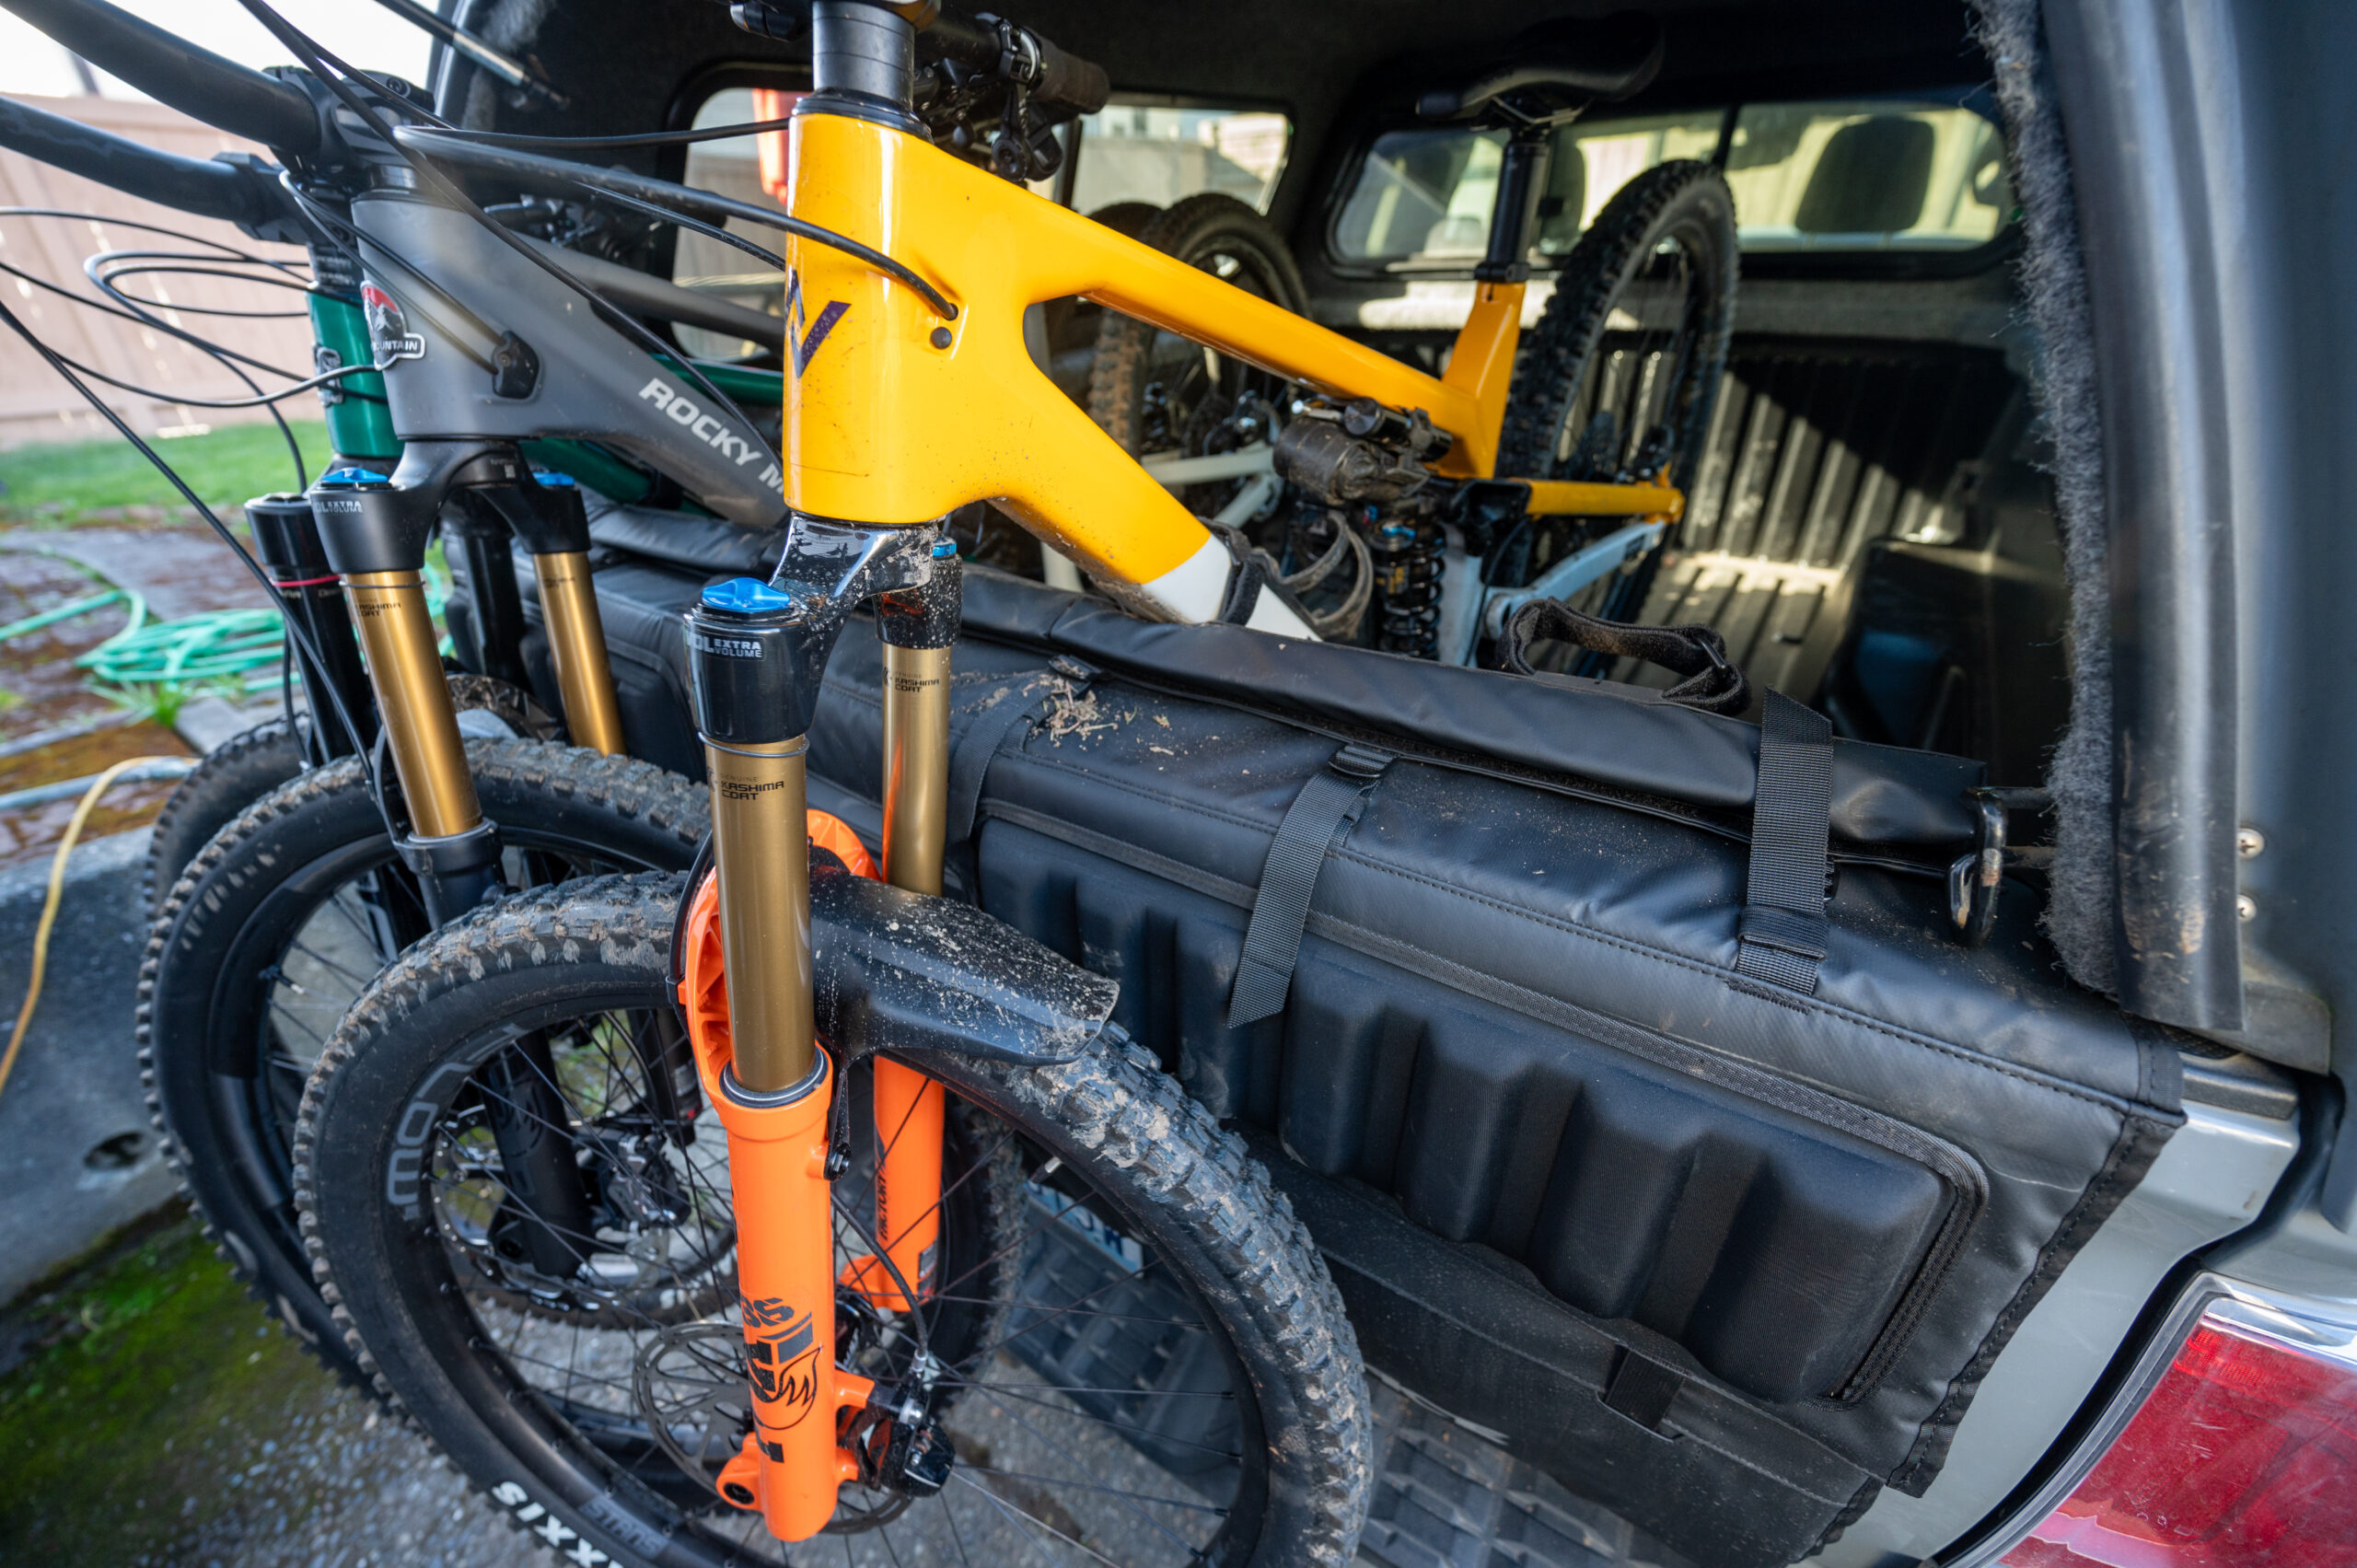
Race Face T3 Tailgate Pad
MSRP: $259
David Golay: I’ve been using Race Face’s new T3 tailgate pad for a little while now, and it’s easily the best-fitting and most secure tailgate pad that I’ve tried to date. The T3 is offered in three different sizes — one for mid-size trucks (five-bike capacity) and a larger one for full-size trucks (six bikes max), plus a mini two-bike version.
The biggest advantage of the T3 over other pads I’ve tried is that the T3 uses an interesting segmented construction to make its size and shape adjustable in order to more cleanly fit a range of tailgate shapes. It’s probably easier to understand if you just watch Race Face’s video on how to set up the T3, but the short version is as follows:
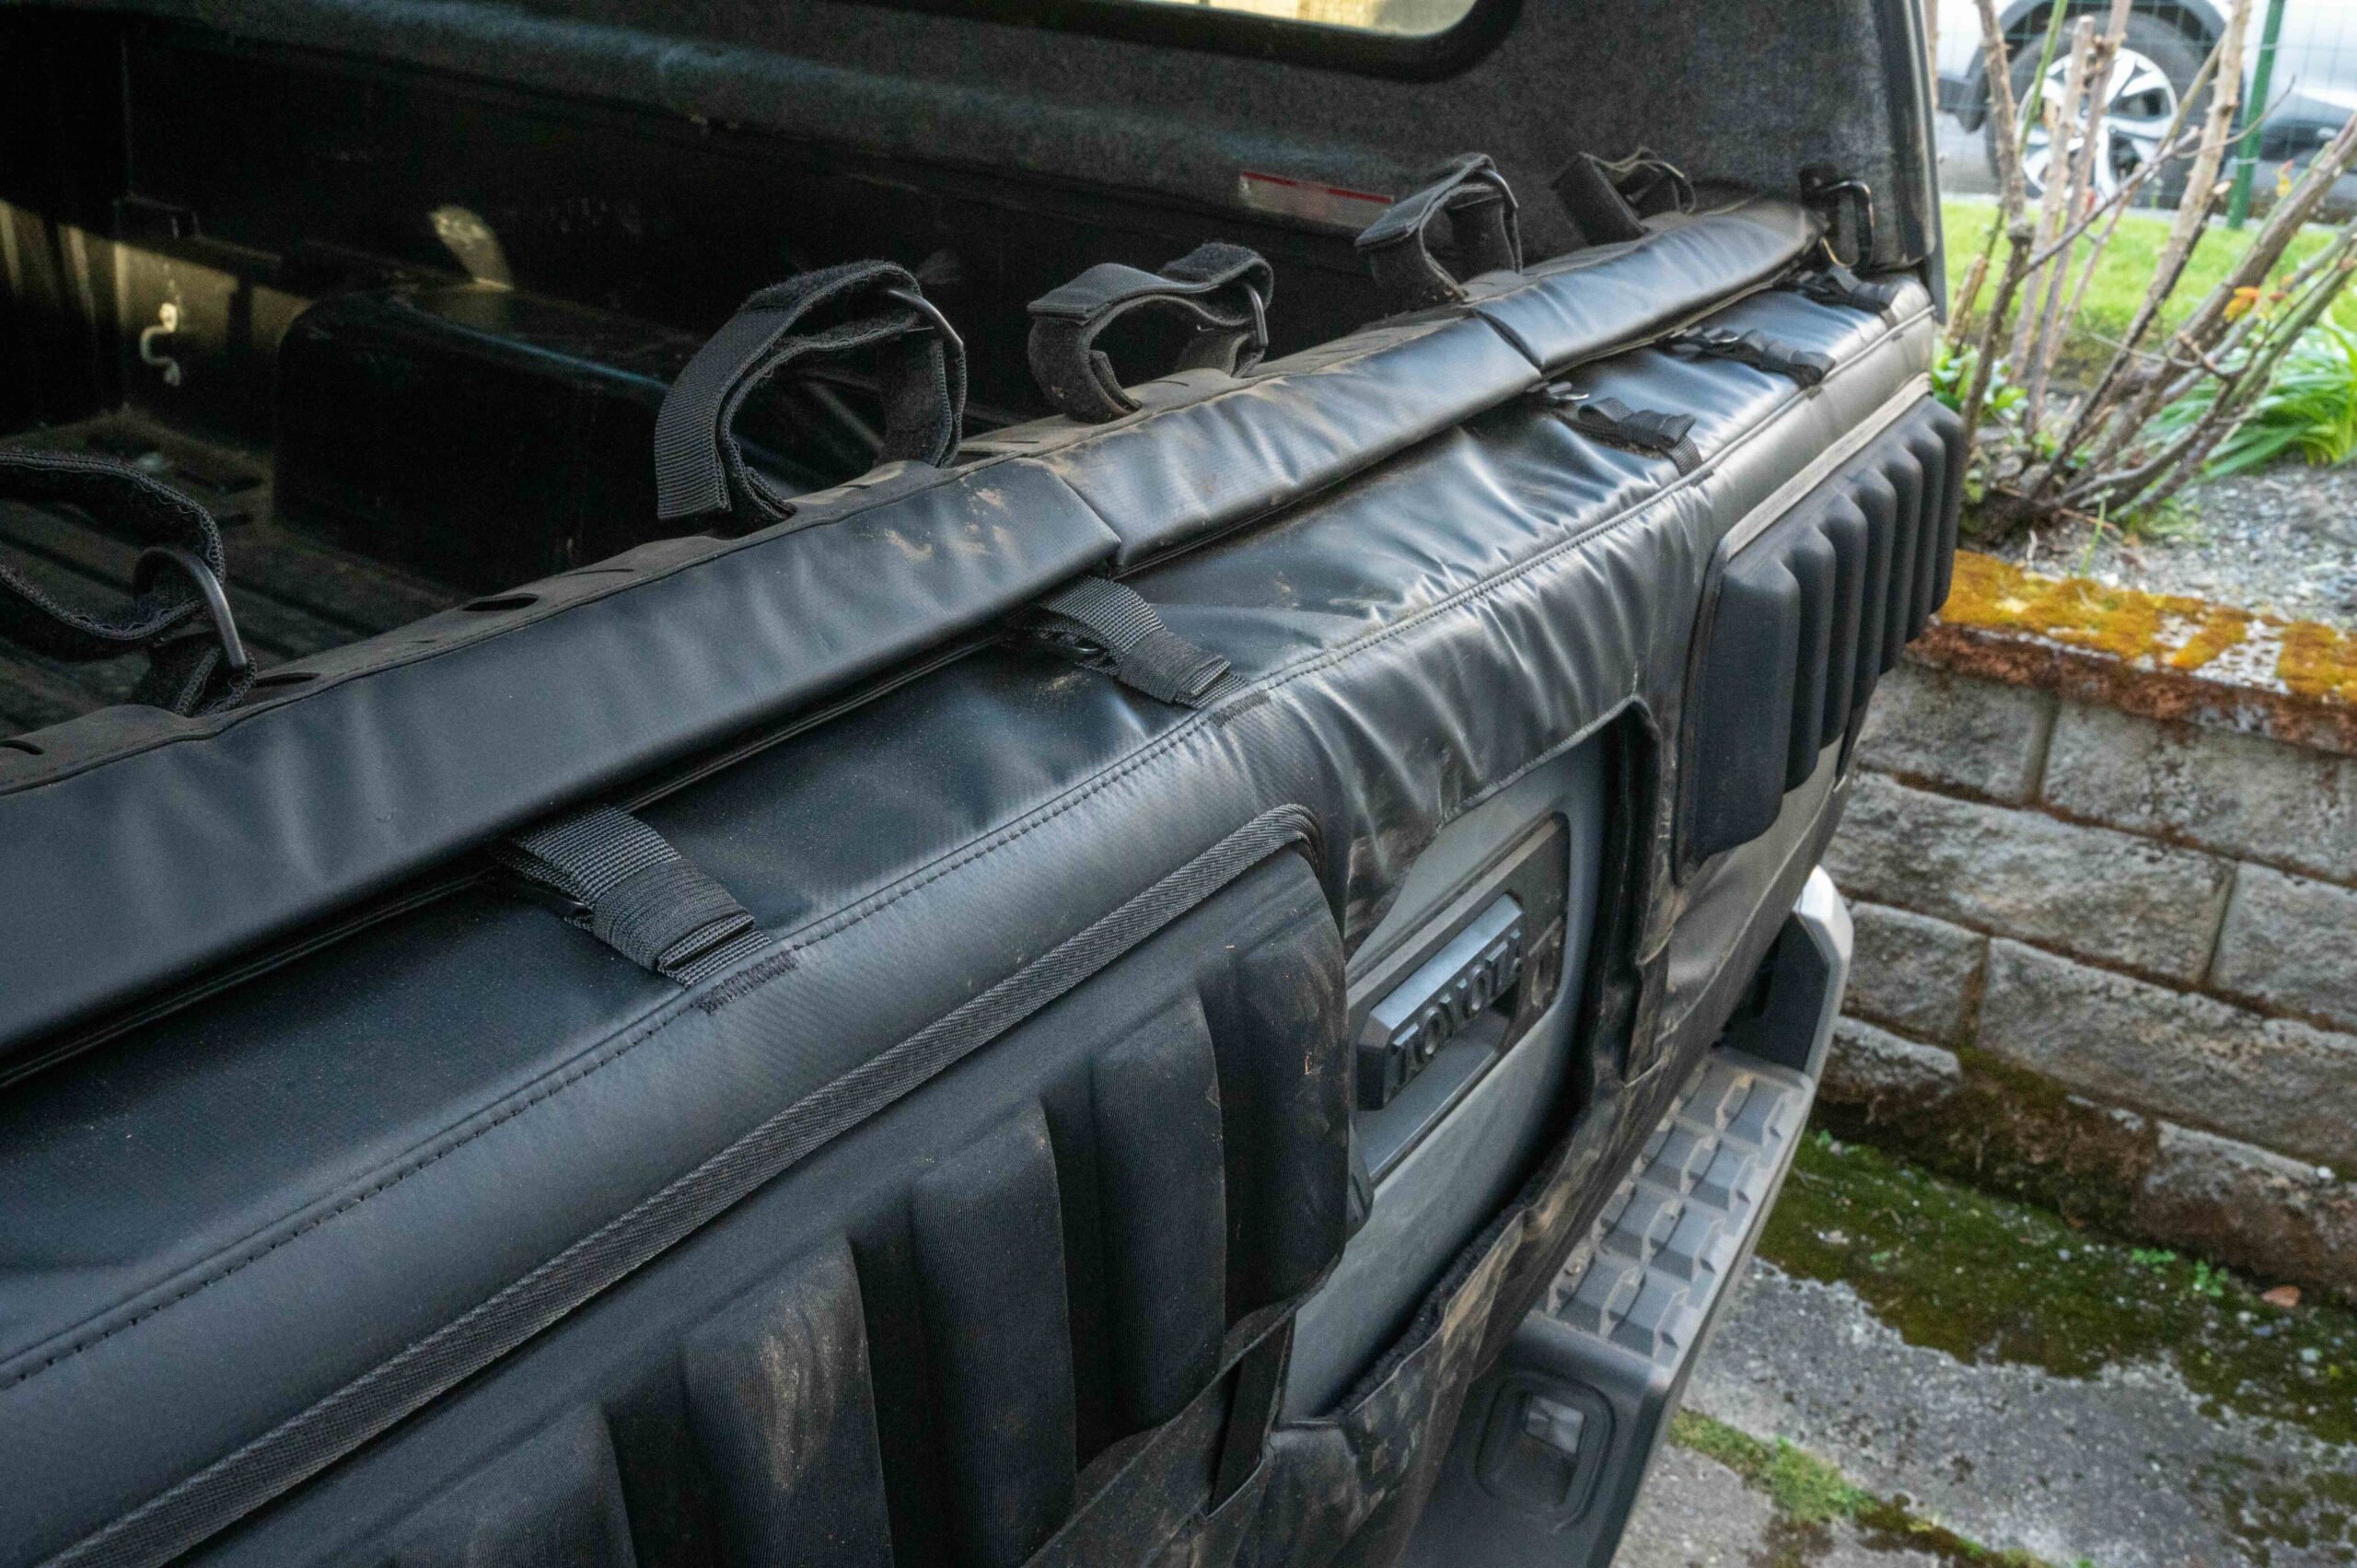
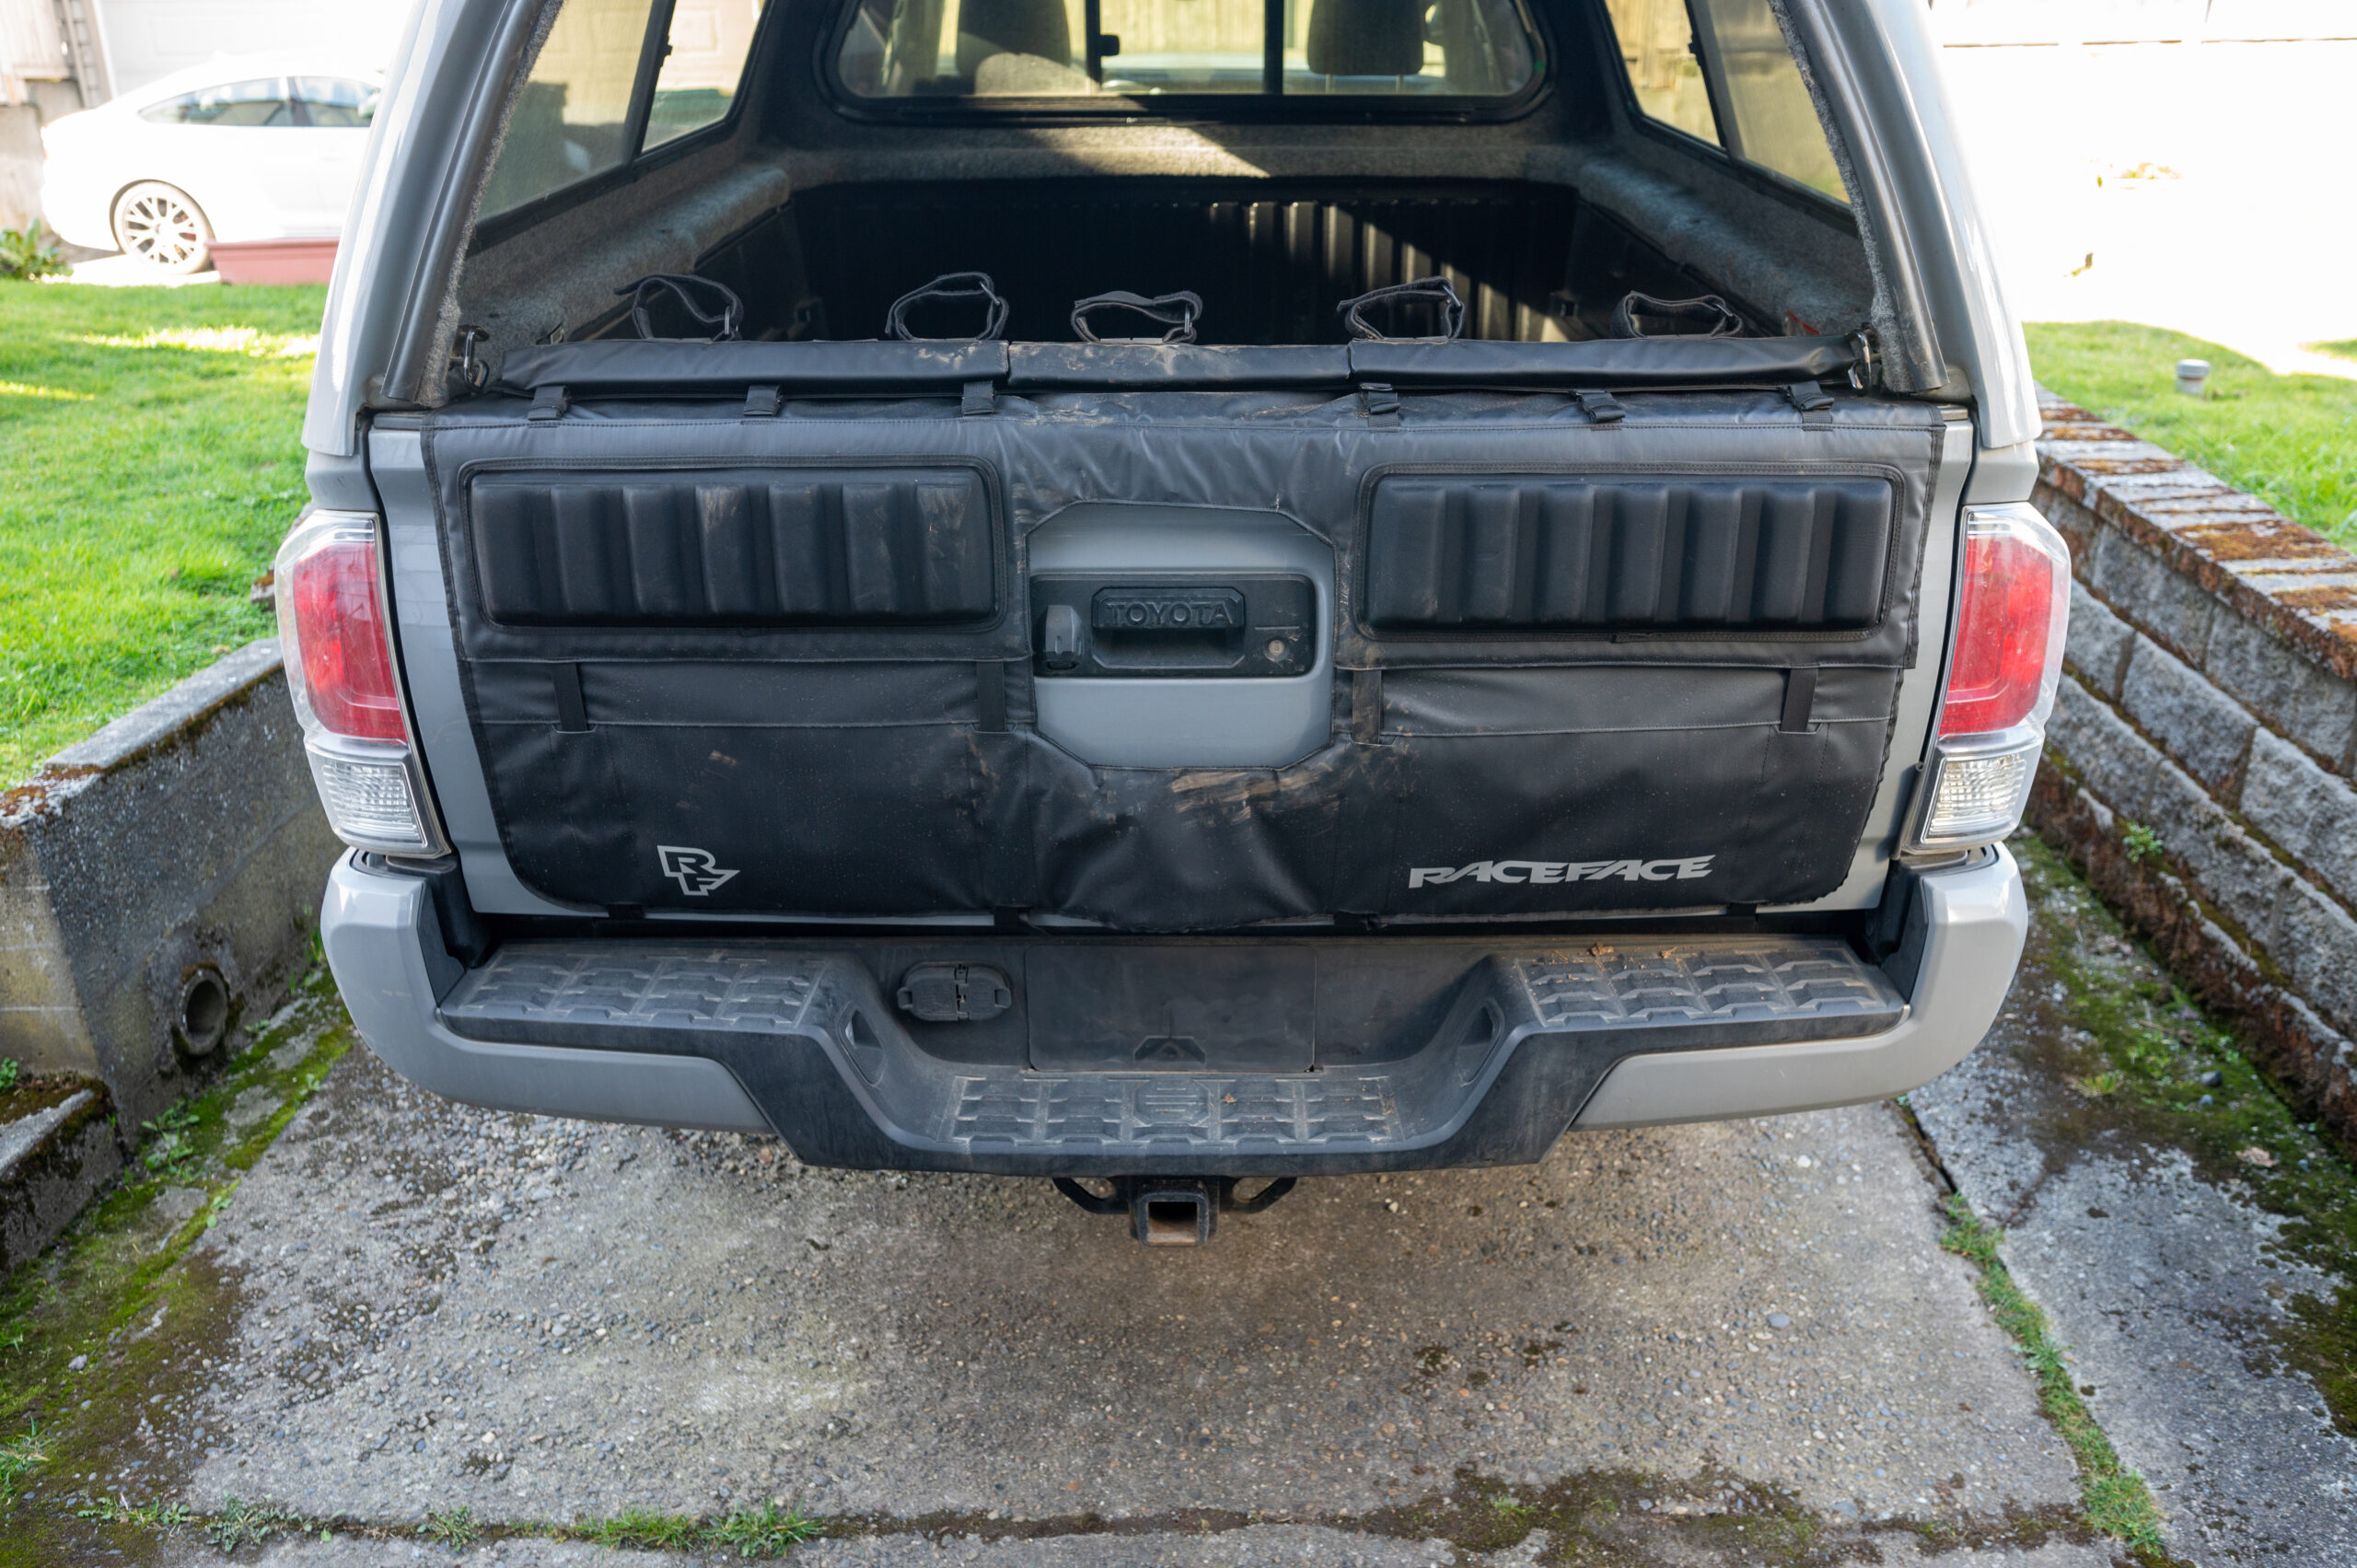
(1) The front face of the pad (the part that faces outward in normal use) is made of a separate upper and lower panel, with a velcro attachment between the two. (The straps that attach the pad to the tailgate also hold the two in place; it’s not just relying on the velcro.) That lets you set the height of the pad to neatly cover the tailgate. There are also little velcro-attached panels that can be used to fill in the extra space around the handle opening if you really want to get the most possible coverage.
(2) The upper edge of the pad has a series of webbing straps that you can use to adjust its shape, to fit a variety of thicknesses and shapes of tailgates. I’ve been using the T3 on a 2021 Toyota Tacoma, which has a slightly curved outer edge of the tailgate, and you can contour the T3 to fit that really nicely. I’ve also previously used the original Race Face Tailgate Pad on a 2000 Tacoma, with a much thinner tailgate, and it just didn’t fit well, being designed to fit thicker tailgates on newer trucks. I don’t have that older Tacoma anymore, unfortunately, but I’m confident that the T3 would fit it much better.
(3) The downtube pads on the T3 are hinged and attach to the top of the pad with more velcro, so you can fold them down if you want to use the T3 with a tonneau cover. I don’t have one on my truck, but it seems like it should work nicely, and the T3 fits cleanly with the Snugtop canopy I have installed, without needing to fold the pads down.
The initial setup of the T3 took a little fiddling to get it to fit perfectly on the tailgate, but now that I have it dialed in, it’s great. The T3 also holds bikes securely and features a lot more padding than Race Face’s older pad variants. Tailgate pads aren’t the most complex product in the universe, but Race Face (and Fox, who sell the same pad with different branding, as the Mission Pad) have put some real thought into making a better one, and it’s paid off.
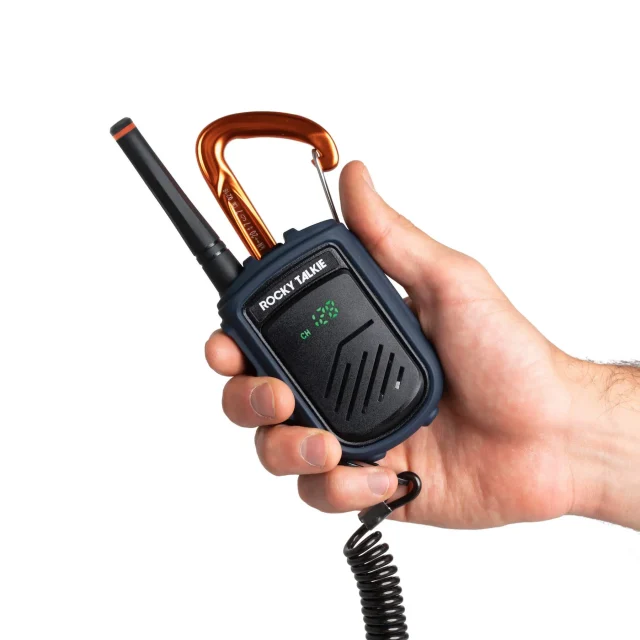
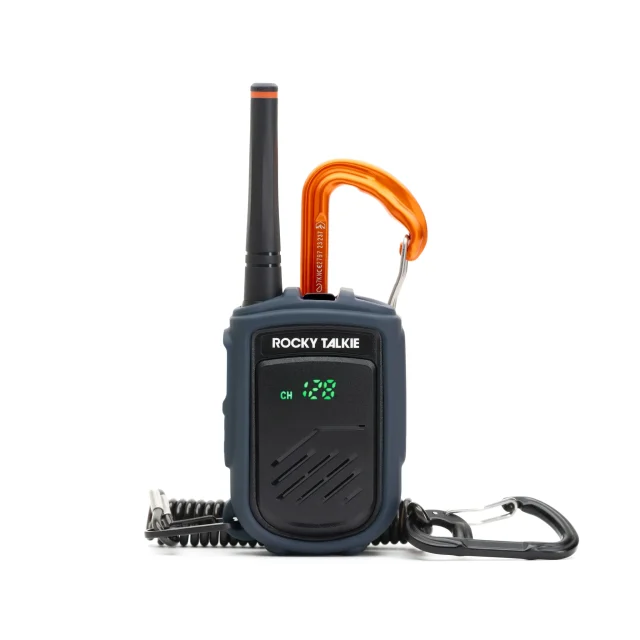
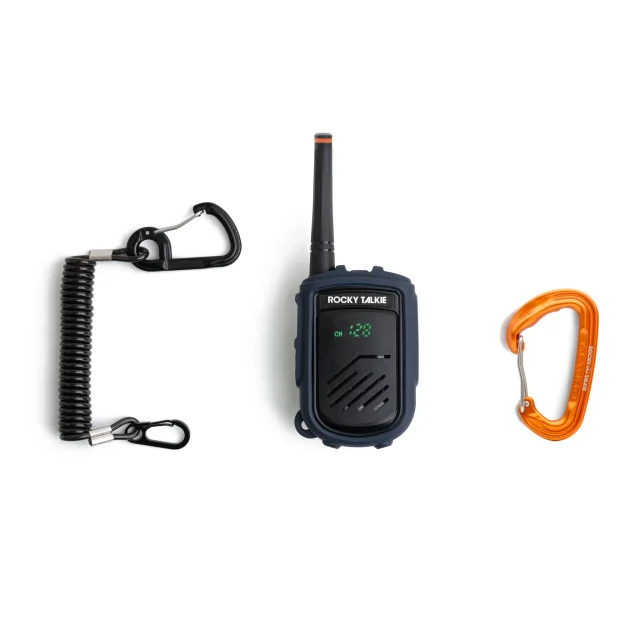
Rocky Talkie Mountain Radio
MSRP: $110 per radio
Luke Koppa: A key part of our review publishing process, and an often overlooked one, is shooting photos of our reviewers actually testing the products. Providing helpful product information is obviously the main priority, but especially when our Full Reviews can easily surpass 3000 words, we also want to break up what would otherwise be a giant sea of plain text and provide some context around who is testing these products and how / where they’re doing so.
However, getting those photos can be tricky and quite time-consuming — the latter of which is a significant factor since we’re not learning a lot about the products we’re using when we’re constantly stopping and starting while shooting photos. And we’ve got a lot of products to test.
As both our lead photographer in Crested Butte and someone who’s writing a lot of our reviews, I’m always on the lookout for ways to improve the efficiency and quality of our on-mountain photo shoots. And for this season’s photo laps, Rocky Talkie’s Mountain Radio has been one of my favorite new tools.

Now, I’ve spent a good bit of time with BCA’s BC Link 2.0 radios and still enjoy using them in the backcountry, but they proved less ideal for our lift-accessed shoots since they work best when paired with a backpack. I had heard about Rocky Talkie’s Mountain Radio a couple years ago and liked the idea, but it wasn’t until I started using them with fellow photog, Taylor Ahearn, that I really started to be sold on their usefulness for our particular use case.
Now, to be clear: I’m not a radio expert. I can offer some of Rocky Talkie’s stated specs and my own impressions after using them for the past several weeks, but I’m sure other folks could offer more precise takes on the nitty gritty details. And, in the future, I do plan on doing a more detailed writeup on both the Mountain Radio and BCA’s newer and more directly comparable BC Link Mini, so stay tuned for that.
But for now, the bottom line is that I’ve found Rocky Talkie’s Mountain Radio to be very easy to use, and it’s been a huge asset while shooting photos (or just skiing with friends) on the mountain.
My favorite aspects are the radio’s compact size and simple functionality. It’s about 3.7” x 2.5” x 1.1” in size (9.3 cm x 6.3 cm x 2.8 cm), so it fits in almost any jacket or pant pocket that would also fit a modern smartphone. And if I leave the radio’s speaker / mic side facing away from my body, I don’t even have to take it out of my shell jacket’s chest pocket to use it.
Even while wearing mittens, I can find and click the radio’s large talk button with it still in a pocket, and the person on the other line can still clearly hear me. That means that using the radio adds almost zero additional steps to setting up and coordinating a photo with a skier / rider who also has a Mountain Radio, but it allows us to precisely communicate things about where we want them to turn, what the snow conditions are like, when they’re dropping, etc. That’s equated to better photos, less time spent yelling across the mountain at each other, and encouraged me to try more complex photo setups.
Given what I’ve just described, we’ve primarily been using the Mountain Radio without its detachable (and climbing-grade) carabiner or elastic leash. But those are nice if you want to clip it to something like a backpack strap.
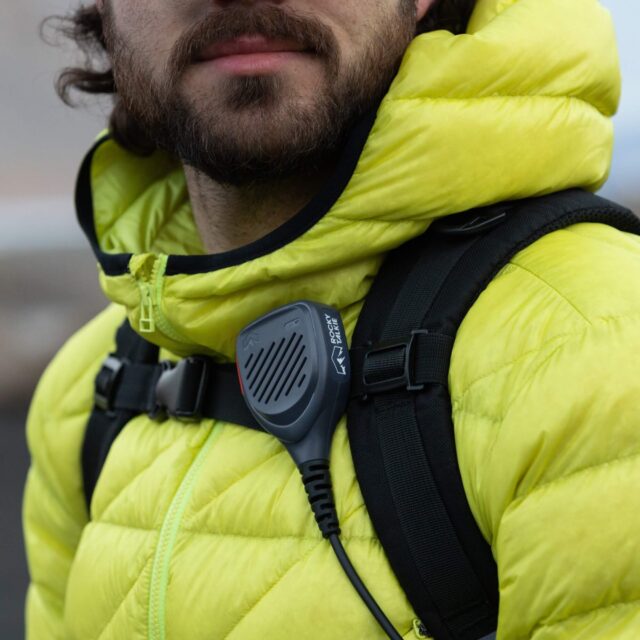
Rocky Talkie also offers an optional, detachable Waterproof Hand Mic ($48) so you can stash the Mountain Radio elsewhere but clip the mic / speaker in a convenient spot. I’ve recently been leaving the external mic attached to our photo backpack since it’s even more convenient than keeping the radio in a jacket pocket, but what I really like is that you can use the Mountain Radio in either configuration — you don’t need to always use it with the corded mic.
Another key aspect for our use case is that the radio needs to be easy to use so we can pass it between whichever reviewers we’re shooting with, and so far, it has been. It only takes a few seconds to get used to the button layout, and most of the settings are “set and forget” — once you’ve got two radios talking to each other, you often only ever have to use the talk button on the side.
For reference, the Mountain Radio’s power (2-watts) is the maximum power legally allowed for use without a license; Rocky Talkie lists a max range of over 35 miles but says 1-5 miles is more typical in backcountry terrain.
We haven’t tested the max range very often (we’re typically within a few hundred yards of each other). The only instance I tested when I wasn’t able to get a connection was when I was on the northwest side of Mt. Crested Butte with one radio and Jonathan was on the southeast side of the mountain, with maybe a mile and several ridges / forests between us. I was able to get a secure connection once I got to the top of the Silver Queen lift and the distance between us wasn’t obstructed by as many ridges or trees, but I wouldn’t rely on the Mountain Radio for consistent communication if my partner and I would frequently be several miles apart with multiple mountains, ridges, forests, etc. between us. For that scenario, Rocky Talkie’s newer 5-Watt Radio makes more sense; it’s more powerful but is a bit larger and requires a GMRS license.
As for other specs, the Mountain Radio is IP56 rated for water resistance (splashproof / snowproof, but not submergible), and its 1550 mAh lithium-ion battery is rechargeable via a USB-C port. Rocky Talkie says its operating temperature is -20° to 120°F (-28.9° to 48.9°C) and that its battery can last more than four days. I’m always nervous about forgetting to charge things, so I typically charge it after each day of use, but after using it for about 7 hours in typical winter conditions, I found that its battery would typically display about 70-80%, so their claims seem sensible.
All in all, the Mountain Radio has become a key part of our on-mountain photography setup, and I’ve become a big fan of it as someone who spends time on both sides of the camera. Stay tuned for more of our thoughts on it and a comparison between the Rocky Talkie Mountain Radio vs. BCA BC Link Mini Radio.
Dakine Poacher RAS Vest
MSRP: $225
Jed Doane: For many, sidecountry riding is the best of both worlds — freeriding outside resort boundaries, but with much less required effort than traditional touring. That said, I’ve never loved riding in the resort while wearing a backpack; the swingweight feels awkward, and taking the pack off / on for every lift ride is a hassle.
Dakine’s Poacher RAS vest is designed to address both of those pain points for lift-accessed riding while still offering some of the functionality of a low-profile backcountry backpack. And after using it just about every day on a recent trip to Hokkaido, Japan, it’s proved to be a great option for particular use cases.
Overall, the Poacher Vest’s pockets seem well-designed. I liked the front storage options, especially the two bigger waist pockets in which I typically kept a selection of snacks. The vest’s two chest pockets also made for nice spots for my phone, and keeping the high-use items in the front meant that I rarely took off the vest during a day of resort riding. The main back pocket is larger than I expected, with room for avalanche gear, lunch, and multiple layers. There’s also a soft sunglass pocket that I didn’t use much, as well as a stretchy built-in helmet holster that’s easy to deploy and stow.
The Poacher RAS vest is made from an 840D ripstop nylon fabric that has held up well to brush, trees, and board edges. Unsurprisingly, the thicker fabric does decrease breathability during bootpacks, but I found that, if I kept the top buckle clipped and unzipped the front zipper, I was comfortable during longer bootpacks.
The fit of the Poacher RAS vest is very adjustable via easy strap tightening on both sides. For reference, I’m 6’2”, 165 lbs (188 cm, 74.8 kg) and wore the size L/XL; I imagine the M/L would work as well.
The “RAS” in this vest’s name means that it’s compatible with Mammut’s Removable Airbag System 3.0, which allows a user to switch an airbag system between multiple packs. Dakine’s Poacher packs (in 18, 26, and 36L) are compatible with the RAS system, as are many packs from other brands. I didn’t personally use the airbag system, which is sold separately, but it could be an appealing option for those who plan on doing a lot of sidecountry riding or other mechanized backcountry access where a larger pack isn’t necessary.
I also loved the Poacher RAS vest for powsurfing. I’ve found that the bulkiness of a traditional, higher-volume pack can really get in the way of the weighting and flow of powsurfing, especially in less ideal snow conditions. The Poacher RAS vest is easy to move in and can carry snowshoes easily using the vest’s external straps.
Overall, those looking for a low-profile but useful storage solution for lift-accessed or lift-assisted riding (with optional airbag compatibility) should definitely check out Dakine’s Poacher RAS vest.
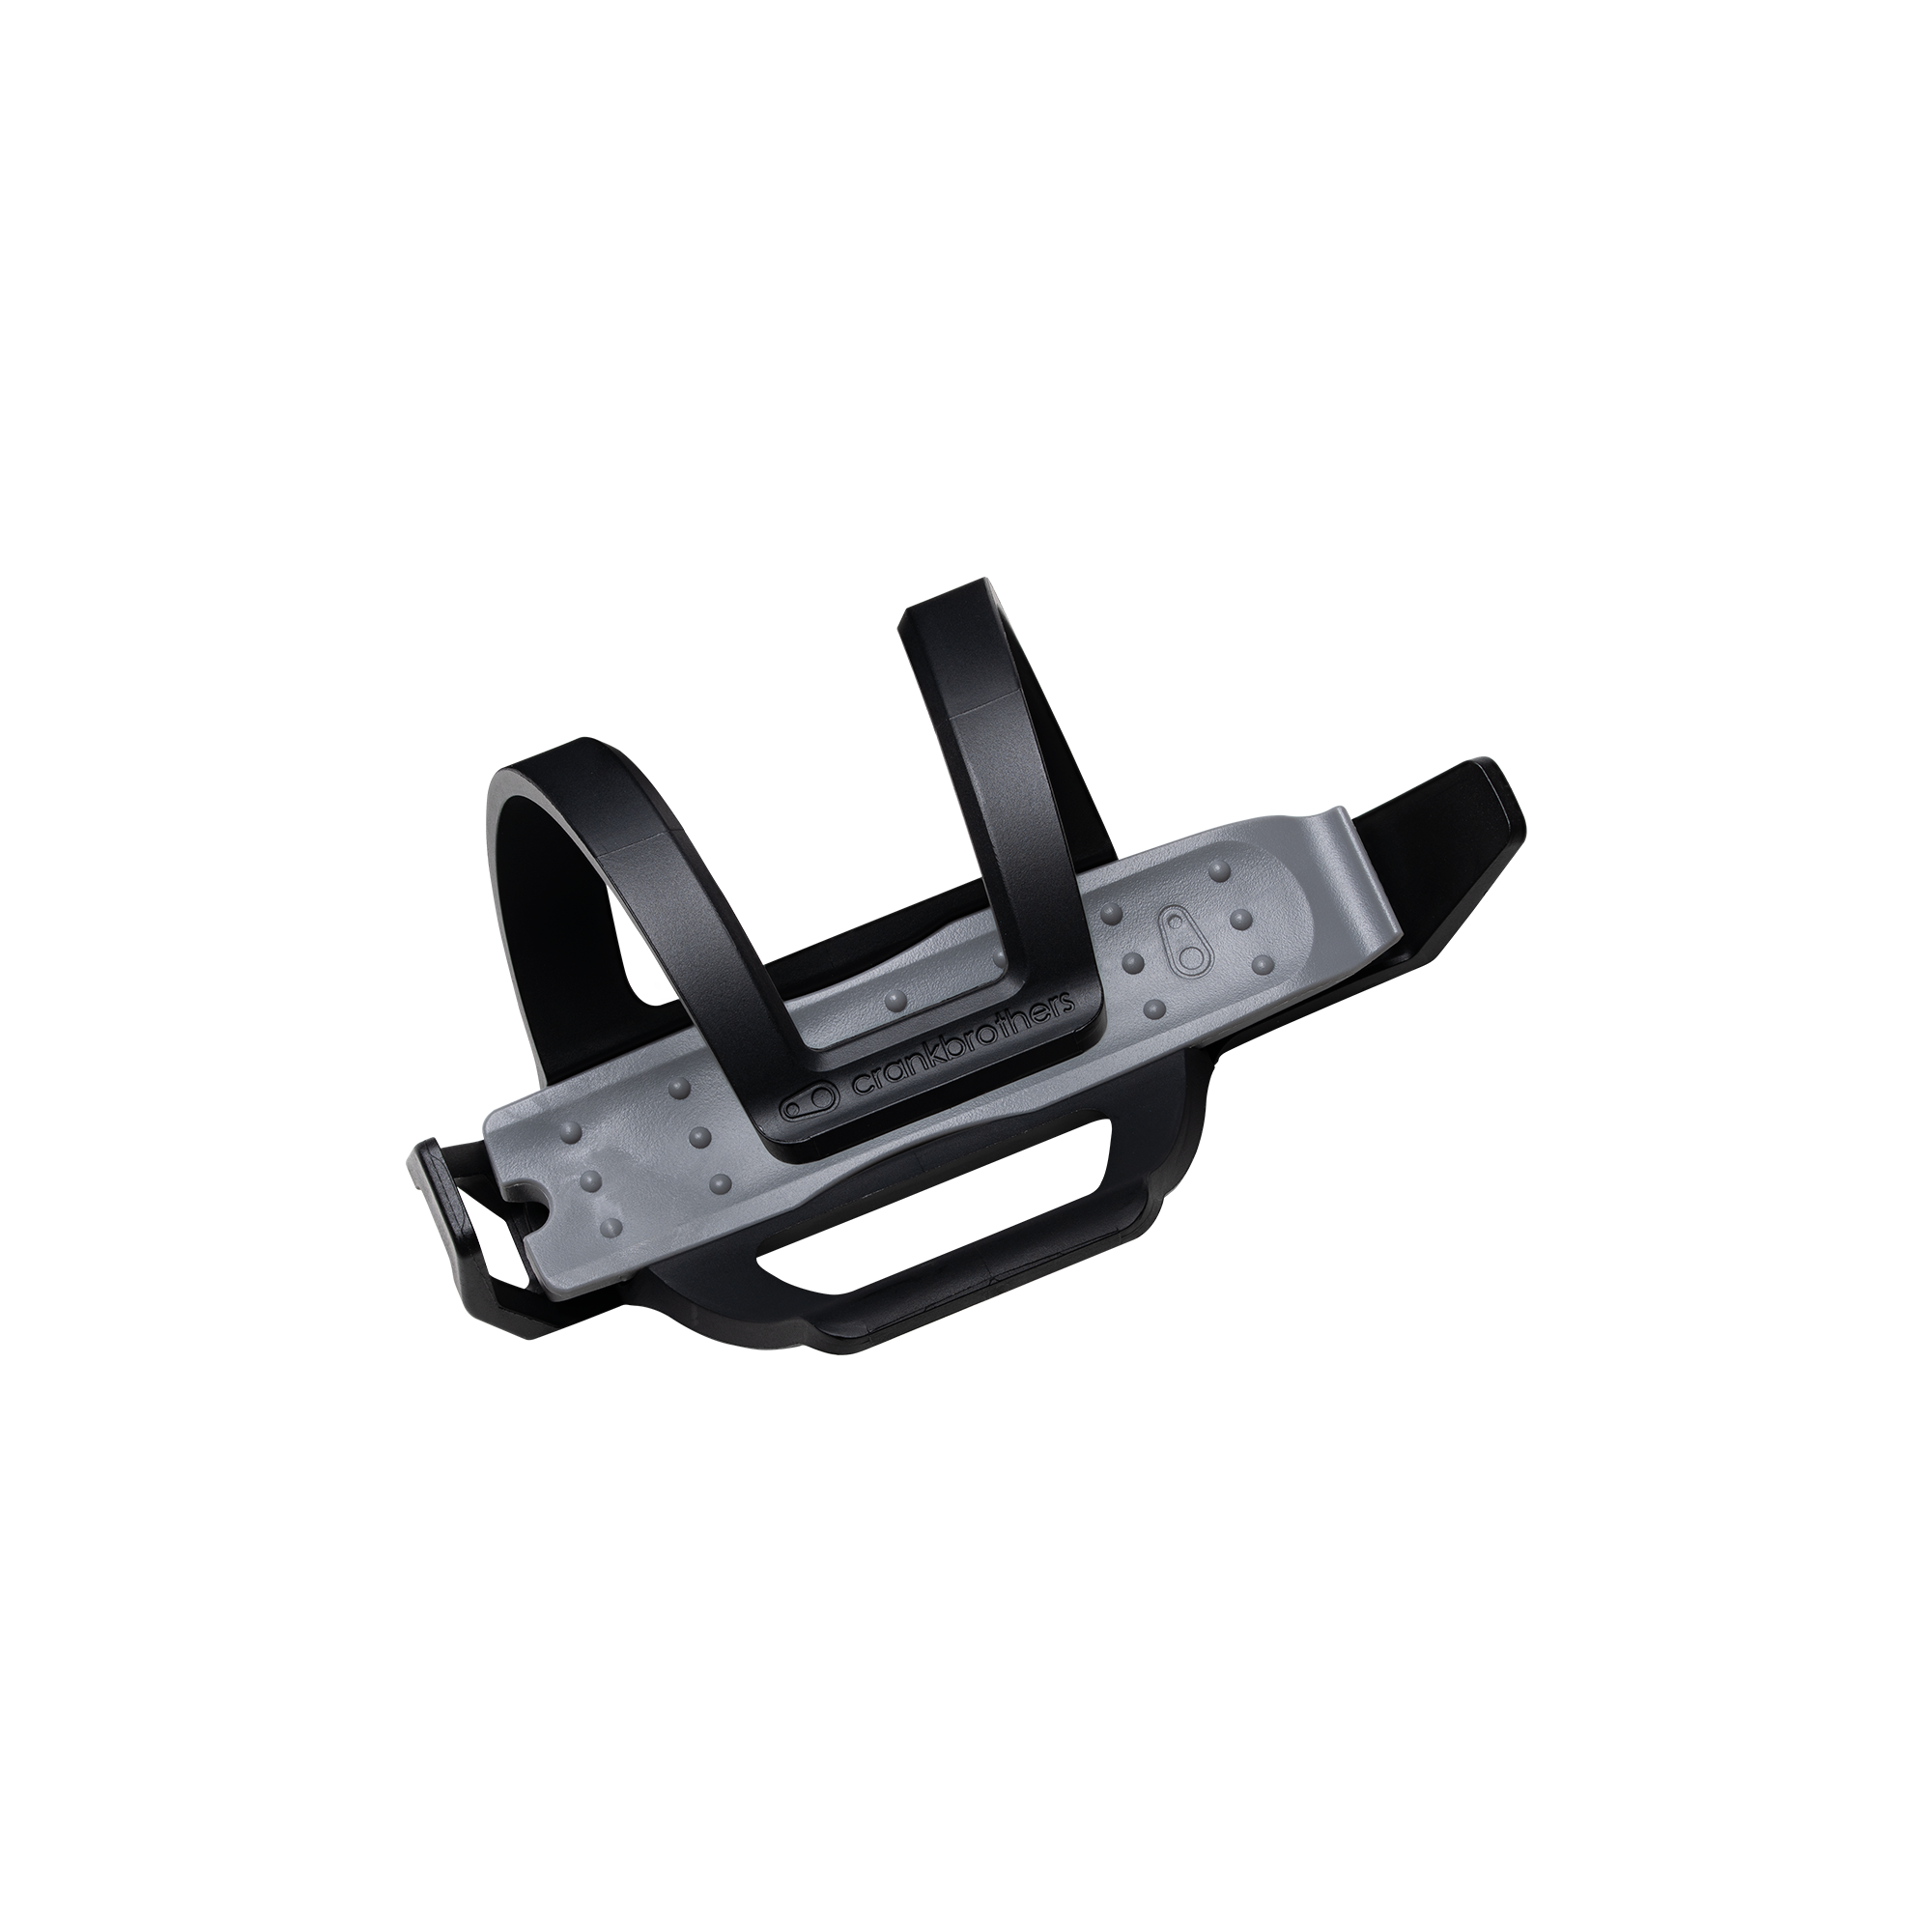
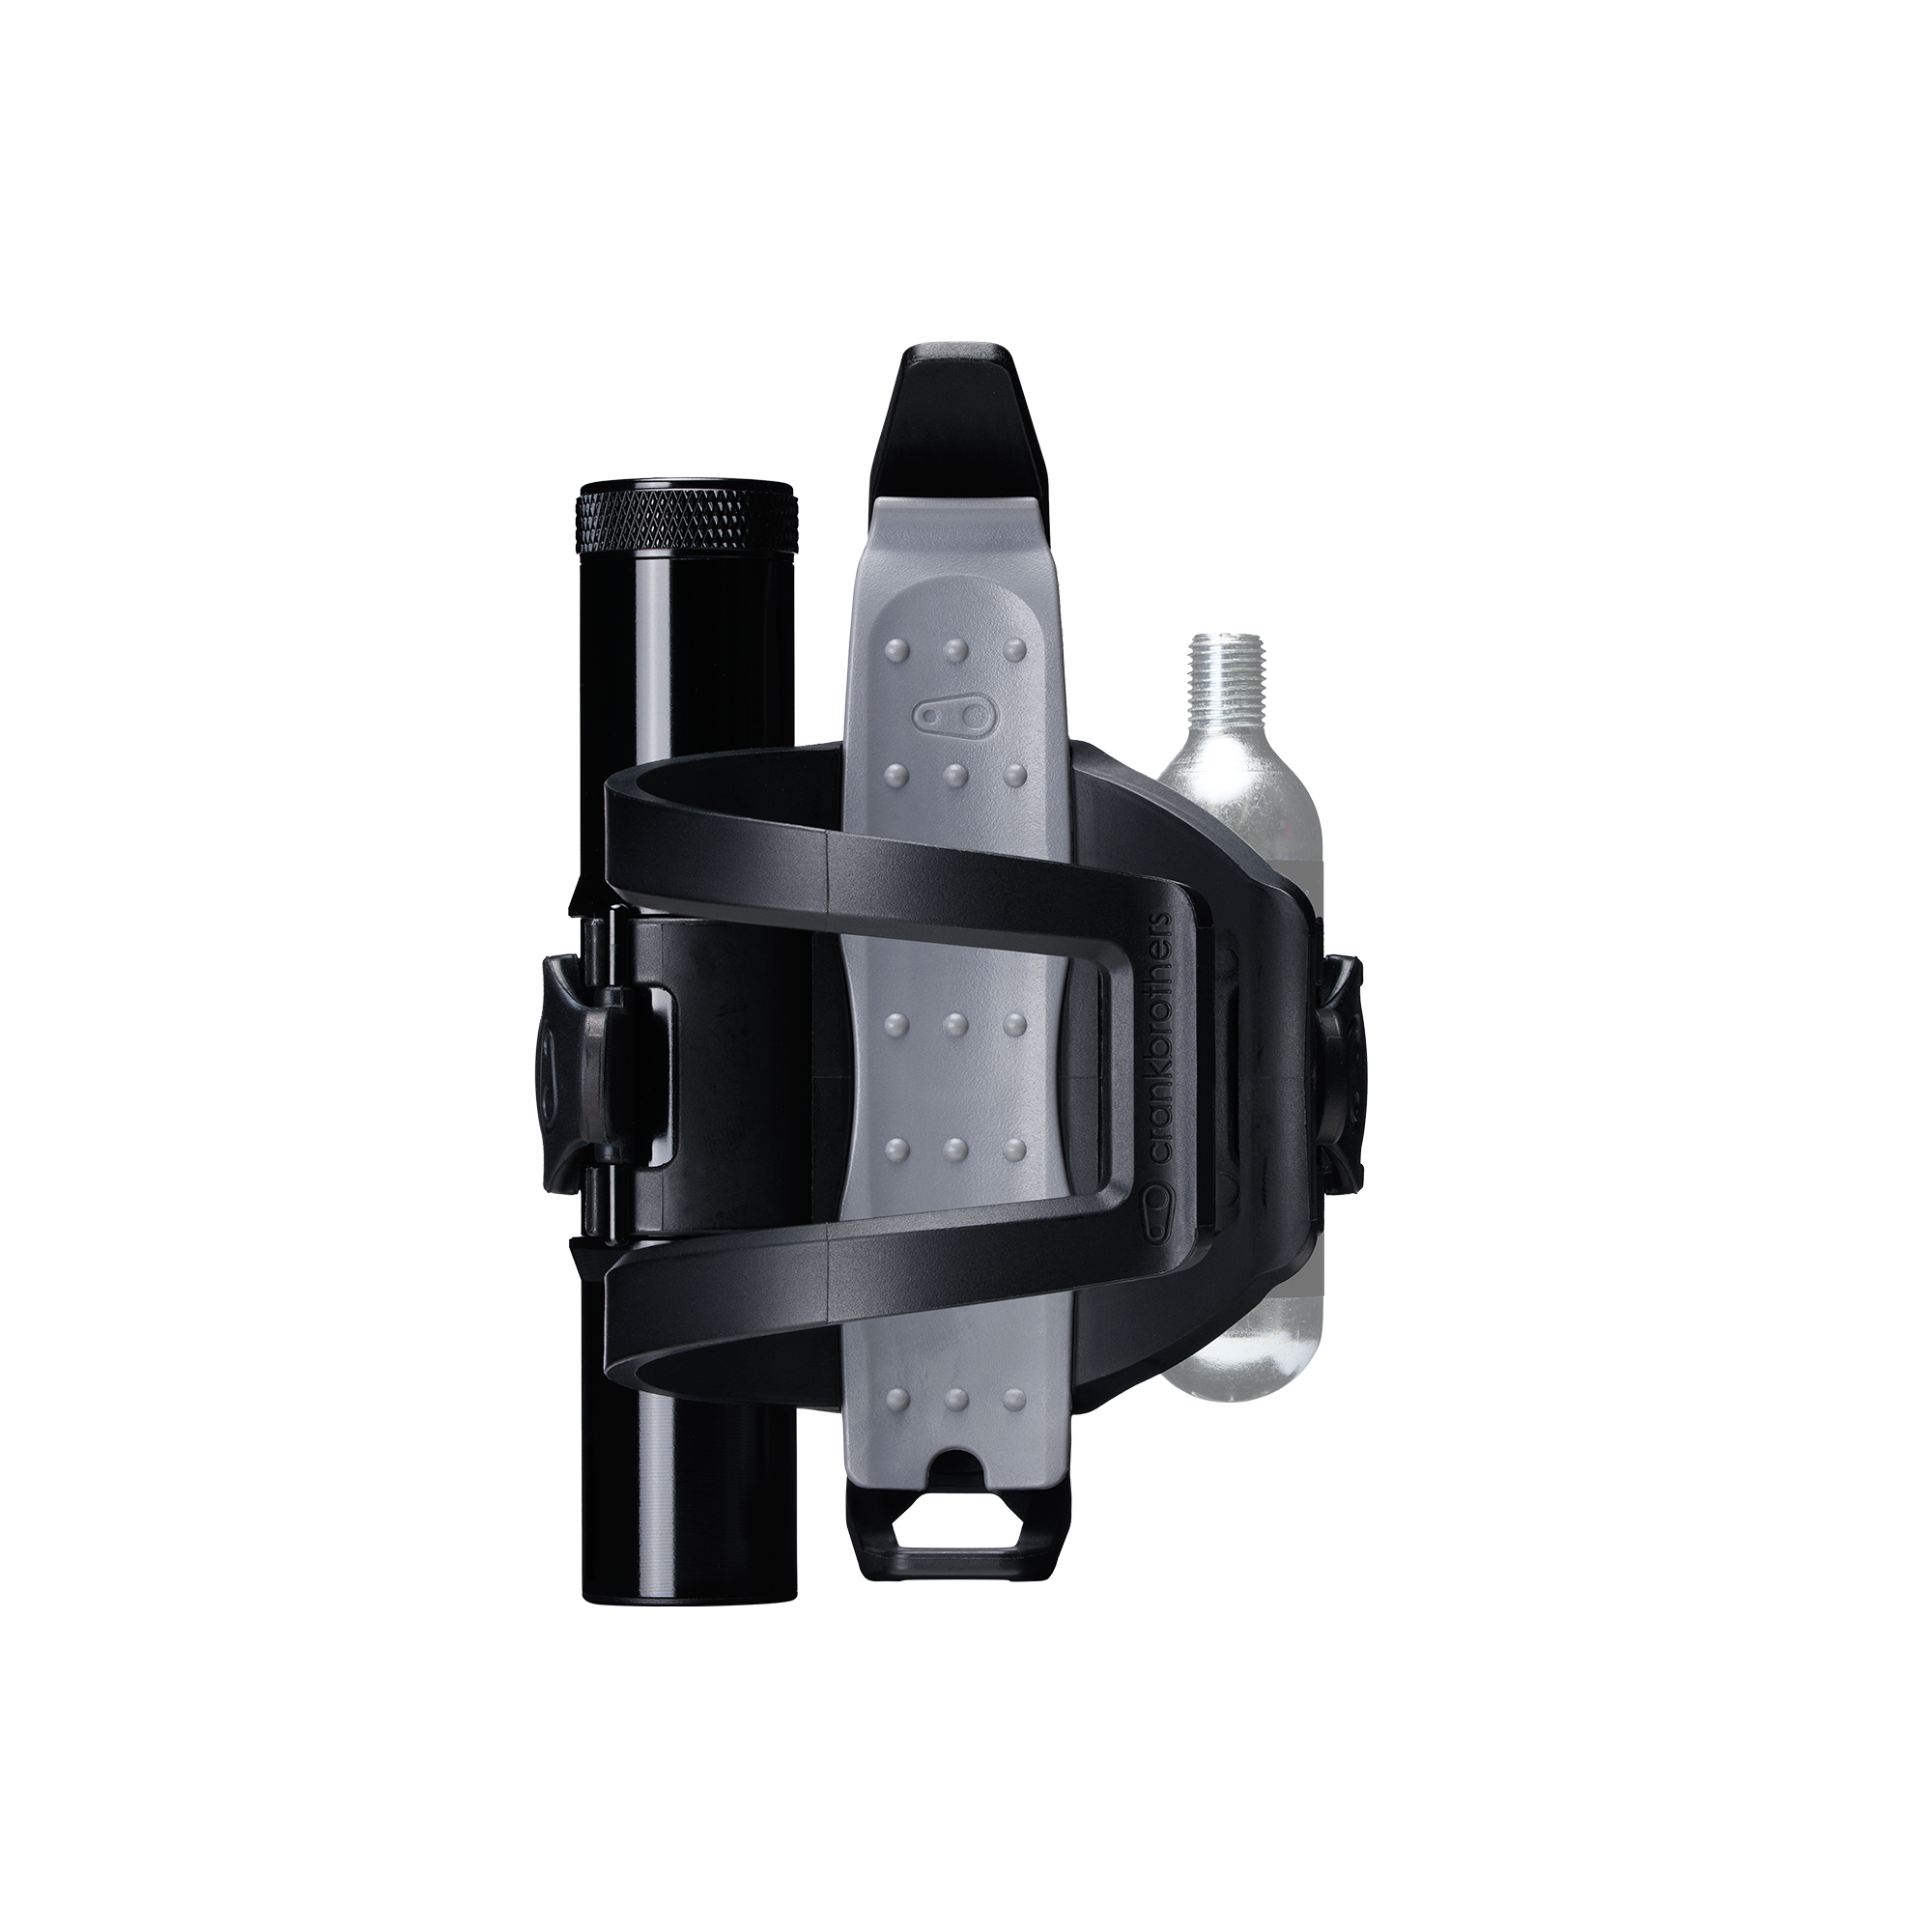
Crank Brothers S.O.S. Tools
MSRP: $15 to $120
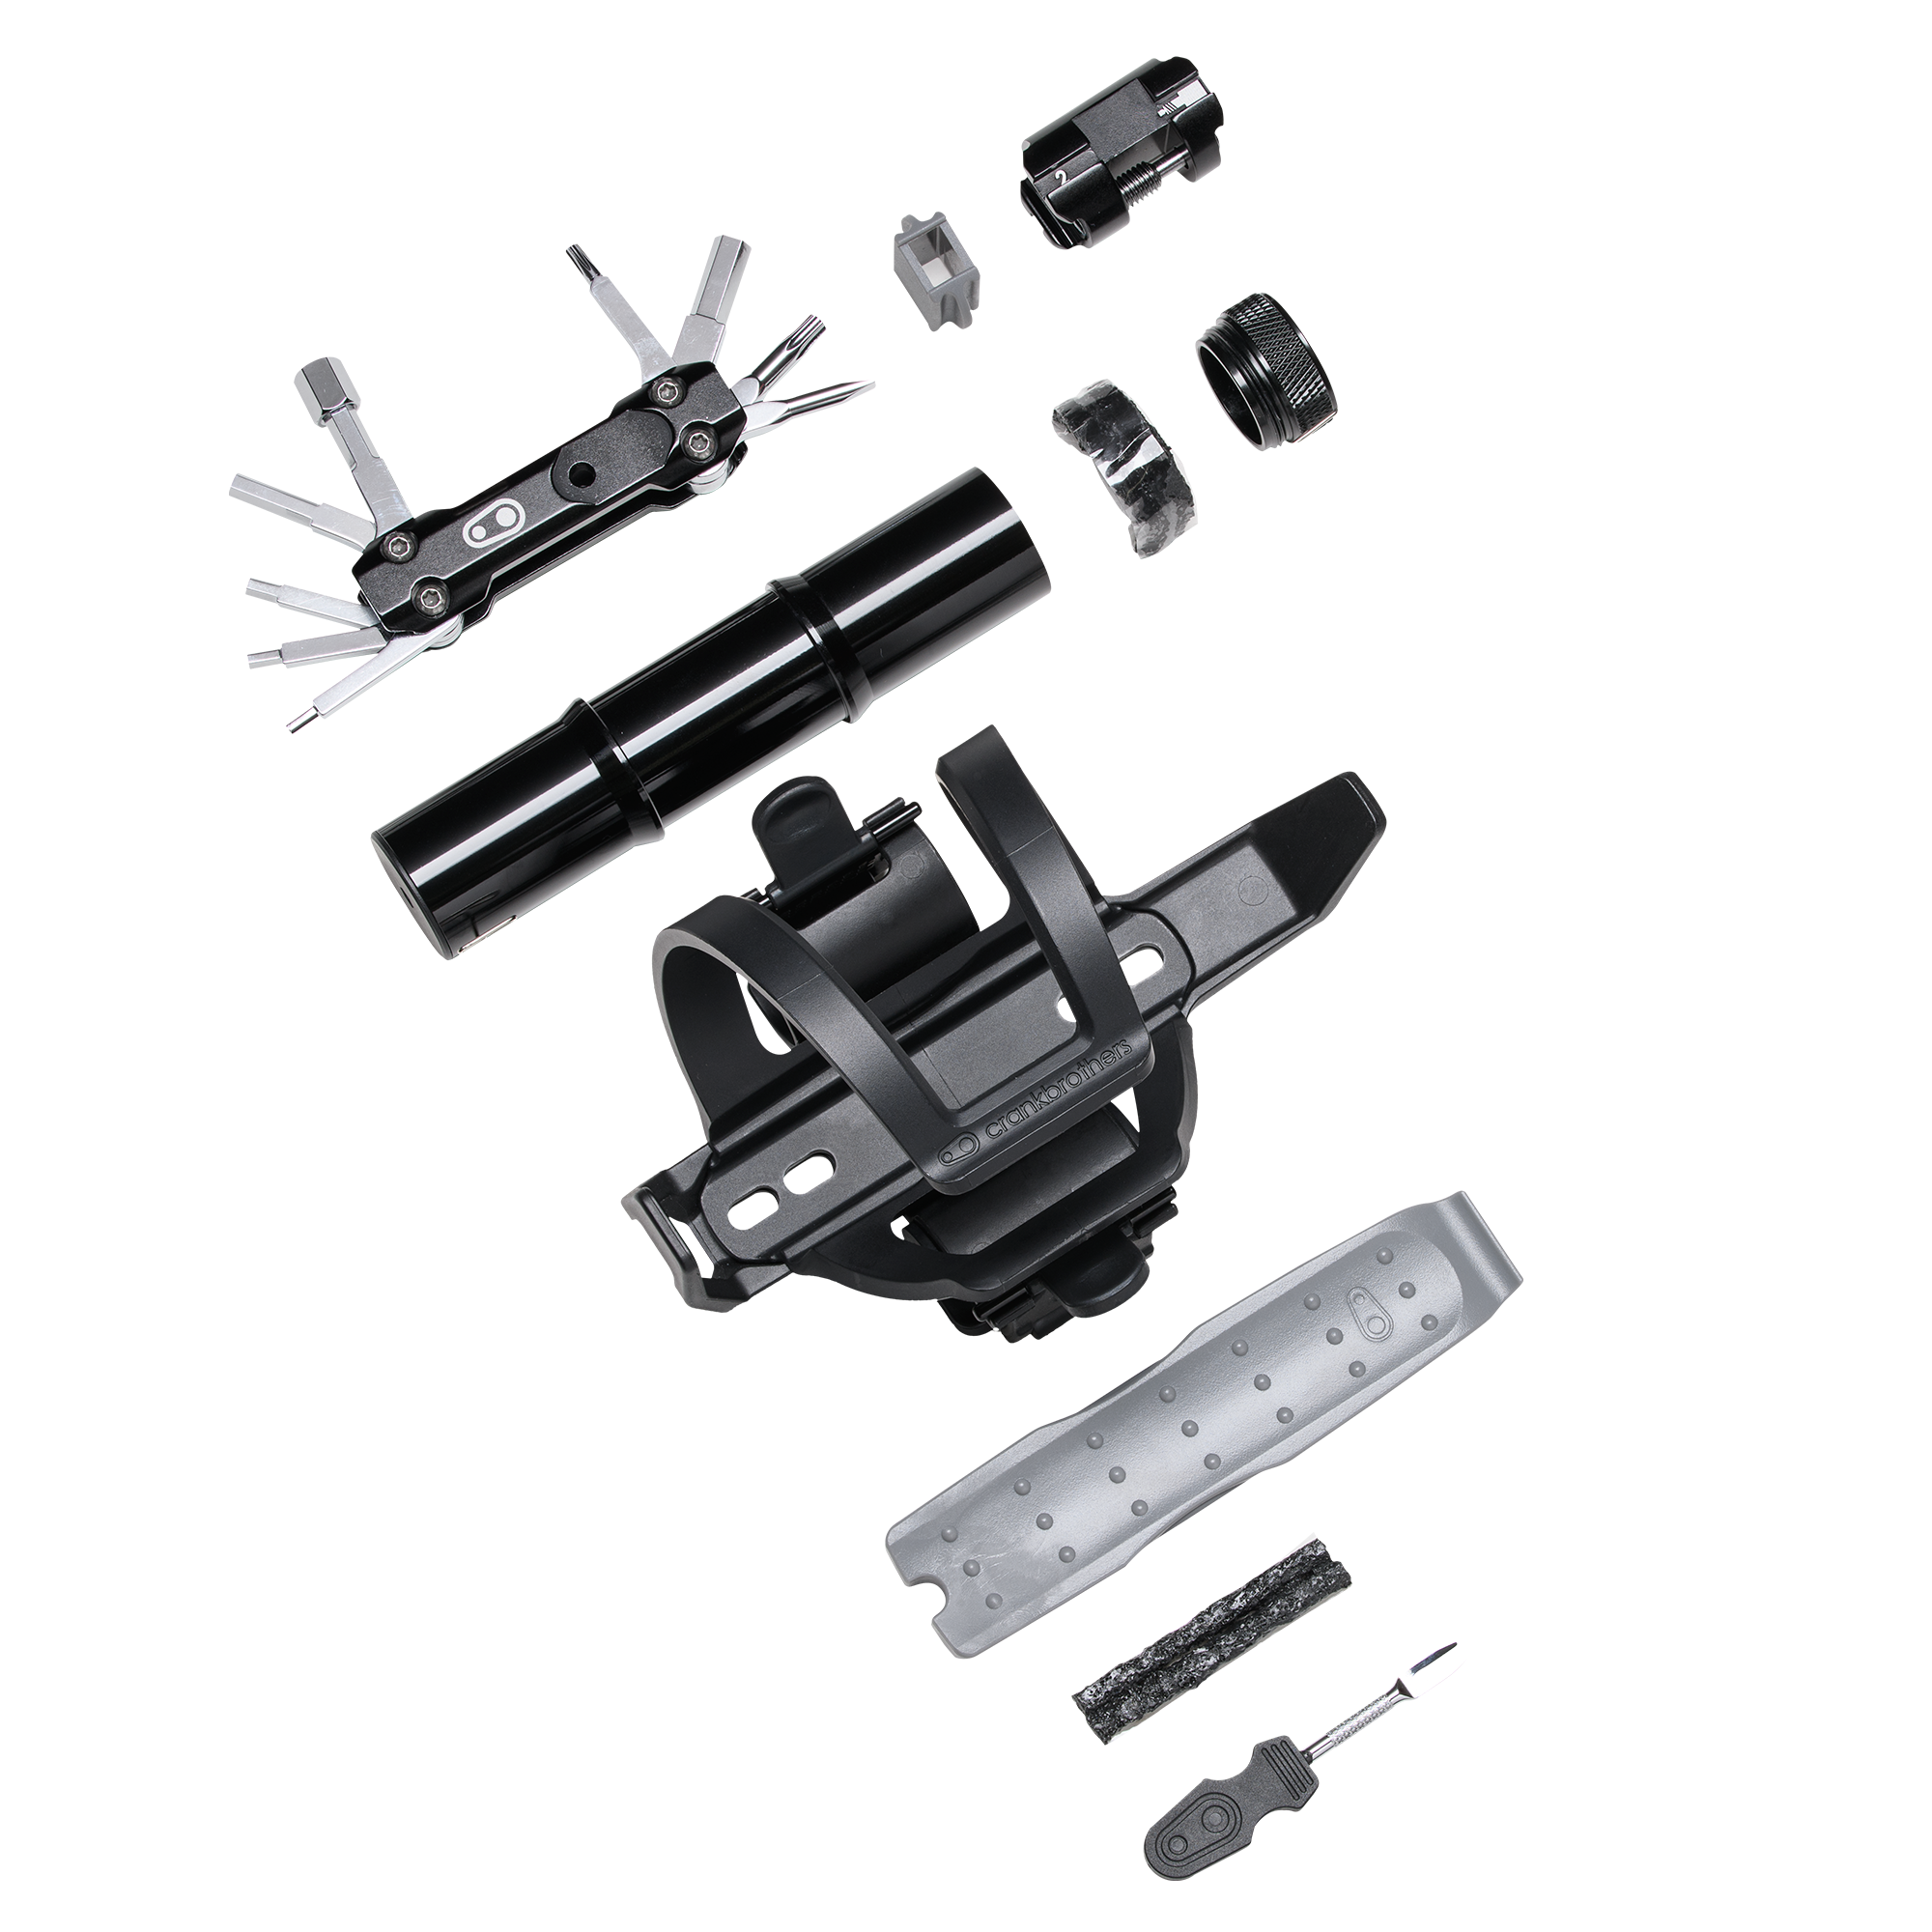
David Golay: I’ve been testing a variety of on-bike tool storage options (stay tuned for an upcoming roundup) and Crank Brothers’ new S.O.S. tools are a compelling option, with a bunch of flexibility to configure the exact options you want.
In short, there are a few different base components to the S.O.S. kit that can be mixed and matched in a bunch of different ways depending on your exact needs. Here’s a quick rundown:
- Tire lever with a built-in plug kit ($15 MSRP)
- Bottle cage that includes a clip-in storage spot for said tire lever ($40, including tire lever & plug kit)
- Tube strap bracket with the same tire lever and plug kit ($30)
- Versions of the bottle cage and tube strap bracket that include storage for a multi-tool and CO2 cartridge or mini-pump ($100 and $90, respectively; tool included, pump / CO2 cartridge sold separately)
- Slimmer-fit storage canister that houses the tire lever, multi-tool, and a CO2 cartridge (or whatever else you can fit into a similarly-sized cylinder) in a narrower footprint than the bottle cage or tube strap ($120)
That’s a lot of stuff, and I’ve been testing all of it, so let’s pick it apart piece by piece.
The S.O.S. Tire Lever + Plug Kit is what it sounds like — a tire lever that houses a plug kit — and it does what it says on the label. You get a solid, functional tire lever with a plug-insertion tool and two plugs that snap neatly into the underside of the lever. You can buy the lever / plug kit on its own, or it’s included with the BC2+ Bottle Cage, TS2 Tube Stash+, or the more fully-featured TS18 Tube Stash Tool Kit or BC18 Bottle Cage Tool Kit (more on all of those in a sec).
The BC2 Bottle Cage+ ($40) is, well, a bottle cage, but it’s one with a handy storage spot for the tire lever and plug kit underneath the bottle cradle. The bottle cage itself is a two-piece affair so that the center section can be reversed to make the cage right- or left-handed (just undo the mounting bolts and flip it around). The added height from the tire lever does mean that the BC2 Bottle Cage+ leaves a tiny bit less bottle clearance than some lower-profile cages without the tire lever storage; on most bikes, it isn’t an issue, but if space is very tight it might be a no-go.
The TS2 Tube Stash+ ($30) is essentially the same thing as the BC2 Bottle Cage+ but with a velcro strap for a tube or other similarly-sized item in place of the bottle cage. It uses the same tire lever + plug kit, and mounts up to a standard set of water bottle / accessory mounts.
Then the BC18 Bottle Cage Tool Kit ($100) and TS18 Tube Stash Tool Kit ($90) add a pair of brackets to the TS2 siblings with storage for either a 16 or 20 g CO2 carriage (with the included shim) or a Crank Brothers Clic pump (shim removed) on one side. On the other, there’s a storage tube that contains the S.O.S. Multi-Tool (the tool and CO2/pump storage brackets are the same, so you can put either on either side of the bike).
The S.O.S. Multi-Tool has many of the main features you need for many on-trail fixes:
- Allen wrenches: 2, 2.5, 3, 4, 5, 6, and 8 mm
- Flat-blade screwdriver
- Torx drivers: T10 and T25
- Chain tool
- Spoke wrenches: #0, 1, and 2
- Valve-core tool
- CO2 inflator
The CO2 inflator head attaches to the main folding tool with a little plastic clip, and contains the chain tool, spoke wrenches, and valve core tool; the rest of the tools are part of the main tool body itself. The whole assembly slides into the tube that holds it, and a spring in the base pops the tool out of the tube when the cap is unthreaded.
Finally, there’s the TT17 Twin Tube Tool Kit ($120), which packages the S.O.S. Multi-Tool and either a CO2 cartridge (sold separately) or storage canister (included) into a fold-out holster for both. A tire lever is also included inside the canister, though packaging requirements mean that it doesn’t include a plug kit; the version of the multi-tool that comes with the TT17 forgoes the T10 Torx to put a tire plug insertion tool in its place.
The S.O.S. multi-tool does a nice job of packaging a lot of tools into a small space and generally works pretty well, though the fact that it uses four pivot bolts for all the various tools (two per end of the tool, rather than just one) means that it can be a little fiddlier than some other tools when it comes to turning the tool in really tight spots. I also took mine apart and rearranged the individual tools within the body — the stock arrangement puts the Torx drivers, flat-blade screwdriver, and 6 mm Allen on the outer face when the tool is folded, meaning that you have to open those up to find and fold out the smaller Allens. I wanted to get the more commonly used tools on the outside.
I’ve been slow to adopt on-bike tool storage, largely because I’m switching between review bikes with such regularity that managing tool storage for all of them would be a chore — especially with steerer-tube mounted systems — but the various S.O.S. tool kits have been serving me well for a few months now. And while I think they all work well, somewhat depending on the mounting options on the bike in question, I think the BC18 is my favorite — it fits on the overwhelming majority of bikes and has pretty much all the tools I’d want to carry on a normal ride of a few hours. It’s compact, easy to install, and works nicely.
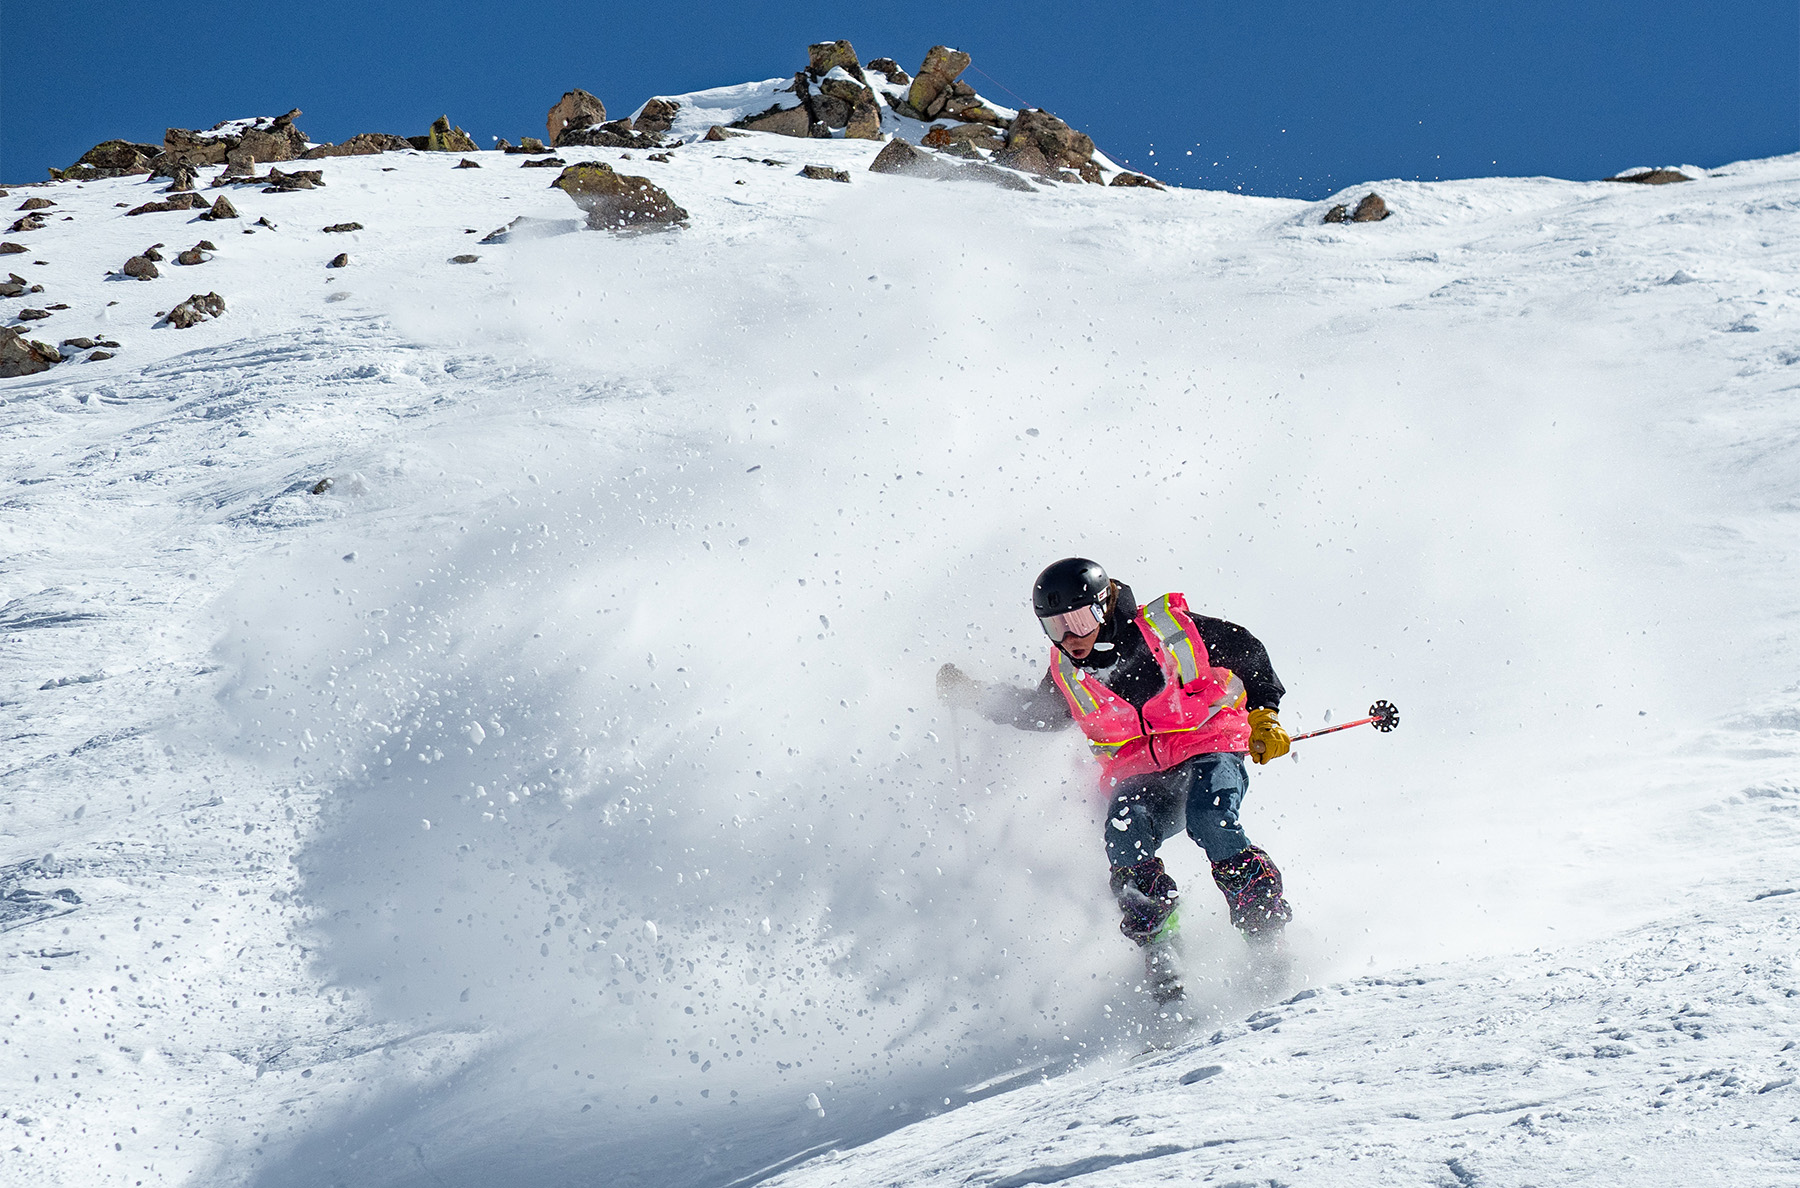
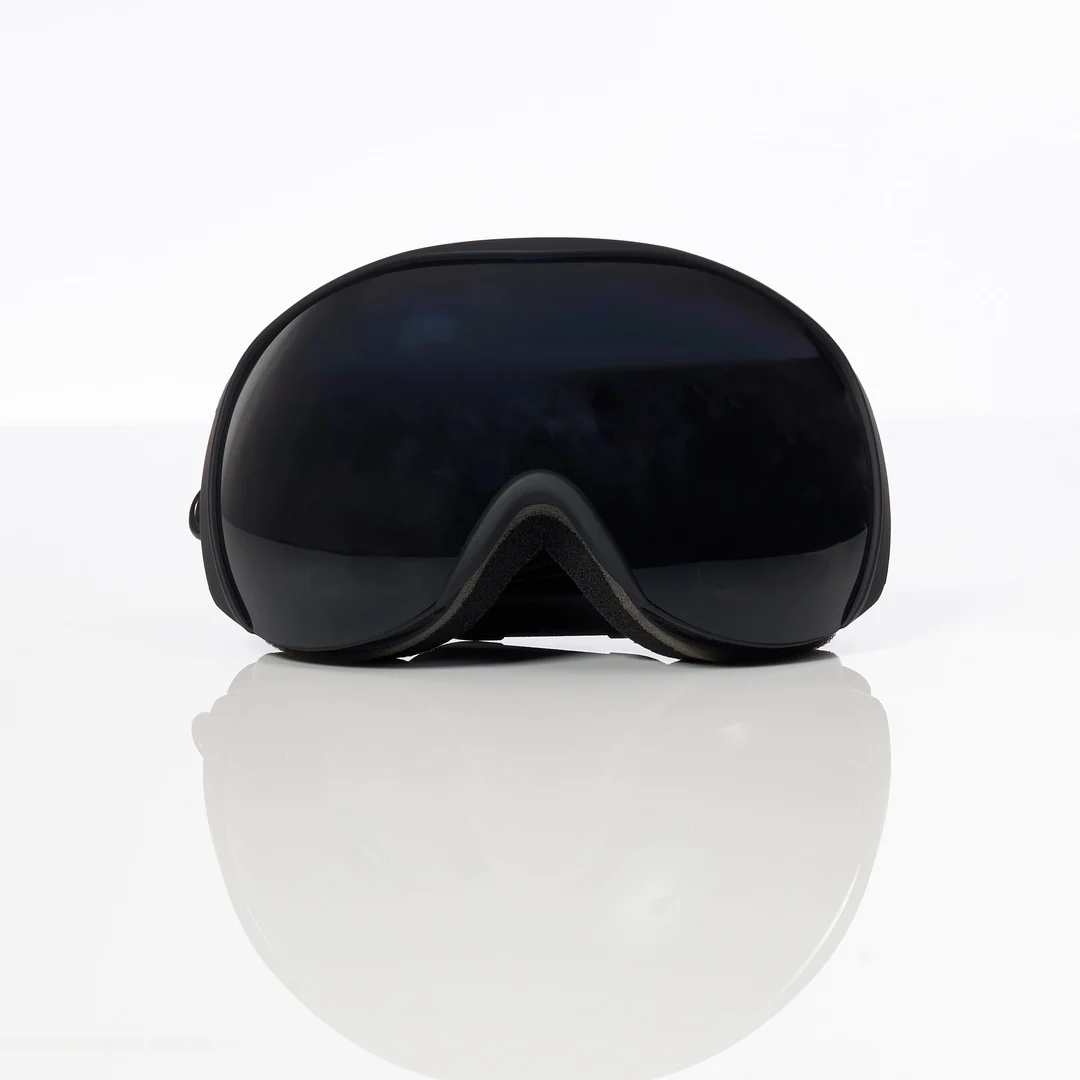
Rekkie Smart Snow Goggles
MSRP: $349
Noah Eckhouse: I was introduced to Rekkie at this season’s Blister Summit. The man behind it, Henry Pease, is a young entrepreneur who showed up in Crested Butte with samples of his new smart-display Rekkie goggles. “Yet another pair of goggles?” I thought to myself, but these are quite different in two fundamental ways: They feature a small heads-up display that shows you critical skiing data, and the goggles have a built-in radio transmitter that can communicate with your riding buddies and tell you where they are. As a techie myself, I was intrigued, and wondered if these new features would add to or detract from my skiing experience.
After about 10 days using the goggles, I must admit I’m impressed. First and foremost, they are just good goggles. I had wondered if, in a rush to get to the tech, this aspect might be overlooked. But I found the Rekkie goggles to be comfortable, fog-free, and the standard lens (optional high-contrast and low-light lenses are available) worked well in the majority of snow / light conditions.

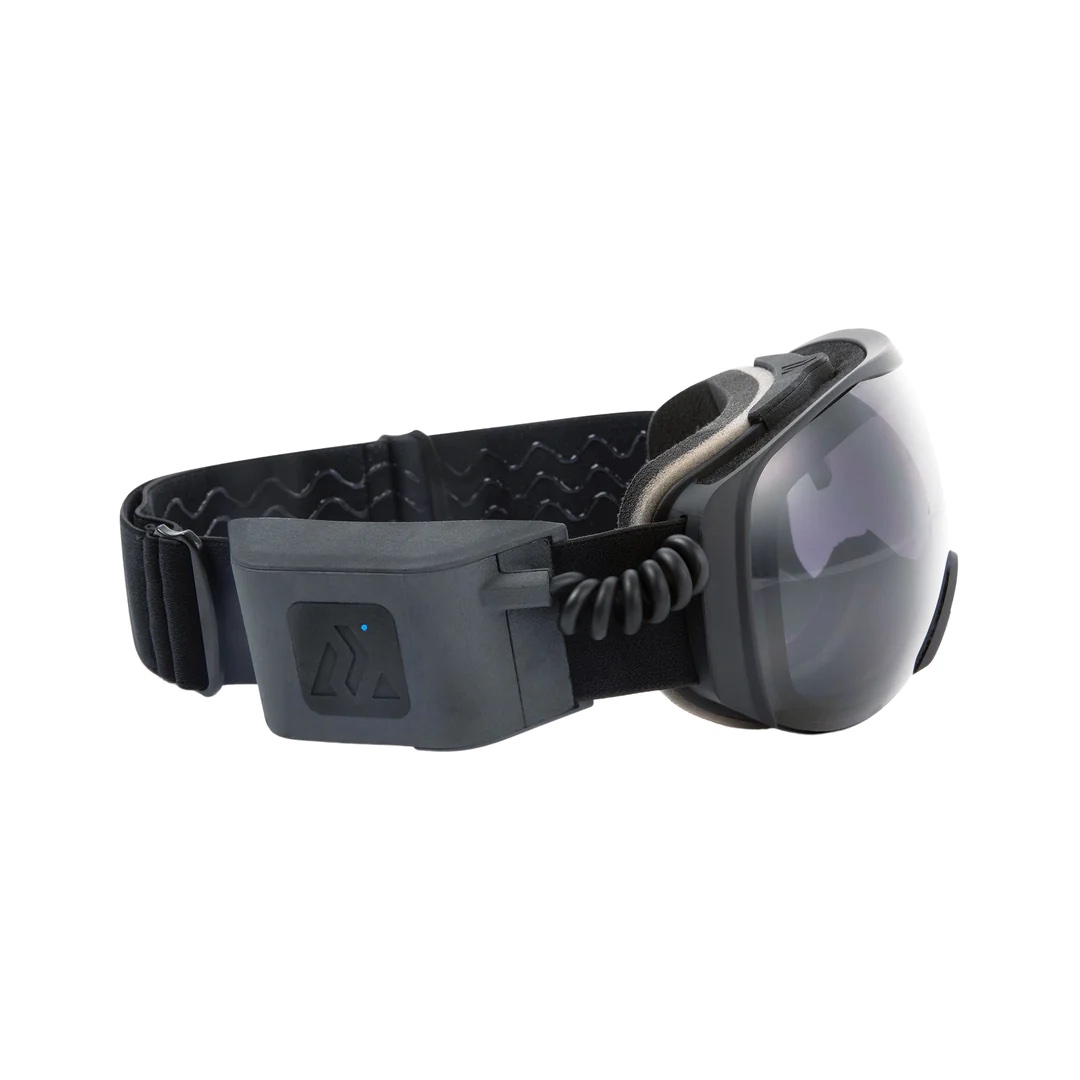
Next, the heads-up display. It projects inside the goggles above the bridge of your nose, and pairs via Bluetooth with the Rekkie app on your smartphone. The default display can show you everything from current speed to altitude, unread texts/alerts, compass heading, and the number of buddies you’re skiing with. While the display takes some getting used to, I found it interesting and informative – and did not distract from my ski day. I could also ski with the Rekkie goggles for 3-4 days before needing to recharge them (which took just a few hours, via USB-C port).
The electronics package sits in a 3” x 1” x 1” (~7.6 x 2.5 x 2.5 cm) pod mounted to the right temple of the goggle strap, which contains the CPU, battery, and radio transmitter. I was pleased to find that I didn’t notice the weight or size of the pod while out on the mountain. There is a single multifunction button on the pod to turn the goggles on / off, or toggle through menus (which can also be activated by tilting your head). In addition to providing ski data, the goggles can display your texts, control your music, show your daily ski totals, and answer calls. All without having to pull off a glove or get your phone out.
But then there’s the aspect that I find most interesting: Rekkie can keep you in touch with your ski buddies. Which of us hasn’t lost a friend on a crowded groomer, in the trees, or just in the base area? Remember that sinking feeling when you wonder if they were upside down in a tree well, or patiently waiting for you down at the lift?
Provided you have both downloaded Rekkie’s app, your Rekkie goggles can point right to your missing compadres. The goggle’s digital radios have a range of about 700 meters and combine with a connected phone’s GPS and cellular data to show you on the Rekkie display what direction, and how far away, your buddy is. In a place like Crested Butte, where cell coverage is very limited, it’s particularly helpful that the location info isn’t solely reliant on cellular data, though, to get the benefit of the radio connection, both parties would need to have Rekkie goggles.
To be clear, Rekkie’s display layout and app are a work in progress. I’ve emailed Henry several times and he’s been very receptive to feedback. But many improvements could just be a wireless software update away, and I expect to see many more features emerge over time. It’ll be exciting to watch. Fun side note: The Rekkie team (three brothers, Henry is the youngest) appeared on Shark Tank earlier this year and cut a deal with Mark Cuban.
So, Blister community, what do you all think? Would this enhance your ski day and make it more fun and/or safer? Or would you prefer fewer electronics in your ski kit? Let us know in the comments below.
Sprindex Coil Spring
MSRP: $140
David Golay: I’ve known about Sprindex’s adjustable coil springs for quite a while now, but when they first floated across my radar, my response was basically “that’s a very clever idea, I should give one a try one of these days.” But I only finally got around to it when I got the new Norco Sight in for review, which came with a Sprindex spring as the stock option. Waiting that long was a mistake.
In short, Sprindex makes coil springs with an adjustable spring rate. They’re offered in a bunch of lengths and spring rate ranges, and they include reducers for the inner diameter to fit most coil shocks on the market. The spring-rate adjustment is tool-free and is accomplished via a stepped spacer that can be wound in or out to take up differing amounts of space between the first wrap (ish) on the coil spring.
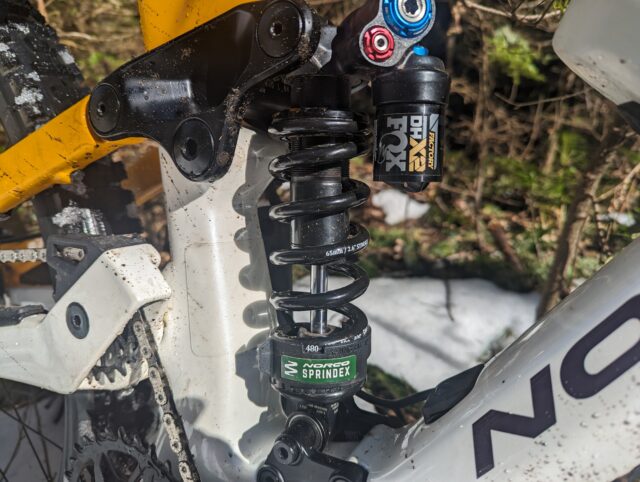
You just hold the spring with one hand to keep it from rotating, lift the tab on the spacer, and turn it in the desired direction with the other. A cutout window on the spacer lines up with printed-on spring rates on the coil to indicate the current setting. It’s extremely quick and easy to use, and it does just what it’s meant to — make your coil-sprung rear shock a little softer or stiffer as needed.
Now, you may be wondering how that differs from spring preload. Adding preload to a spring increases the amount of force needed to make it break away and start compressing, but preload doesn’t fundamentally change how stiff it is once it starts compressing. The Sprindex adjuster does. In short, the stiffness of a coil spring is driven by a fairly short list of factors: (1) the mechanical properties of the material used, (2) the diameter of the wire used to wind the spring, (3) the diameter of the wound spring, and (4) the number of times the wire is wound to produce the end result.
The Sprindex adjuster acts on that final factor by taking up space between subsequent wraps of the coil in an adjustable manner, effectively adding or subtracting from the total number of wraps of the spring wire that are in play. By blocking off a portion of the spring and stopping it from compressing, the remaining “active” portion of the spring has to deform more in order to achieve the same total amount of compression in the spring, and in doing so, becomes stiffer.
That’s valuable for a bunch of reasons. First, of course, it just makes it easier to set up a coil-sprung bike. You don’t need the exact right spring rate, just a Sprindex with the right general range, and then can tinker from there. It also gives you much more resolution to fine-tune the spring rate; the Sprindex has ~5lb/in steps in rate, whereas most coil springs are sold in 25 lb/in or even 50 lb/in steps.
Sprindex’s springs are also slightly progressively wound, to provide a little extra bottom-out resistance. For reference, most coil springs are linear, meaning that they have the same spring rate throughout their stroke, but you can make a spring progressive by varying the spacing between coils along the length of the spring.
I haven’t A/B’d the Sprindex against a normal spring enough to have any real opinions on that part; like most things, it’ll probably be a good thing for some folks on some bikes and less beneficial for others. But the Sprindex’s quick, easy, and tool-free adjustability is enough to have me sold — especially as a reviewer who’s constantly setting up the suspension on new bikes — but there’s very real value for everyday riders here, too.
Remco Tools Bike Lift
MSRP: $595 – $1164
Simon Stewart: The Remco Tools Bike Lift is a motorized bike stand that can raise a bike from the ground up to a good working height via the push of a button. This may seem like a bit of a luxury, that is until you try wrestling a 50+ pound eBike with one arm, while the other operates the clamp, into a repair stand — then it quickly starts to feel a lot more like a necessity. Especially in my case, where I’m doing so with review bikes on a very regular basis.
Bike repair stands have been a part of my life for decades, and as a result of many years working in the bike industry, I now only use professional-grade shop stands, largely because of their reliability and ease of use when using them on a daily basis. Currently, I have a Park Tool Deluxe Single Arm Repair Stand, which is the stand you’re most likely to see in the service area of many bike shops. These stands are most definitely not portable since one of the main benefits is their extremely heavy and sturdy steel base plate, which, for me, is a non-negotiable must-have. The other component I’m not willing to compromise on is the clamp. The Park Tool Professional Micro-Adjust Clamp is my preferred clamp, and working with it has become second nature to me so I’d rather not entertain other options.
With that in mind, I’m a big fan of Remco Tools’ approach — they made the Bike Lift compatible with other brands’ repair stand components. I have my Remco Bike Lift set up with the Remco Tools steel base plate and my go-to Park Tool Professional Clamp using the Remco Tools 2” Clamp Chuck.
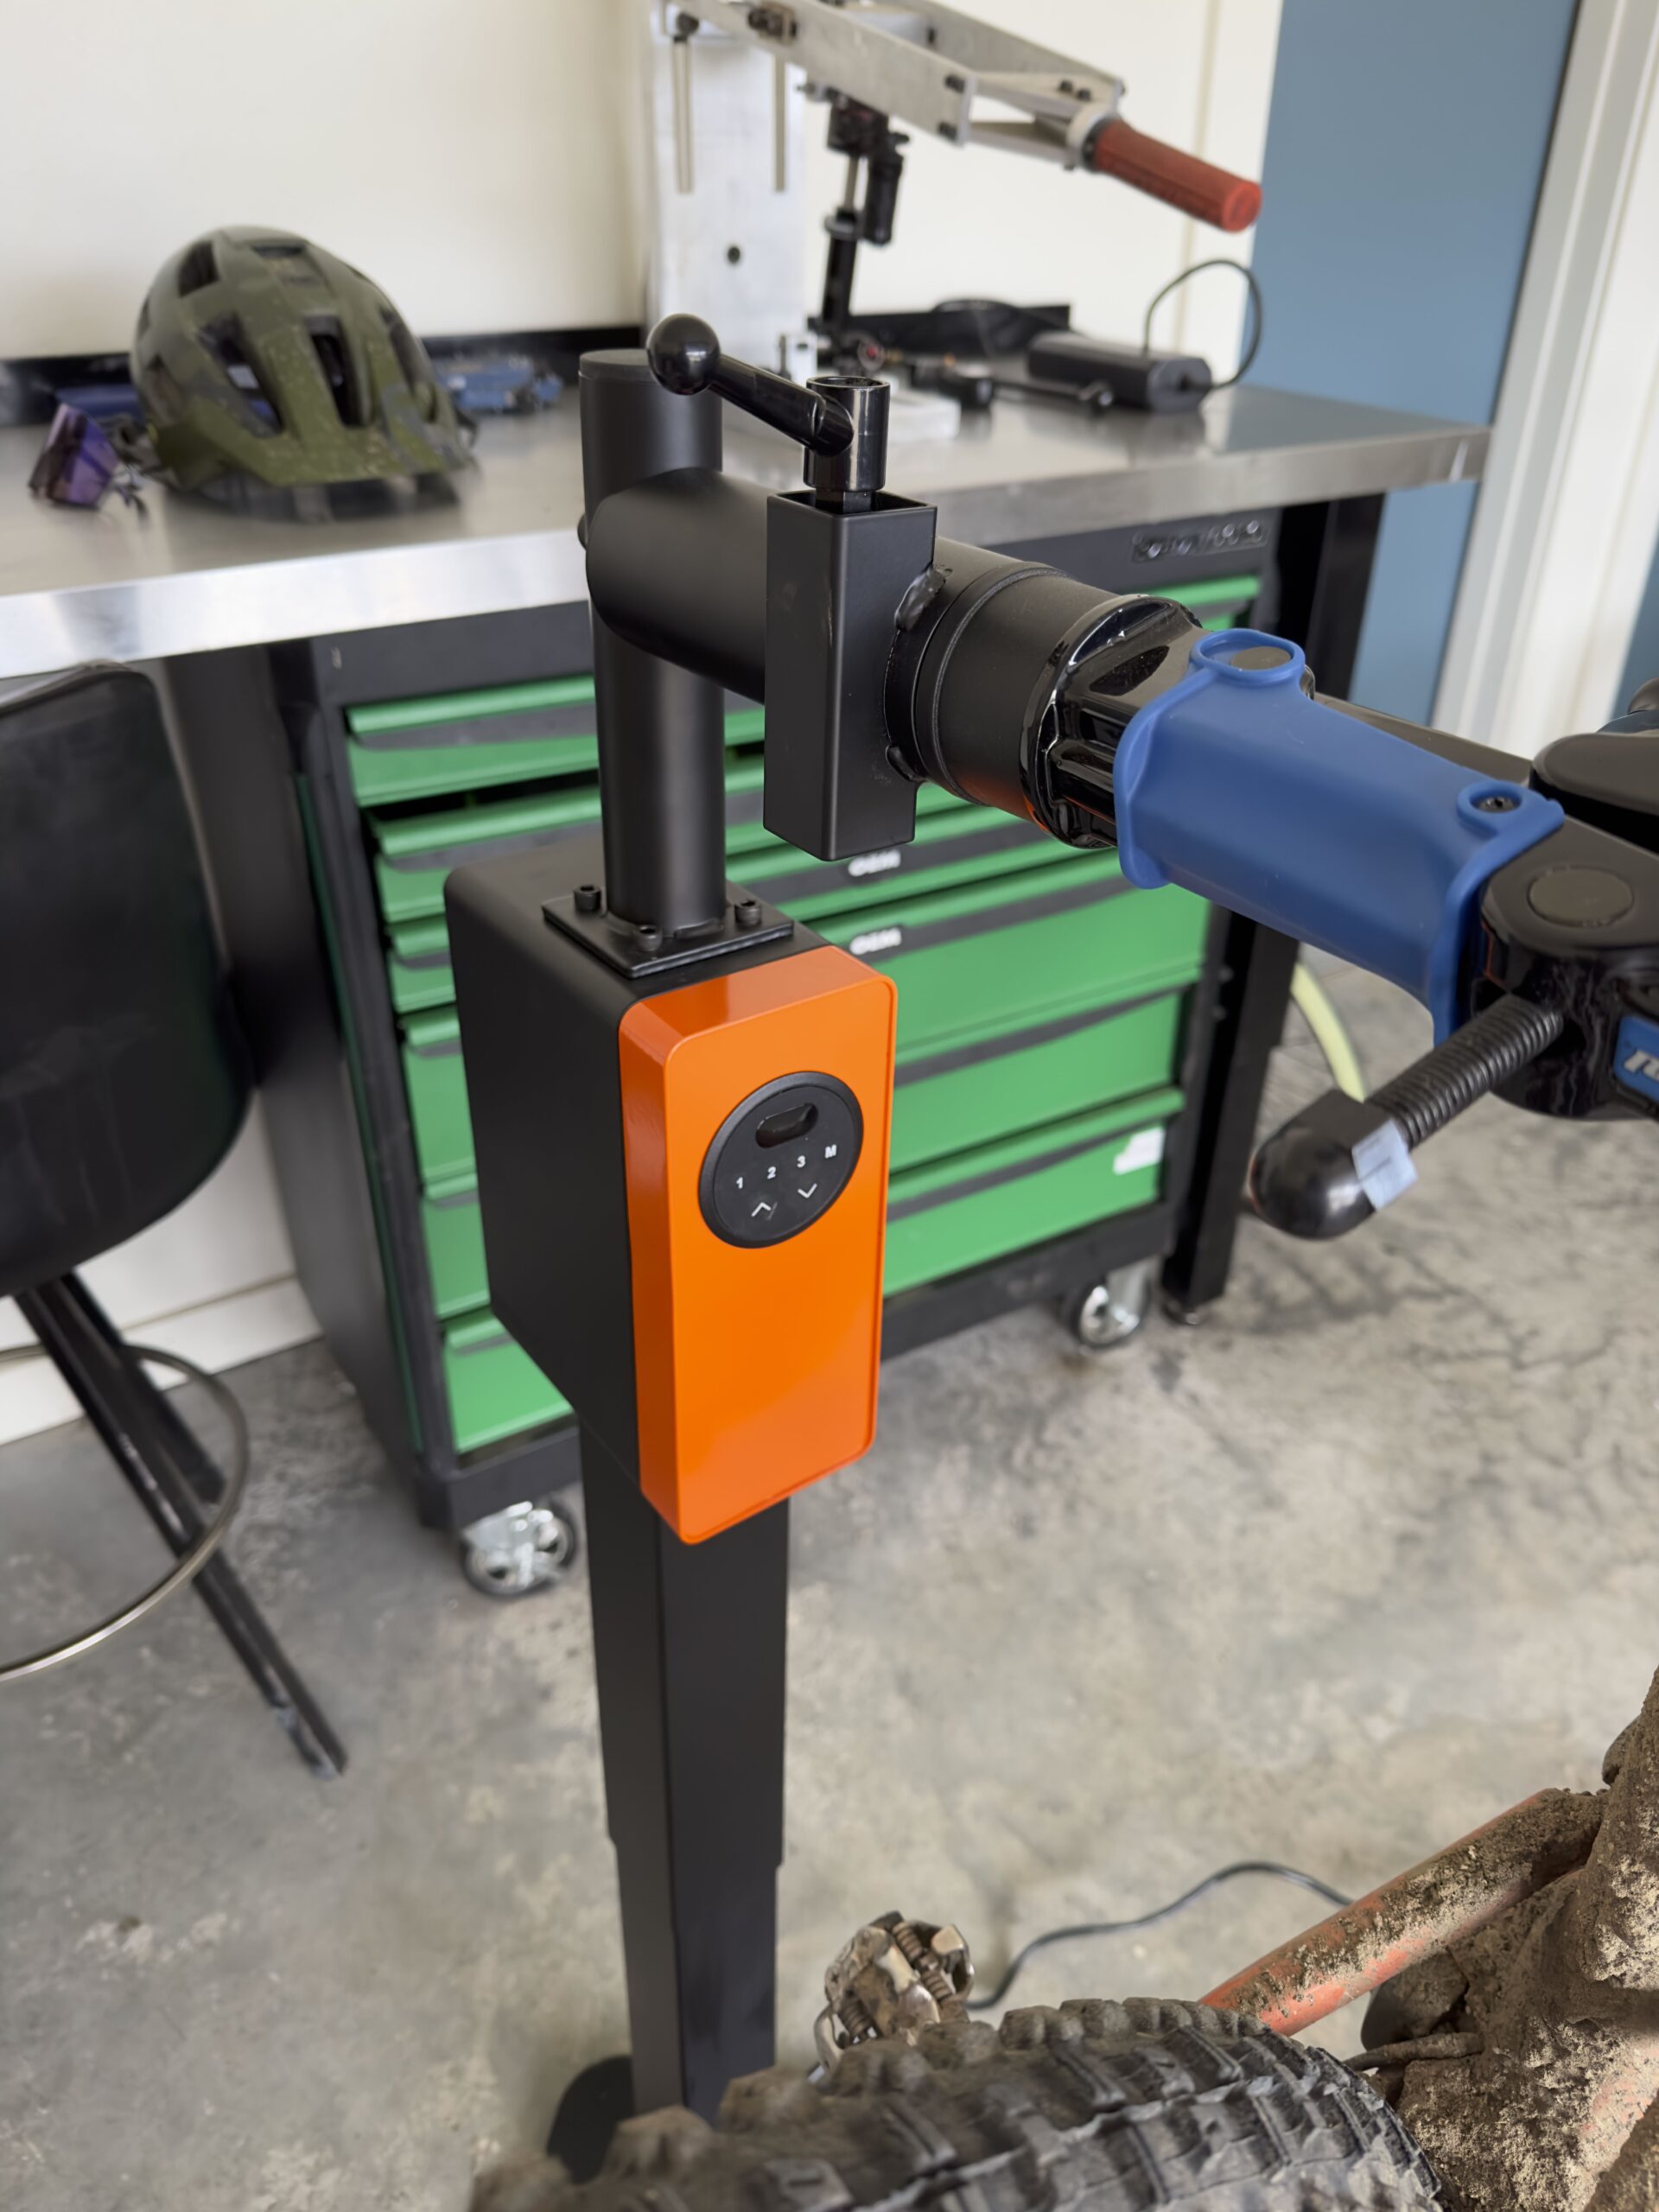
The Bike Lift is compatible with any 2” diameter clamp, which includes Park Tool, Feedback Sports, and EVT clamps. I could have used the base plate from my Park Tool stand but opted to use the Remco Tools one instead so I could keep my Park Tool stand operational. The Remco Tools base plate feels every bit as burly as the Park Tool base plate, and the overall quality of the rest of the components on the Bike Lift is very high.
The Bike Lift is rated for up to 100 Ib / 45.36 kg and can raise a bike over two feet from the low position of 33.75”, to the max height of 59.75” (85.73 cm & 149.86 cm, respectively). The lift mechanism is quiet and smooth. It’s also programmable so you can set it to your preferred low and high positions — I think this feature would be more beneficial if you were primarily working on the same bike. Since I work on lots of different review bikes at the same time, I’ve found it best to manually adjust the low height when installing the clamp on the seatpost, and then going up to the preset max height.
Working on a bike in the stand felt instantly familiar (thanks to the Park Tool Clamp), and I’m surprised by how useful being able to adjust the height is turning out to be. I love rolling an eMTB up to the stand, clamping it, pressing a button, and watching it go up — it’s strangely very satisfying.
On the value side, the Remco Bike lift makes a strong case — at around $1160 with the Park Tool Clamp and Remco base plate, it only costs a bit more than $250 over my Park Tool Deluxe Stand with the same clamp. Should you already own a stand with compatible parts, then you can get into a Bike Lift for as low as $595. There are lots of other stands that make more sense if you aren’t going to be using them as often, need to travel with them, won’t be using them with heavy, motorized eBikes, etc. But if you regularly work on eBikes, I think the Remco Bike Lift could be money well spent, and for me, it’s way better than handing it over to my Chiropractor or Physical Therapist…
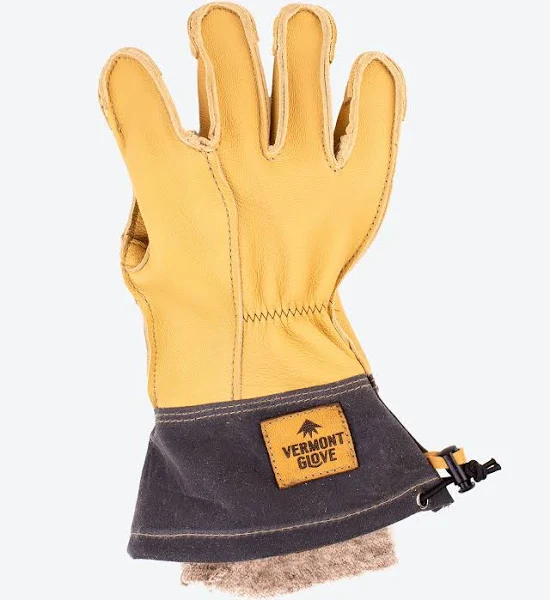
Vermont Glove – Vermonter & Uphill Skier
MSRP: $110 & $150
Kara Williard: I am a big fan of durable, leather gloves for many applications, namely skiing and farming. Over the past few months, I have been using two different pairs from Vermont Glove, and I have been pretty pleased with their quality and comfort.
During the ski season, I’ve been using their Uphill Skier glove for anything from actual uphill skiing to warmer days in the resort, snow blowing, and dealing with farm chores in the frigid temps of the Gunnison winter.
Vermont Gloves are hand-stitched in Vermont using goat leather, and this craftsmanship shows. The more I wear them, the more they break in and offer even better dexterity over time. The Uphill Skier comes with a removable wool liner which has proven necessary on the colder days. With a somewhat low-profile, waxed-canvas cuff that you can cinch, they are easy to take off / put on. That said, and especially after some break-in time, I found that I rarely had to take them off, even for tasks that require more dexterity, such as getting the snow blower to start or transitioning my ski boots from uphill mode to downhill mode.
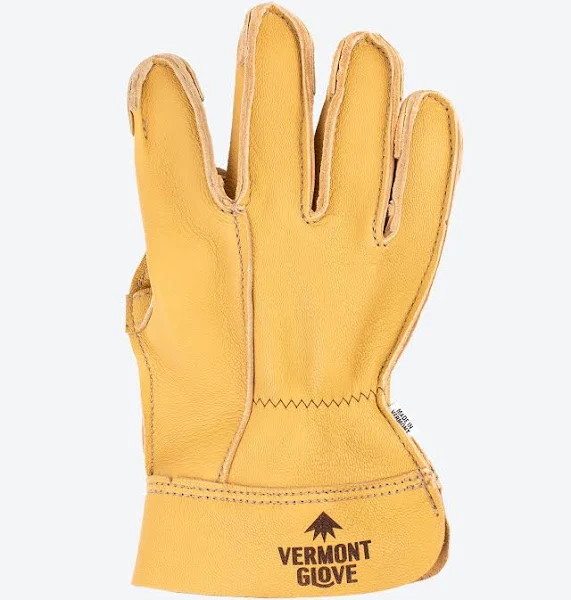
Now that we’re transitioning into spring, I have been utilizing their Vermonter Glove a whole lot for chores around the house. While it definitely feels like a classic leather work glove, there are a couple of attributes that set it apart from others I’ve used. The Vermonter’s unlined goatskin leather is flexible enough to make the glove really comfortable and easy to work in, but it’s also proven really durable so far. And as with many full-leather gloves, the more I wear it, the more comfortable and dextrous it becomes. The stitching and seams have also been nearly unnoticeable, with no rubbing / chafing on my hands. Like the insulated Uphill Skier gloves, the Vermonter gloves are easy to take off / on, which I find super handy for this sort of glove since I frequently need to get them off / on for tasks such as planting seeds or cleaning the chicken coop.
For both of these gloves, I opted for the size Small; Vermont Glvoe has a pretty nifty sizing process you can utilize to find out what size is best for you. If you purely go off nominal sizing, Vermont Gloves run a bit larger than most companies, but following their sizing instructions left me with a great fit. For both gloves, the size Small started on the slightly snug side, but they now feel perfect. Opting for the smaller size has certainly helped with dexterity and they’ve now nicely conformed to the shape and size of my hands.
Ibex Woolies Pro Tech Crew & ¾ Length Bottom
MSRP: $115 (crew) | $105 (bottom)
Luke Koppa: Over the years in various articles, I and a few of our other reviewers have written about merino-wool baselayers that feature fabrics knit from Nuyarn yarns. I’ve become a big fan, largely for all the performance improvements that Nuyarn claims about their yarns vs. ring-spun alternatives.
In particular, they say their yarns offer 35% more volume / loft (and are therefore 35% more thermally efficient), 5X quicker drying, 50% better tensile strength, 8.8X more abrasion resistance, and 85% more elasticity. They accomplish this via a proprietary process that “drafts” merino wool fibers along a synthetic filament (typically nylon), rather than spinning them via more common ring- or core-spun methods.
Once knit into fabrics and sewn into final apparel pieces, the result is typically a fabric that is stretchier, warmer for its weight, more breathable, and more durable than most other comparable wool and wool-synthetic hybrid knits. Nuyarn fabrics still provide many of the benefits of traditional wool, including its odor resistance, but with durability and stretch that rivals many synthetic-dominant fabrics.
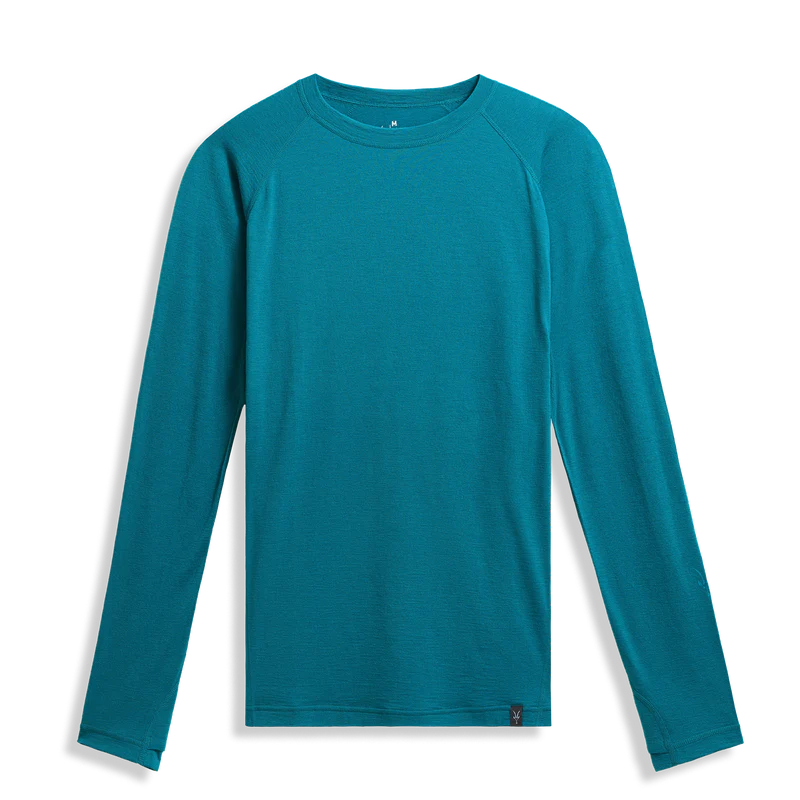
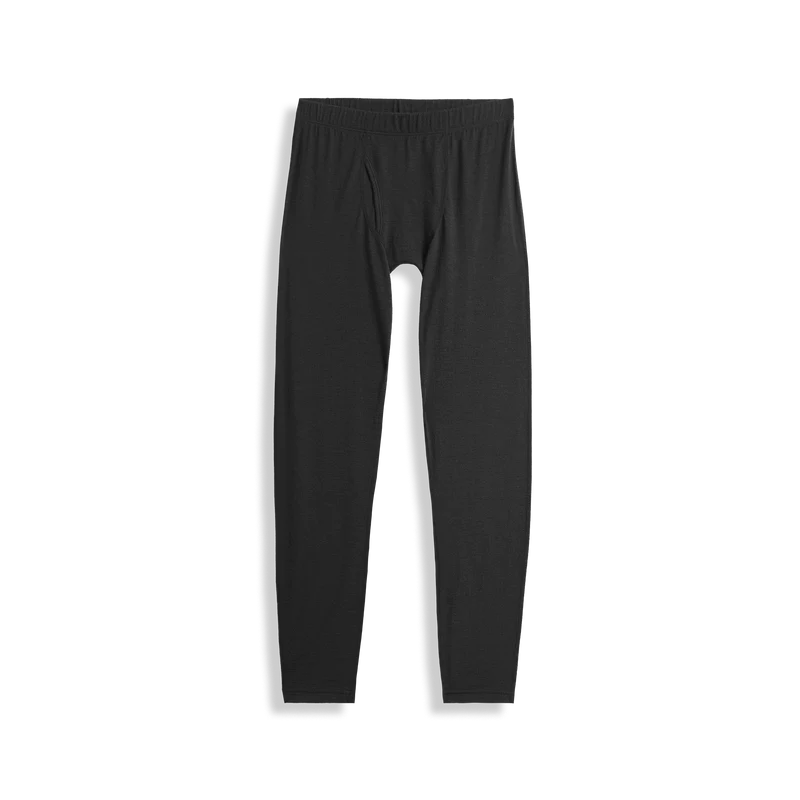
Ibex recently updated their do-everything baselayers, and the new Woolies Pro Tech layers feature a 125 g/m2 Nuyarn fabric. I’ve worn the Woolies Pro Tech Crew and Woolies Pro Tech ¾ Length Bottom for dozens of days this season, and I’ve found them extremely versatile. They’re thin and breathable enough to serve as the sole layer under a shell when the temperature is near or slightly above freezing, but they also serve as a good base when paired with warmer midlayers.
One of the polarizing aspects of these baselayers will most likely be their fit — they’re very slim. I’m 5’8”, 155 lbs (173 cm, 70 kg), and have both in my usual size of Medium; on me, they’re pretty much skin-tight. Thankfully, due to the fabric’s stretch, I never notice any restriction while moving, and their slim fit layers nicely under additional jackets and pants. But if you prefer a baselayer that fits more like a T-shirt, this isn’t it; for my preferences, that means I never really just lounge around in the Woolies Pro Tech combo without an additional layer or two over them.
If you do like a thin and slim baselayer, though, the Woolies Pro Tech series is excellent. They’ve been very comfortable, versatile across a huge range of temperatures and layering combos, resistant to odor buildup so I don’t need to wash them often, and they haven’t lost any of their shape or stretch after dozens of days spent skiing in them this season.
“It’s a Bright Night in Crested Butte” children’s book
- Written and Illustrated by Rob Santilli
- MSRP: $15.99 at Townie Books in Crested Butte and on Amazon
Noah Eckhouse: It’s not often that we review children’s books here at Blister. However, this is a special book: The subject is our hometown of Crested Butte and it was written by CB resident and Blister Summit attendee, Rob Santilli.
It’s a Bright Night in Crested Butte is a story about a young boy named Jackson who leaves his home in Pennsylvania to visit his grandfather, Papa Bob, in Crested Butte. Excited and overwhelmed, Jackson can’t believe his eyes when he sees how much snow there is everywhere around him. Filled with a million questions, Jackson sees his wry grandfather respond in actions, not words.
When quizzed about how you move around in so much snow, Jackson is quickly fitted with snowshoes and shown how he can effortlessly stay on top of the deep powder. When the bright light of a clear winter night coming through his bedroom window awakens him, Jackson is comforted by Papa Bob, but the cause of all that light is not immediately revealed.


Along the way, the duo explore all that Crested Butte has to offer: Elk Avenue and its enormous snow drifts, the Secret Stash, Rumors Coffee, Townie Books, etc. — all with a backdrop of snow and “Crested Butte blue” sky. Ultimately, Papa Bob takes Jackson for a moonlight XC ski and the mystery of the reflecting moon and stars is revealed as the reason why it is so bright long after the sun has set.
The book is beautifully illustrated with drawings and photos by the author. I think the story is appealing to readers of all ages, as it evokes the joy and wonderment of mountain towns and all their physical beauty. As a gift for a child, a grandchild, or just a wonderful memento of your own memories of snow-blanketed time in the mountains, I think It’s a Bright Night in Crested Butte will put a smile on your face and bring warmth to your soul.

G3 Splitboard LT Glide Skins
MSRP: $233 (on sale for $97–$140 as of publishing)
Blister’s Measured Weight: 488 g (S/M size)
Jed Doane: These lightweight and packable mohair / nylon mix splitboard skins from G3 have been a favorite of mine this season. They pair well with lightweight splitboards (I’ve been using mine with the Cardiff Powgoda Carbon; more on that in the future) for a fast, glide-forward uphill experience.
I’ve tested the Splitboard LT Glide skins in cold, lightweight Hokkaido snow as well as some slushy tours in the Cascades / Pacific Northwest. They’re not the grippiest on very firm skin tracks, but I haven’t had any significant enough issues in that regard for me to really be left wanting for more grip. And that’s largely because of how well they glide; they seem better in that regard than other mix-plush I’ve used including the Pomoca Climb 2.0 and Voile Hyper Glide.
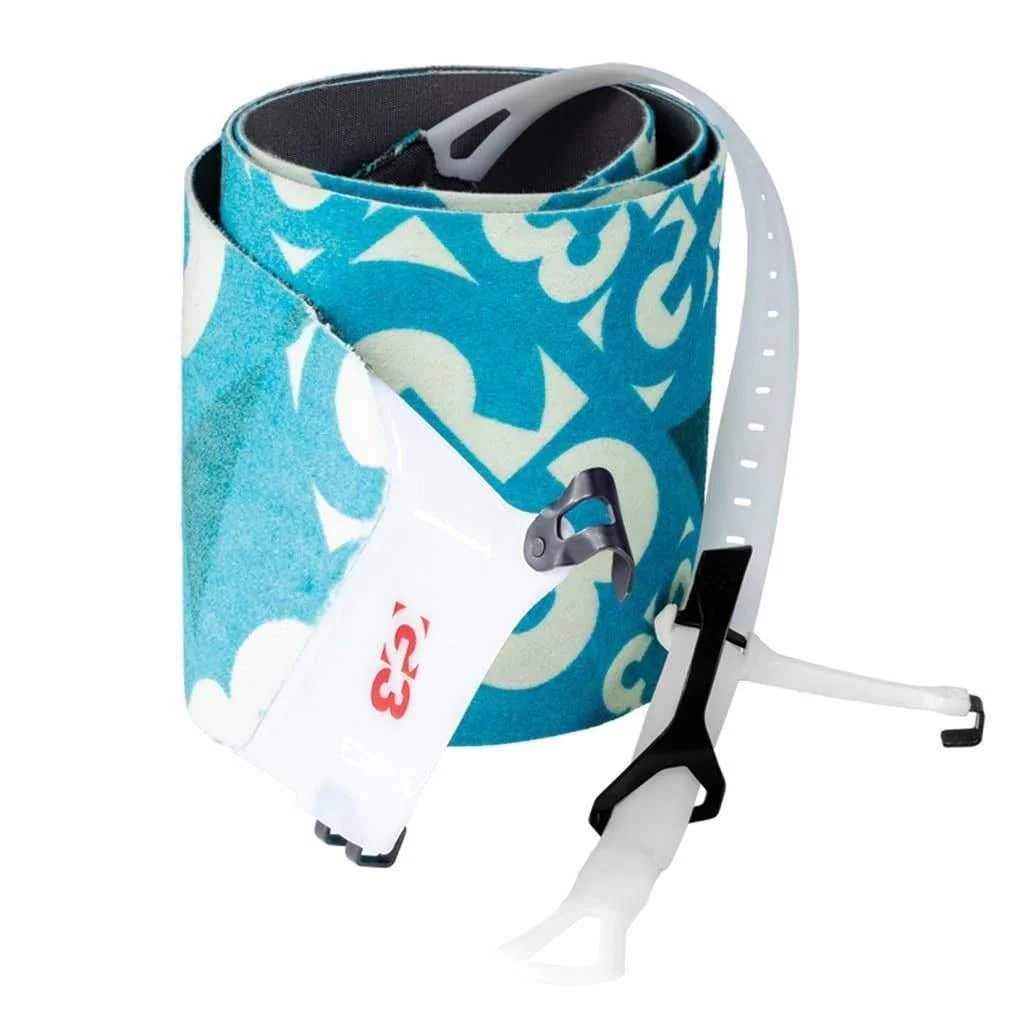
(For reference, G3 also offers a full-nylon version, the Splitboard LT Universal, if you want more grip at the expense of glide.)
The Splitboard LT Glide’s tip clip is also the best I’ve seen on any skin. Its plastic insert is a little bulky, but the construction makes it easy to align the skins with the flat edge of the splitboard, which is not always easy with some other tip clips, especially wire-based ones, and G3’s has been very dependable. Its tail clip is easily adjustable and securely connects to most boards with standard tail geometry; those with a swallowtail splitboard should check compatibility, and G3 says some of those boards might work better if you swap the left and right tail clips to reverse their orientation.
Overall, G3’s Splitboard LT Glide has been an excellent skin for efficient backcountry travel this season.
As somebody who works for A Search Giant ™ I had a viscerally negative reaction to Rekkie. Glass made me cringe back in 2013, and distance (and time) hasn’t made the heart grow fonder. I’m a compulsive gearhead, but the last thing I want when I’m out on the mountain and away from work is a heads-up-display. I’m sure that others will feel differently though.
Have you crashed with your smart goggles yet? Whats the word on durability / repair-ability? Seems like it would make more sense to run a longer cord down to a jacket pocket like old school headphones.
Hi Leif, we actually used to run a cable down to a jacket pocket for the battery in our early prototypes, and generally found it to be really annoying! Having the electronics on the strap makes it so there’s no hassle. The case is made of a highly impact-resistant and tough nylon (PA 12).
I could see an interesting integration of the goggles with other backcountry mapping tools, like overlaying an intended route and warnings about dangerous slopes. It’s a very niche use case though, and most of the time I’d rather spend my time in the backcountry not looking at screens ¯\_(ツ)_/¯
Hi DF, we’re working on this! The first implementation will be the ability to add multiple waypoints. That way, you can plan your route in advance, and then you (and everyone else in your group) can reference those points. The goal is
1) safety in keeping everyone on the same page, and
2) reducing the time you need to reference maps or phones, so you can spend the most time skiing.
Please feel free to contact us with any feedback or other ideas!
Noooooo!
Seriously, that integrated with something like AspectAvy (from a previous GEAR:30 episode) could be a legitimate benefit. It’s… just… not what I want when I’m in the backcountry.
My experience is the Rekkie goggles are fairly rugged. I did crash in them… and while I didn’t go headfirst into a tree well or do a Hoji-style “death cartwheel” while wearing them, I smacked my head on the snow without damage. Like most goggles, my sense is the lens & plastic would fail before the electronics. They were also stuffed in ski boots, in my ski locker, dragged home and back to the slopes without incident.
As to the other comment of more tech vs. less tech, I don’t ski with headphones but would ski with these. YMMV. Also, the heads up display switches off >15mph so the distraction concern is minimized.