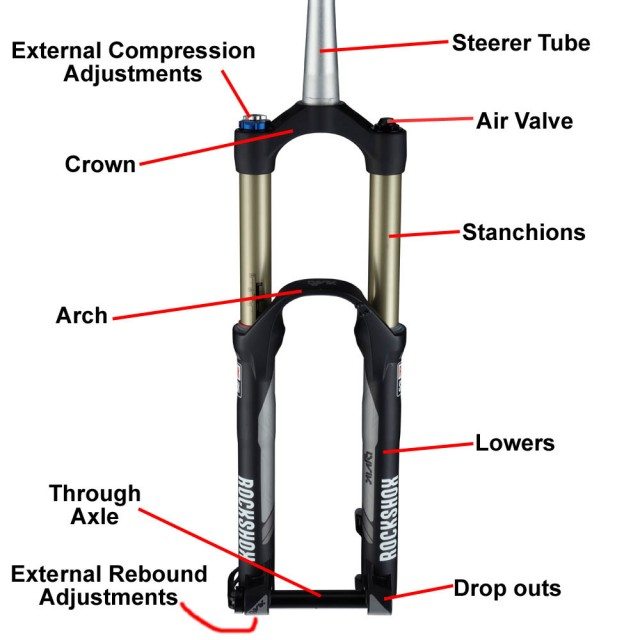
- Rebound: Fork
Setting rebound on the fork can usually be done by pumping the fork with your hands and seeing how fast it rebounds. Like the rear shock, start by setting the rebound to the fastest setting. Now compress the fork by pushing on the handlebars and rapidly pulling back up. With the quick rebound setting, the fork should easily keep up with your hand movement when you pull up.
You want to adjust the rebound to the point where, when you quickly pull your hands back up, the wheel just stays in contact with the ground. If you pull your hands up quickly and the wheel lifts off the ground, the rebound is too slow. If you pull your hands up quickly and there’s consistent pressure on your hands the whole way, the rebound is too fast.

After setting both the front and rear suspension, climb aboard and, with your weight centered, bounce heavily on the bike. The front and rear shocks should return at roughly the same rate. If one feels significantly faster or slower, you might have gotten off track somewhere and should repeat the above steps.
Again, this is my personal preference. There are plenty of people who set their rebound differently for their front and rear suspension, but those people are weird and should be shunned.
Compression
Unfortunately, I don’t have any awesome tricks for setting up your compression. Some suspension makers (Cane Creek, for example) will give suggestions for setting the compression on certain frames, so you should check the manufacturer’s website to see if they have pre-set configurations for your bike, especially if you have a higher-end shock.
- Compression: Rear Shock
If you don’t have any pre-set configurations, I’d recommend starting your adjustment with very little compression damping. From there, make all adjustments 1 or 2 clicks at a time, gradually changing things until you get the shock to feel like you want it to. Many compression adjustments can be tough to feel—you often won’t notice much of a difference bouncing around on the bike on smooth terrain. You need to repeatedly smack into trail obstacles to start to feel the difference in compression settings.
If you have separate high and low speed compression adjustments for the rear shock, add low speed compression if your bike bobbs a lot during pedaling. Too much low speed compression will start to make small bump performance suffer.
Add high speed compression if you’re bottoming out hard on bigger hits. Too much high speed compression will mean hard hits will feel overly harsh and you might not use all of your travel.
If your rear shock has an external compression adjustment that’s not separated into high and low speed knobs, you can add a bit of compression damping in any of the above situations— pedal bob or bottoming out on bigger hits. Without separate high and low adjustments, it’s a compromise between the various considerations noted above.
- Compression: Fork
The basic principles are the same for the fork as for the rear shock. Cornering and braking performance are also affected by the compression damping—too little compression damping will allow the fork to “dive” and compress deep into its travel during braking or hard corners.
Compression damping (particularly low speed compression damping), can help with this, but too much low speed compression damping will hamper the fork’s ability to deal with small bumps. High speed compression damping can help keep the fork from getting overwhelmed on larger hits, but too much high speed compression damping will make the fork feel harsh.
Like the rear shock, if your fork only has one compression adjustment knob, adjustments will be a tradeoff between these various considerations.
Travel Adjustment
Some suspension will have adjustable travel, meaning that the amount of travel can be reduced or increased. Many forks have this as an internal adjustment, meaning that you can take them apart and change the travel, but I’ll focus on suspension that has externally adjustable travel where you simply flip a lever and the travel increases or decreases.
- Forks
Travel adjustable forks are relatively common and can be fitted onto most bikes. Examples include the Fox Talas forks, Rockshox’s Dual Position Air, and X-Fusion’s DLA forks. Many of the other suspension manufacturers also have a travel adjust feature available on some of their models, although this is usually something reserved for higher-end forks.

- Rear Shocks
There are only a few companies that offer travel adjustable rear shocks, and most of these involve a frame company that has partnered with a suspension manufacturer to make a custom shock. The Cannondale Jekyll and Scott Genius bikes are a couple of examples.
Travel adjust comes with some obvious benefits—by reducing the travel, you can make a longer travel bike feel at least a little bit more like an efficient, shorter travel bike. Particularly on the fork, this can come in handy on steep climbs. A long travel fork keeps your handlebars pretty high, which in turns forces your body to be a little more upright and farther back on the bike. This makes it hard to keep weight over the front wheel, thus leading to the wheelie effect on steep climbs. Reducing the travel on the fork helps prevent this.
The travel adjust also has some downsides though. Aside from the higher price tag, the travel adjustment increases complexity—there’s just more that can go wrong.
The travel adjust feature will also add some additional internal seals. This is an additional maintenance issue, and it also adds stiction. That added stiction can make the suspension feel less supple over smaller bumps, so often the travel adjustment comes at the cost of suspension performance.
Most of the travel adjustable rear shocks are also part of a proprietary system (read: less versatile). The shock on the Cannondale Jekyll will only fit that frame, and no other shocks can be retrofitted to it. So if you have problems with your shock, you have to go to Cannondale to get a replacement. That might not be a problem now, but wait a few years and you have no guarantee that Cannondale will still be making a shock that fits your frame.
That wraps up our 101 and 201 Suspension articles. Hopefully you now have a better understanding of the different frame types out there, how much travel is appropriate for your style of riding, and other suspension concepts.
And while this piece is just a basic overview on how to dial in your suspension system, it should help you improve your performance and comfort on the bike. And a good bike shop can help you fine tune your setup, too.

For the next in the series, you guys should cover how to tune suspension for different feels and highlight what you gain and what you lose whith each… such as… How do I tune suspension for the maximum pop off of lips, rollers and other features? Or how do I tune suspension for maximum plush, irreguardless of how it might pedal? Or what do I do to tune the suspension if big hits feel too harsh? Usually people have a goal in mind when tuning suspension, but don’t really know what knobs to turn, to get closer to that goal. What is really needed is a goal-to-knob-turning tranlsation guide.
Great articles to quickly get me up to speed on the basics of suspension design, terminology and tuning. I have been looking for a new full suspension bike for the last few weeks. I haven’t bought a new bike in over 20 years and it’s a little overwhelming. Your articles really helped.
Thanks!
These 101 and 201 articles are brilliant–thanks! So much good info–for example, I had no idea that the dumbed-down C,T,D were specifically compression damping adjustments.