
I, along with approximately 12.4 million other riders, normally transport my bike in a pickup truck with a tailgate pad. It’s quick, it’s easy, it’s cheap, and it means I don’t have to deal with a hitch mount rack.
But it’s still not an ideal system, so I have resorted to tinkering and have come up with my own DIY system.
There are three problems with most tailgate pads:
1) The bikes tend to lean over while driving, particularly on rougher roads. Then my top tube starts getting beat up by the adjacent bike’s brake levers, while I’m watching it all unfold in the rearview mirror. I could stop and fix it, but that’s a hassle. Some pads on the market like Dakine and Race Face have taken steps to fix this issue in the form of padded dividers, however…
2) On rough roads, it seems like the downtubes of the bikes take a beating. I’ve heard rumors of downtubes on thin-walled bikes (*cough* Trek) bending or buckling as they get hammered on a somewhat poorly padded tailgate pad. Particularly on trucks that have a more squared off shape to the tailgate, I’m always a bit worried about slinging high-dollar wonderbikes over the tailgate. I’ve never actually had a problem with any of my frames, but I’d kick myself if I did.
3) Over time, as the pad gets dirty and grungy (which it inevitably will), it starts doing a number on the paint on the forks. The forks rest against the pad, which is better than them resting against the truck’s paint. But shifting against the pad eventually leaves a characteristic rub mark on the fork legs.
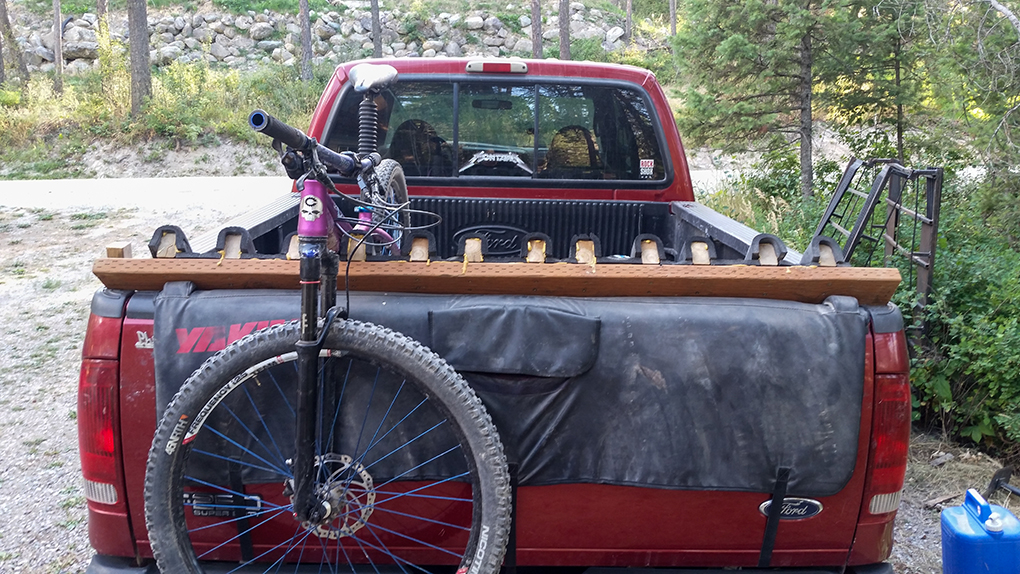
Inspired by a crafty Canadian that had a similar setup, here’s the cobbled together, thoroughly DIY setup that I came up with:

The slots do a decent job of keeping the bikes upright, even on rough roads. And the platform that the bikes rest on is much wider than a tailgate pad, so it’s distributing the load across a larger chunk of the downtube. With the padding on there, it’s much gentler on the frame.
My truck is a Ford F-250, which has conveniently-placed holes in the bed rails. The rack is held in by a couple of wooden posts that drop into those holes. This also makes removing the rack a ~4 second affair.
Assorted notes on the construction:
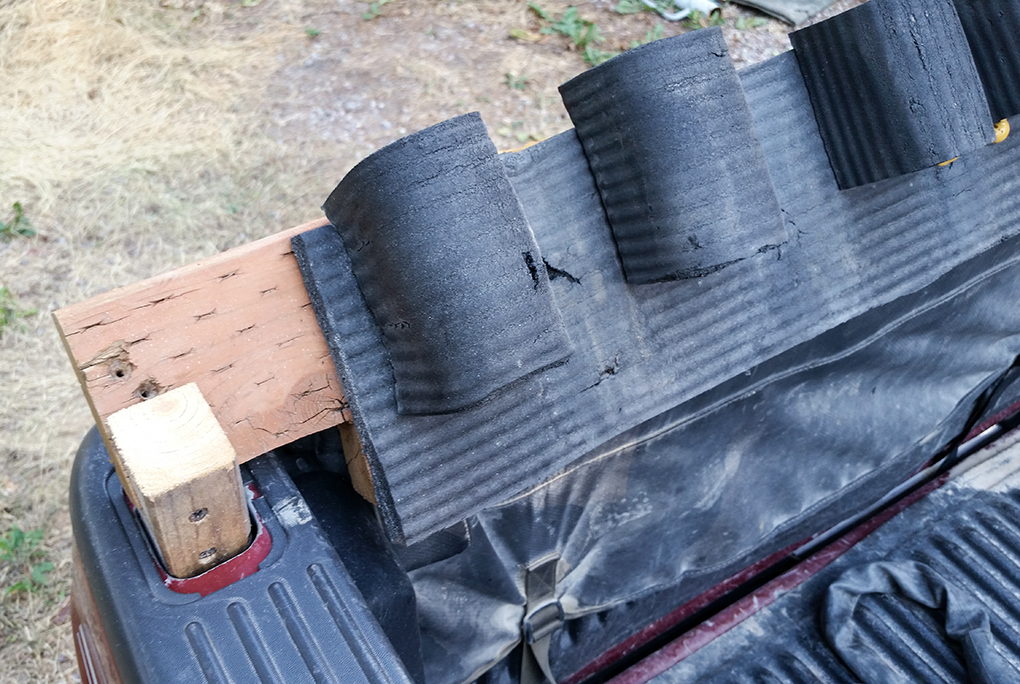
– Tools used: a scroll saw for notching the 2×6 and vertical posts, a mitre saw for cutting everything to length, a table saw for ripping the vertical posts to the proper dimensions for the holes in the truck rails, a drill for screwing everything together, a box cutter for sizing the padding, and an assortment of clamps for gluing the padding on.
– I just used scrap wood. The main cross member is a pressure treated 2×6. Everything else is cheap 2×3 I had laying around.
– The padding I used is a thick yoga mat that I got at Target. A cheaper option would be to use an old foam sleeping pad. I glued the padding on with Gorilla Glue, which was probably the most tedious part of the build just because clamping everything in place while the glue dried was a hastle. As you can see in the picture, even though it’s relatively rubbery, the pad is getting a bit beat up.
– The posts that sink into the holes in the deck rails don’t support any of the weight of the rack – the cross member rests on the deck rails and tailgate. The vertical posts just keep the rack from falling off the back of the truck.
– Getting the angle of the rack just right (so that the downtubes sit flush against it) can be tricky, especially since different frames have slightly different angles. I found it works best to leave a bit of play in the whole system; the vertical posts that drop into the bed rails are fairly loose. This lets the rack rock a bit and match itself to whatever bike is on it. Once a bike is set on it, everything is pretty solid.
– I needed to make the cross member sit as rearward as possible, otherwise it raised the bikes up too high and the forks rested on the tailgate in kind of a weird way.
– Different bikes have different sized downtubes. I spaced the chocks that separate the bikes at varying intervals; some are spaced for a narrower downtube, some are spaced for a wider one.
– This doesn’t negate the need for a tailgate pad; you still need something to keep the forks off of the truck. If you wanted to go full ghetto, I think you could attach a blanket to the cross member, so that blanket would hang down and protect the forks / truck. You’d need to attach bungees at the bottom to hold the blanket tight, otherwise it would flap around when no bikes are on the rack.
– Most full size trucks have holes in the side rails that can be used for anchoring the rack, but some smaller trucks don’t, which means you might have to drill some holes or work out a fitting to make the rack attach cleanly. On the flip side, the tailgates on some smaller trucks are too low to really work well with a tailgate pad anyway, but building a cross bar like this could help fix that issue.
Bottom Line
Plenty of people use tailgate pads without issue, and some of the nicer pads at least partially solve the issue of bikes flopping over.
But ultimately, this little DIY rack was fairly easy and cheap to make, it’s easy to remove from the truck, and it’s a bit more cushy for expensive bikes. If I’m going to be throwing uber expensive bikes on the tailgate, it never hurts to baby them a little bit, and there’s nothing worse than your bike getting scratched and beat up when you’re not even riding it.
1 comment on “DIY Tailgate Rack”