
In our two-part Suspension 101 series, we covered basic concepts & definitions, and the frame suspension designs available on bikes today.
Now it’s time to talk stanchions, lockouts, and everything in between. This first installment in the 201 series details the various elements that make up a suspension system.
Front suspension
Before we wade into some of the more complex details of suspension, here are some of the basic elements you’ll need to pay attention to if you’re shopping around for a new fork.
- The Drop-Outs
Drop-outs are where the wheel attaches to the fork (see image below). These days, there are essentially three different standards for drop-outs on forks (there are other standards for frames / rear wheels, but that’s a different discussion).
The oldest, and probably most common, is the 9mm quick-release drop out. This is what most older bikes used, but it is increasingly being phased out in favor of through axles.
The other two standards include through axles, which means that the axle that runs through the hub is removed in order to take the wheel out of the fork. The axle comes as part of the fork, and is not included with the wheel / hub.
These through axles come in two standard sizes. 20mm through axles were around first, and are most often found on longer travel suspension. 15mm through axles are gradually replacing the 9mm quick releases on lighter weight cross country and trail bikes, and thus are mostly found on shorter travel bikes.
Both 20mm and 15mm through axles are torsionally stiffer than a 9mm quick release.
Similar to the discussion of upright vs. inverted forks, torsional stiffness is important on a fork because you want the front wheel to go where you tell it to. If you’re on a rooty, rocky trail, there will be all kinds of trail detritus that will try to bounce your wheel off of the line you want to be on.
A stiffer fork will help you resist those glancing blows and keep your bike on track. The newer through axles make a noticeable difference in stiffening the fork.
The difference between 20mm and 15mm axles is somewhat less significant, and involves a discussion that will take us more and more off-topic. For the purposes of this write-up, the main thing is to make sure the axle on your fork is compatible with the hub on your front wheel. Not all hubs can be converted between the various different axle standards.
- The Steerer Tube
The steerer tube is the part of the fork that goes through the headtube on your frame and that the stem clamps onto.
For a long time, mountain bike steerer tubes were 1 1/8” in diameter. Then we started to see 1.5” steerer tubes on some longer travel forks. These larger diameter steerer tubes required a correspondingly larger head tube on the frame, so we had to start worrying about making sure the fork and frame were compatible.
More recently, tapered steerer tubes have become quite common. A tapered steerer is 1 1/8” at the top where the stem clamps, and 1.5” at the bottom where it connects into the rest of the fork. This does two things:
1) It makes the fork a bit stiffer due to the larger diameter steerer tube at the bottom.
2) It potentially saves a little bit of weight.
There are other sizes / standards out there (for example, Cannondale has a long history of doing their own thing in the steerer tube diameter department), but the sizes mentioned above are far and away the most common. Again, the important thing here is to make sure whatever fork you get is compatible with the head tube on your frame.
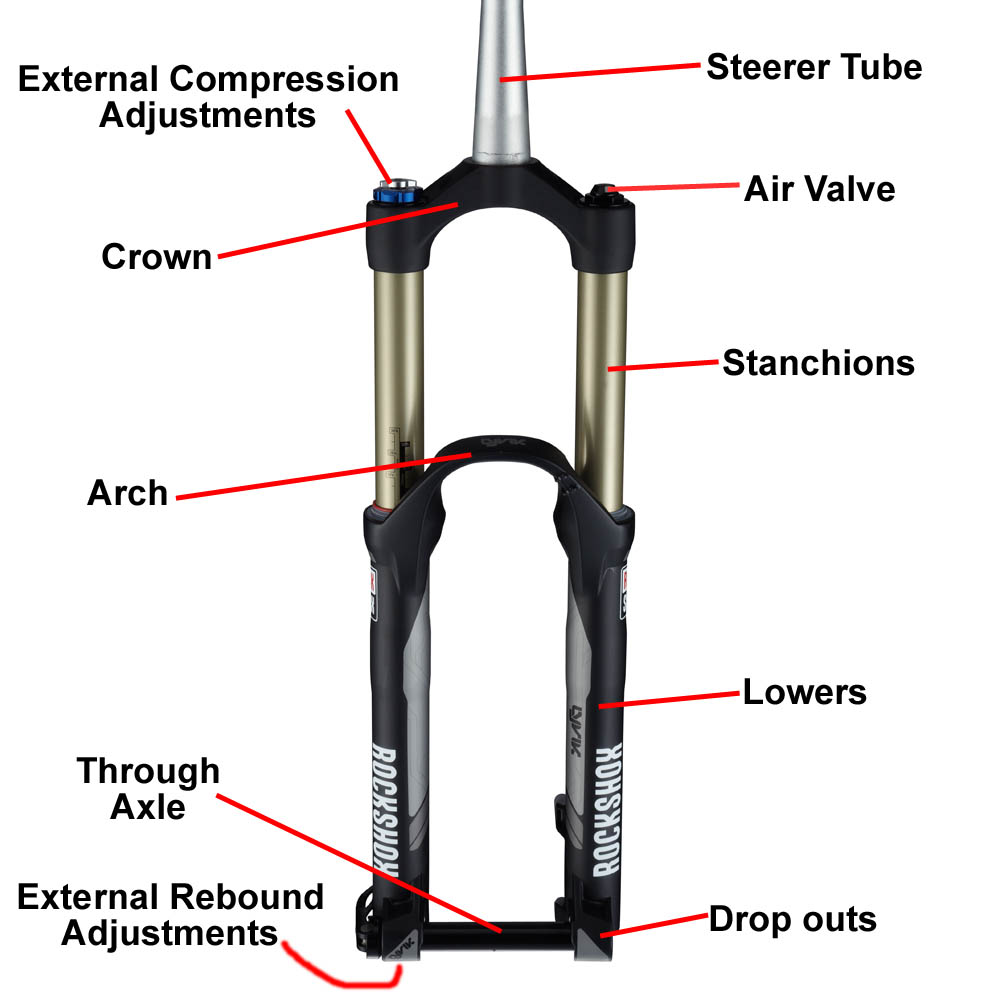
- Stanchions and Lowers
The stanchions are the part of the fork that slides into the lowers. This is pretty straightforward, but there are a couple quick points that bear discussion.
Diameter: Different forks have different stanchion diameters. Generally speaking, bigger stanchion diameters increase the stiffness of the fork, but come with a weight penalty.
For that reason, you’ll generally find the biggest stanchion diameters on downhill forks, and the smallest stanchion diameters on cross country forks. Most cross country stanchions are around 32mm in diameter, while downhill forks are up to 40mm in diameter (or larger, in a few cases).
Stanchion coatings: Especially on some higher end forks, the stanchions will have some sort of “slippery” coating on them to help decrease stiction. An example of this would be Fox’s Kashima coating.
Rear Suspension
Rear shocks will usually come with a frame, and the travel that a frame gets is generally something that is set by the manufacturer. While, to some extent, you can throw a longer travel fork on a bike, doing that with a rear shock is a bit more complicated.
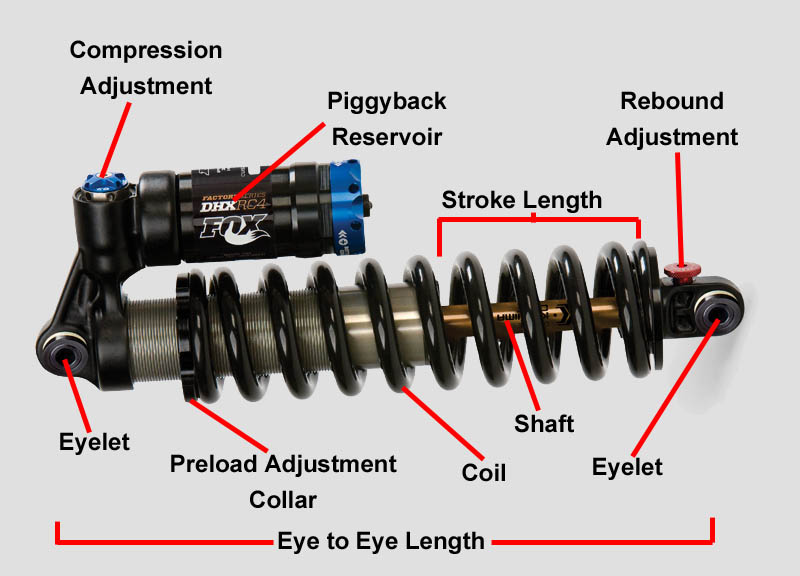
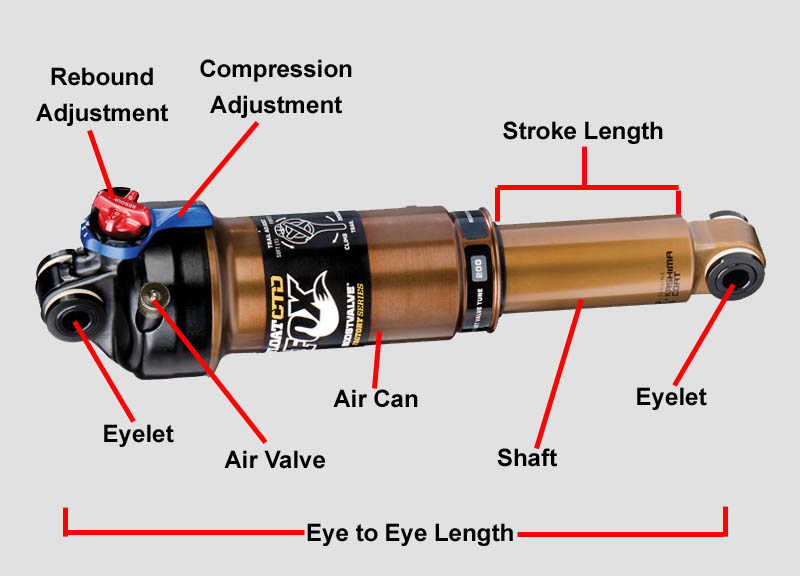
Rear shocks have two separate measurements associated with them—the eye-to-eye length, and the stroke length. The eye-to-eye length is the distance between the two bolts that attach the shock to the frame (measured center to center). The stroke length is how much the shock can compress.
Every full suspension design will have a slightly different leverage ratio, which is the measurement of how far the rear wheel will move for a given movement of the shock. So, to use a simple example, on a bike that has a 2:1 leverage ratio, for 1mm that the shock compresses, the rear wheel will compress 2mm.
Thus, a shock with a 50mm stroke will yield 100mm of rear wheel travel.
Full suspension bikes obviously can’t compress indefinitely—sooner or later the linkages will bottom out, or the rear tire will run into the seat tube.
For this reason, you can’t always just put a longer stroke shock into your frame to get more travel—the rear wheel might just hit the frame on a hard impact.
The same idea applies to the eye-to-eye length of the shock as well. Putting a longer or shorter length shock on a bike is going to affect the suspension throughout its travel, and will often make the bike take on some undesirable attributes.
There are times when it might make sense to put a different sized shock on a frame, but that’s beyond the scope of this article. I would advise against it unless you know what you’re doing.
So, long story short, if you want to replace your rear shock, you need to know what size shock your frame is designed for. You can find this out by either measuring the original shock, or asking the frame manufacturer. Some of the shock manufacturers also maintain a database of what size shocks fit on various frames.
Coil Shocks vs. Air Shocks
Both front and rear suspension can generally be put into two categories—shocks that use an air spring and shocks that use a coil spring.
A few shocks use a combination of both air and coil, and some older shocks used elastomers. On modern bikes, air shocks are most commonly found on bikes where weight is the primary concern.
Coil shocks are generally found on downhill-oriented bikes. You’ll also find coil shocks on some lower-end bikes as a cost saving measure.
The primary benefit of an air shock is that air weighs a lot less than steel. Depending on a variety of factors, you’re looking at roughly 400 grams of extra weight for a coil shock vs. an air shock, which mostly comes from the weight of the coil spring itself.
Air shocks need higher end seals to keep the air in, and that costs a bit more, which is one of the reason you’ll find coils on cheaper bikes.
There are, however high end coil shocks that are found mostly on downhill bikes. The use of these shocks for downhill has nothing to do with price and everything to do with absorbing bumps.
Coil springs come in different spring rates, which are measured in the pounds of force to compress the spring one inch. (Sorry, we’re going to have a brief metric hiatus for this part of the discussion). So a normal spring that one might find on a downhill bike might be 400 lbs, meaning that if you applied 400 lbs of force to that spring, it’ll compress one inch.
An important distinction for coils is that they compress linearly, meaning that, in the above example, 400 lbs will compress the spring one inch, 800 lbs will compress it two inches, and 1200 lbs will compress it three inches.
Air doesn’t work that way—it is naturally progressive. So in an air shock, it might take 400 lbs to compress the shock for the first inch, but it’ll take 1000 lbs to compress it two inches, and 1800 lbs to compress it three inches.
(Note: I just made those numbers up. The force to compress the shock and the amount of progression will depend on the amount of air you’ve pumped into the shock and the size of the air chamber.)
In other words, an air shock will often feel like it gets much stiffer as it gets deeper into its travel.
Another important difference between air and coil shocks are those tight air seals on an air shock. They cost a bit more, and they also add a bunch of stiction to the system.
In terms of no-holds-barred bump sucking performance, stiction is bad. The tight seals that hold in the air make it so that you have to overcome that stiction before the shock will move. This is most noticeable on small bumps—air shocks will often be less supple than their coil counterparts because of that inherent stiction associated with the seals.
On downhill bikes, suspension performance usually trumps weight, so the performance advantages of the reduced stiction and the linear spring rate usually wins out over the weight savings of an air shock (although new air shock designs are starting to change this dynamic).